Back Office Menu Item Setup in Restaurant Solution
Description
What's in this article?
Solution: Restaurant
After creating categories, create an item record for each item you sell. For each item, you must specify a category, item name, price, and tax category (the system pre-selects your default tax category, but you can change to another tax category, as needed). You can search your items by bar code. You also need to indicate how you sell the item such as by unit or weight/measure. In addition, you can add the vendor who supplied you the specific item and your cost for the item. This feature makes reordering simpler and provides visibility into profitability when items are sold.
The Restaurant App makes it very intuitive for you to track your inventory, by allowing you to define up to three variations for any item, you can track all the possible combinations of these characteristics under a single item. Variations are usually grouped together into the variation groups. In addition, you can also set up item modifiers to make it easy for employees to select options and extras when selling an item in the Restaurant App. You will group modifiers into modifier groups.
Multi-store customers
You need to be in Company View to add and edit your items.
Menu Item Setup
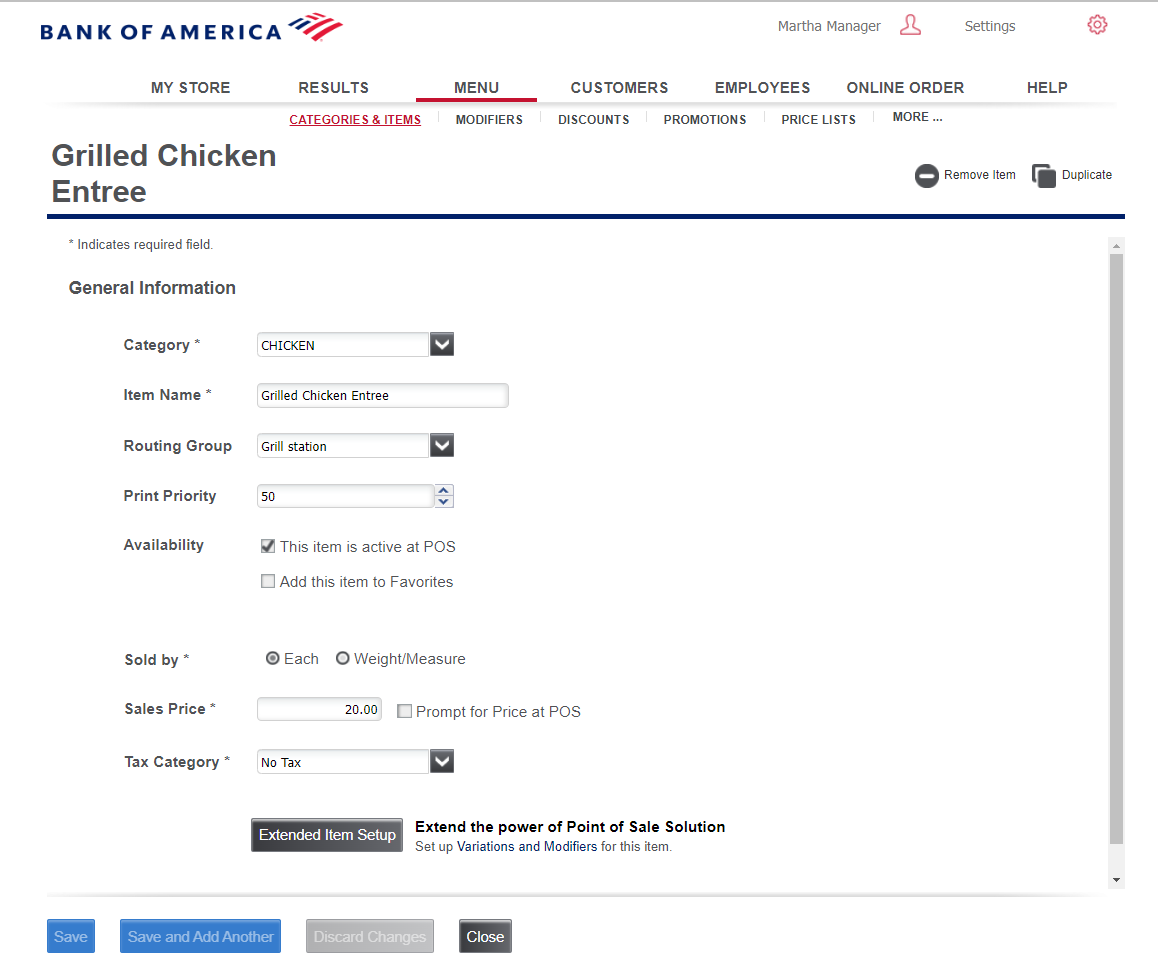
When you add a menu item the view will default to the Extended Item Setup option. For less complex items, you can select Basic Item Setup instead.
- To add extended item information
- In Back Office , select the Menu tab.
- Select Categories & Items subtab.
- Select the category for the item, then click Add Item.
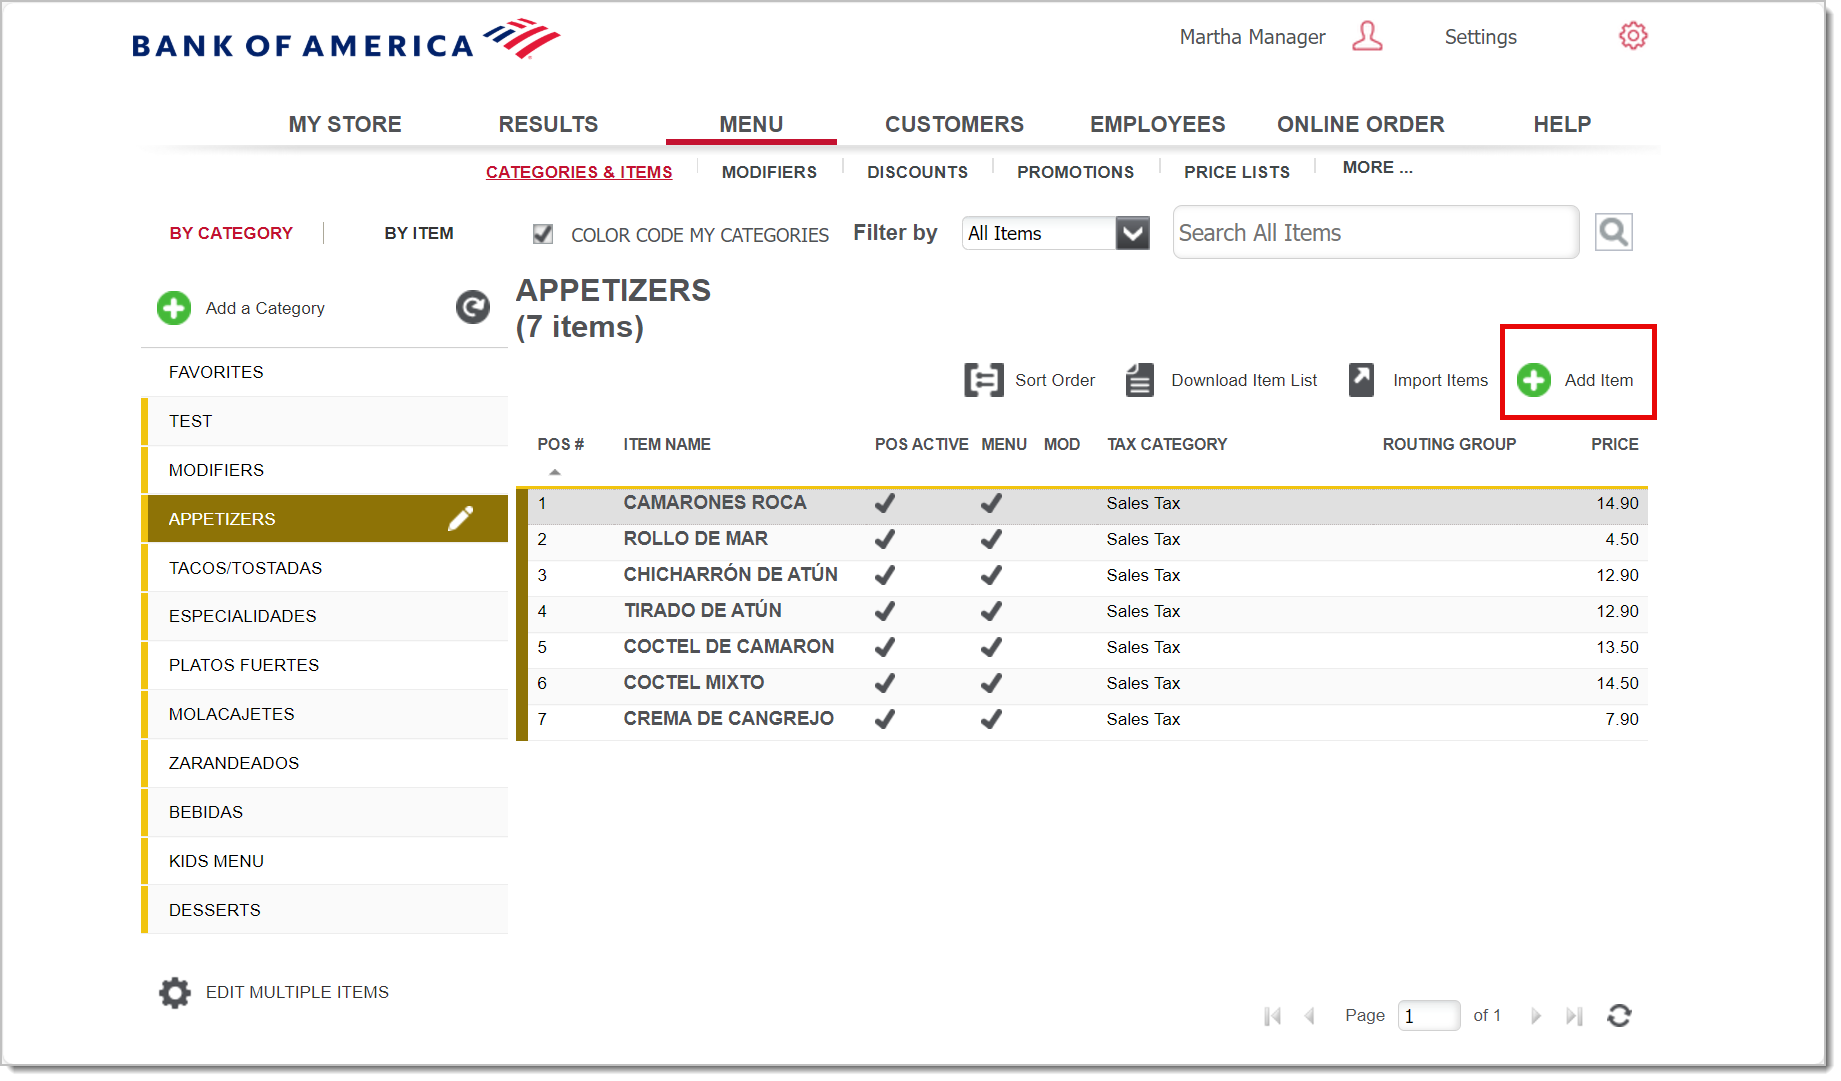
- Enter an Item Name of up to 50 characters. Some names may be shortened on the Restaurant app to fit the screen.
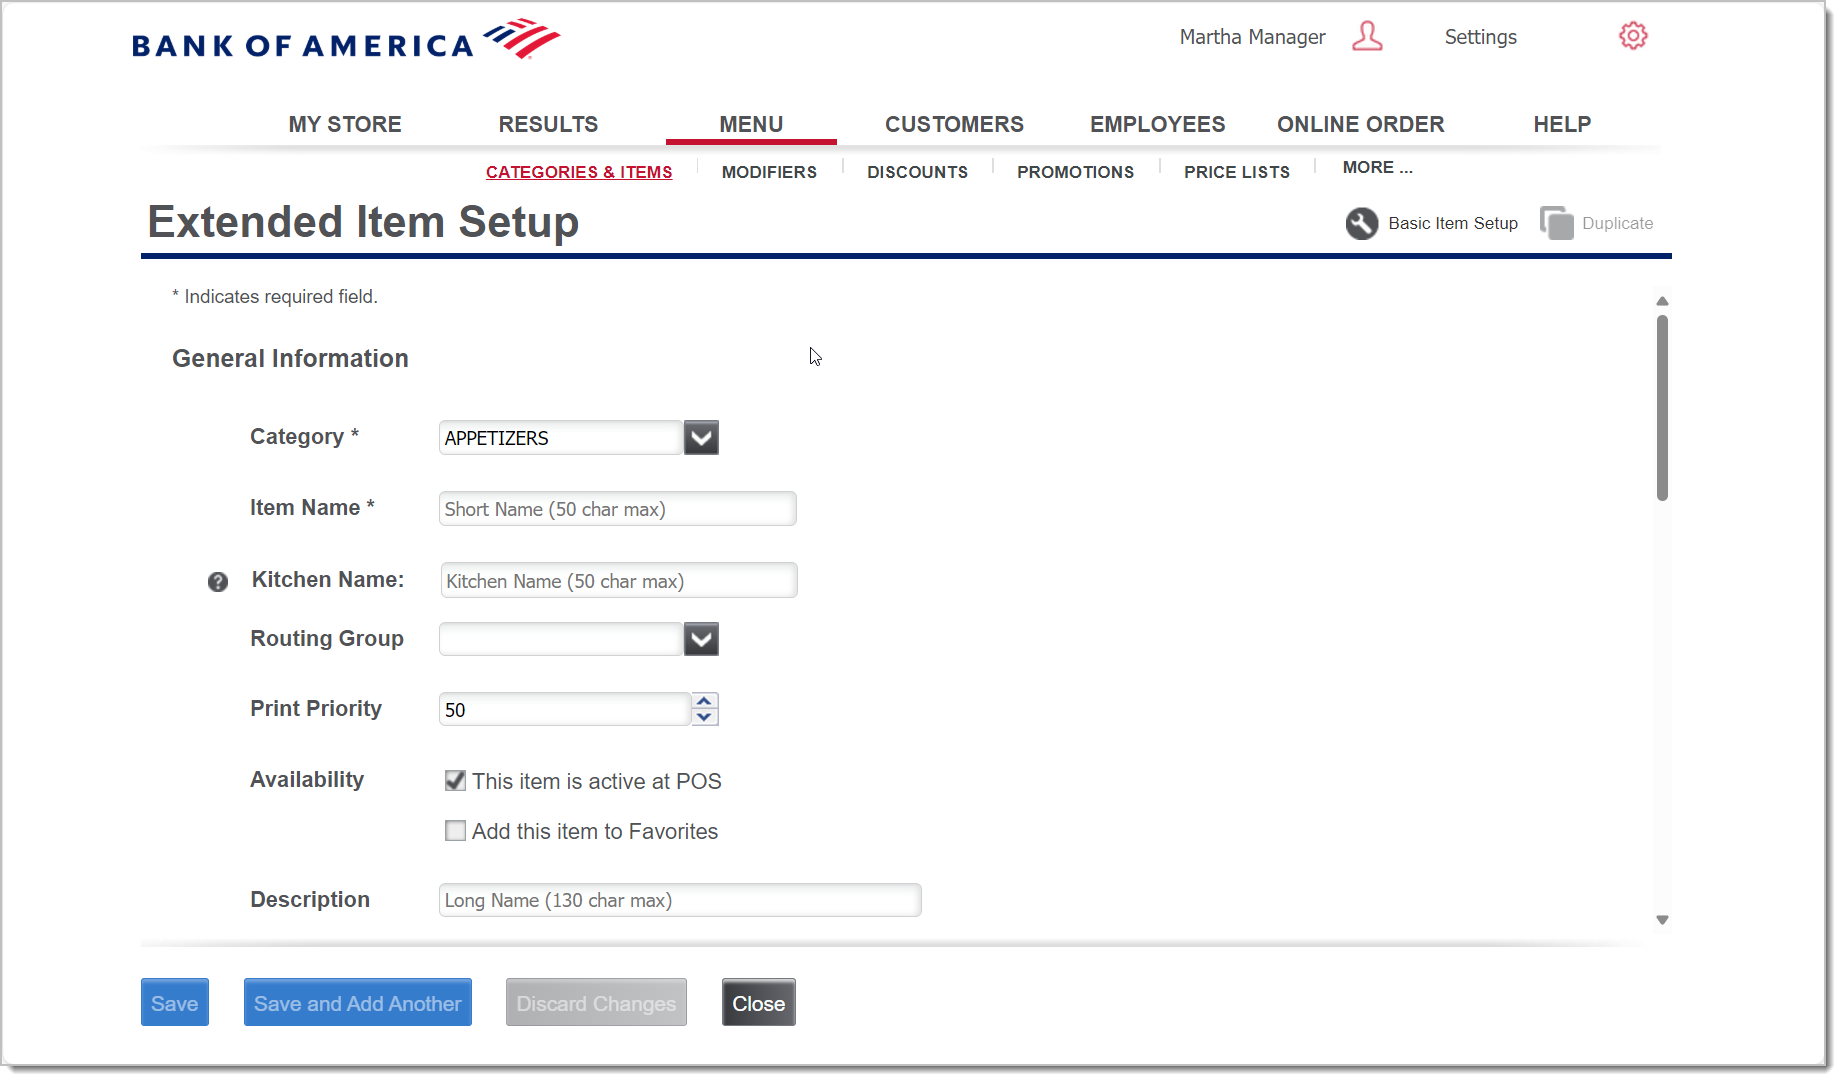
- (Optional) Enter a Kitchen Name for the item. The kitchen name is sent to kitchen devices (kitchen printer or KDS) in place of the item name.
TIP! You can use Kitchen Name to provide the item name in a different language for your kitchen staff. An easy way to enter an alternative language is to copy and paste the translated item name from a site such as Google Translate.
- (Optional) Choose a Routing Group for the item from the dropdown list. When an item is assigned a kitchen routing group, it will be sent to that group as a chit.
- (Optional) Update the Print Priority setting, if desired. Print Priority determines where an item prints on a chit routed to the kitchen. A priority of 1 will print the item at the top of the chit always and a priority of 100 will print it at the bottom of the list. The default setting is 50.
- (Optional) If you do not want this item to display in the Restaurant app, clear the This item is available at the POS checkbox.
- (Optional) Select Add this item to Favorites to include the item on the Restaurant app Favorites list.
- Select whether the item is a Menu Item, Modifier Item, or both.
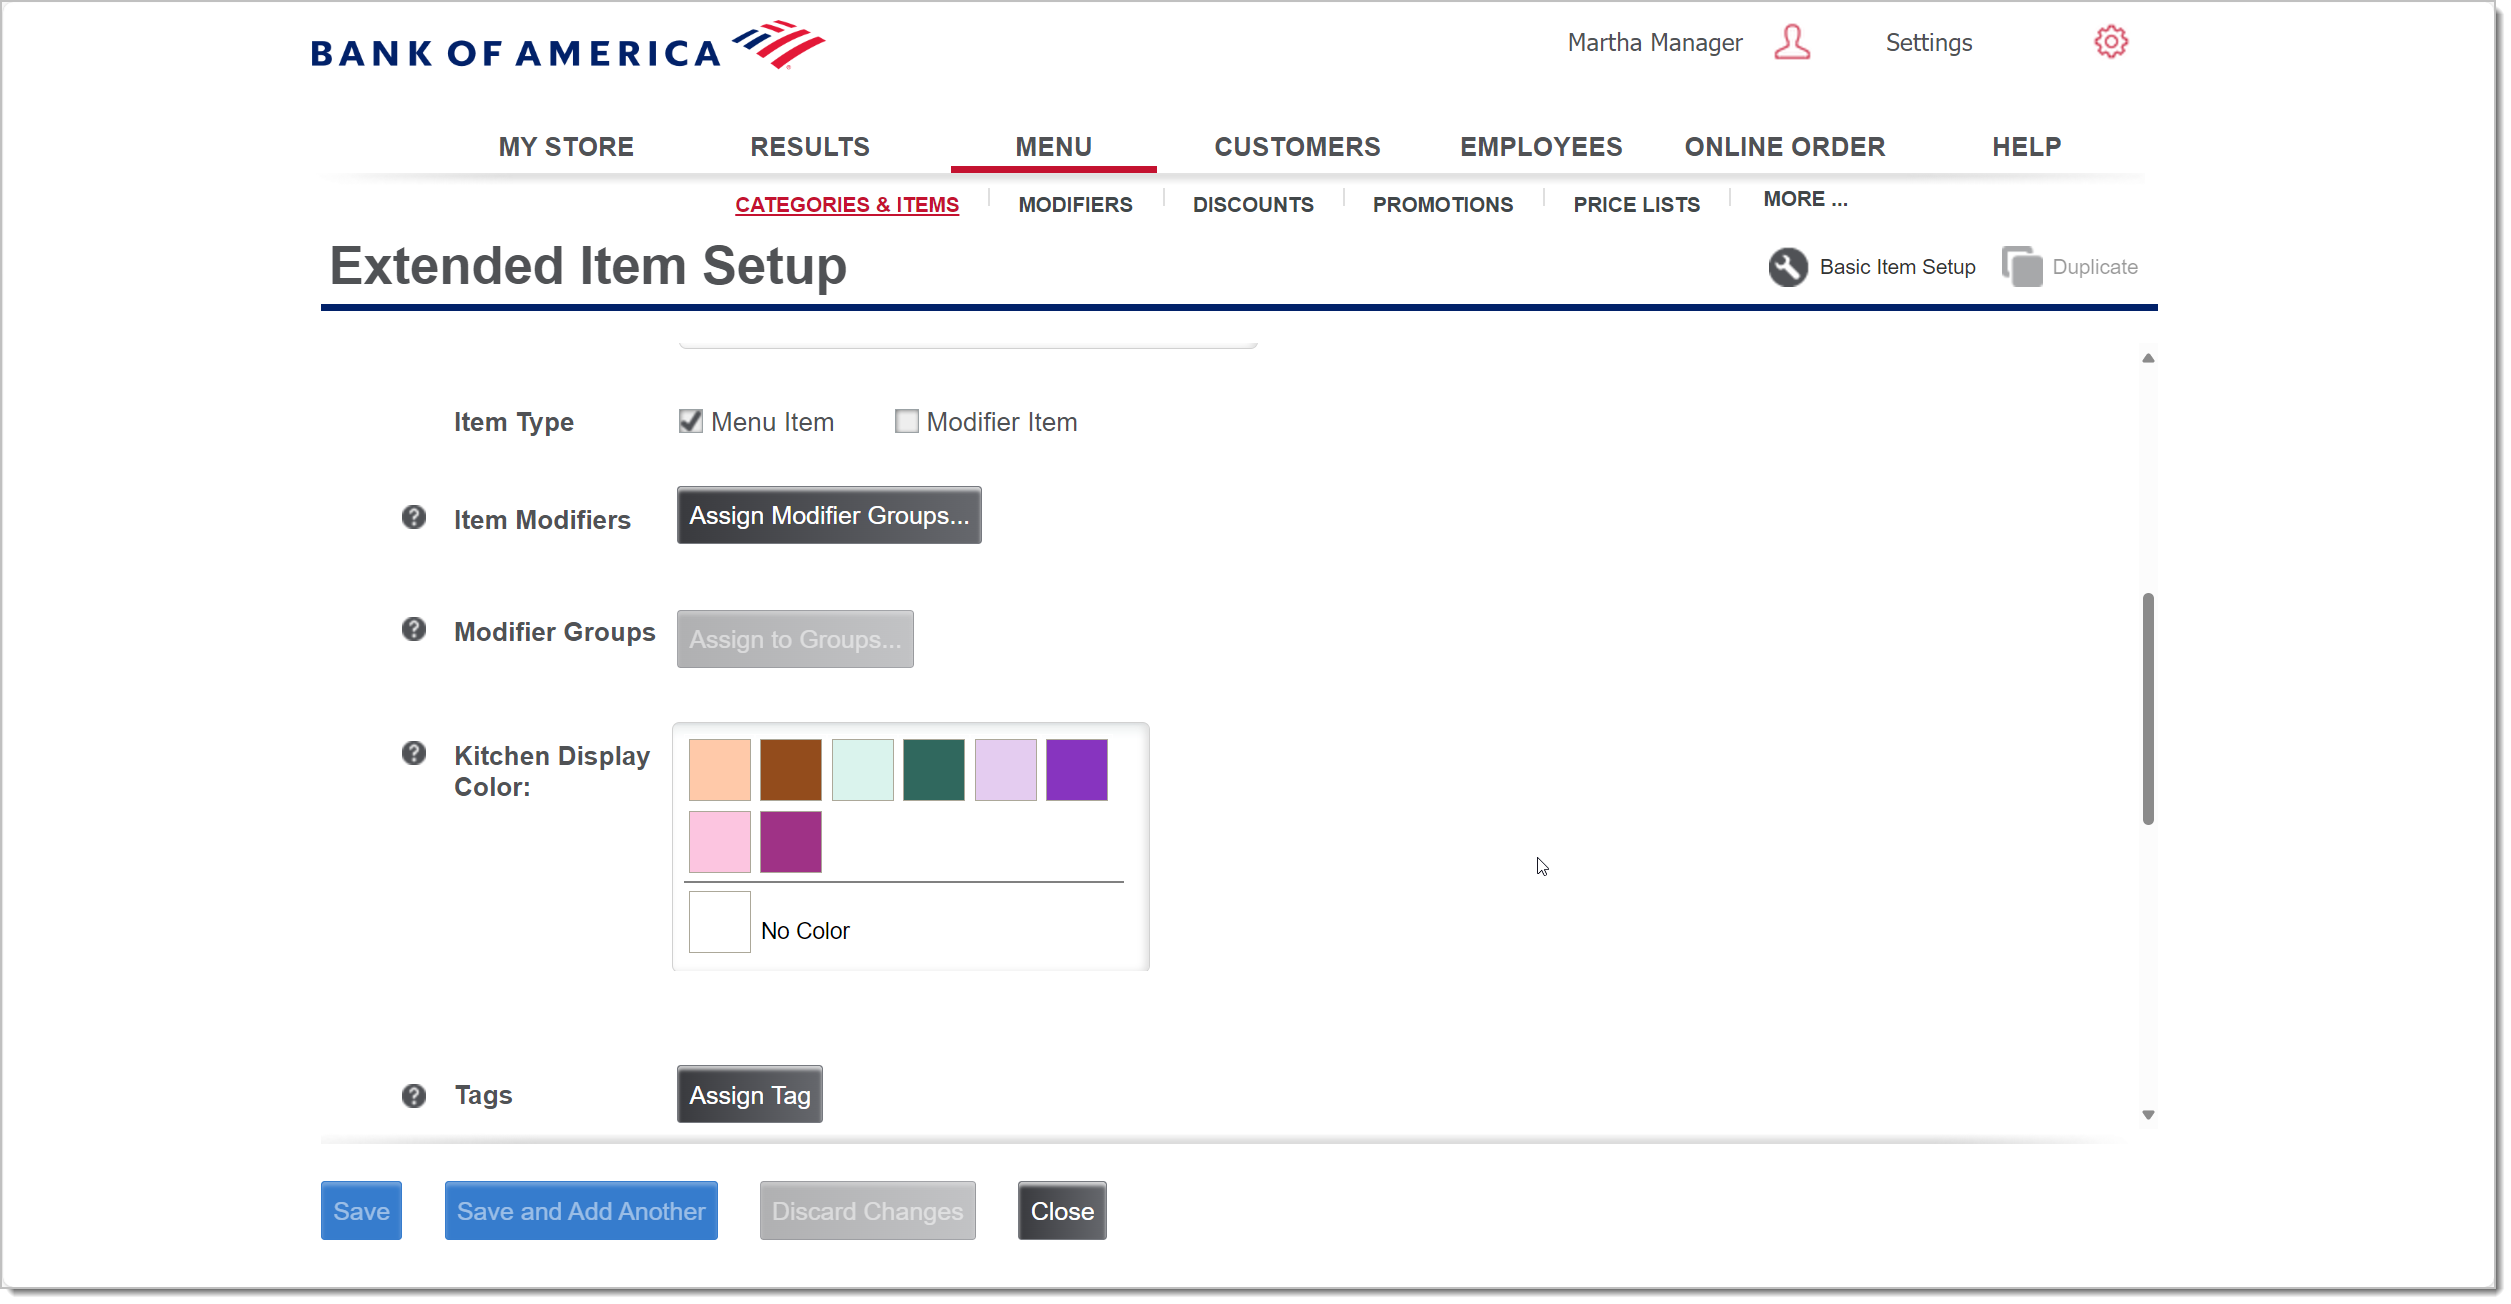
- If the item is a Menu Item, assign Item Modifiers to the item.

- If the item is a Modifier, choose whether to print the modifier item on the customer receipt and then assign it to Modifier Groups.
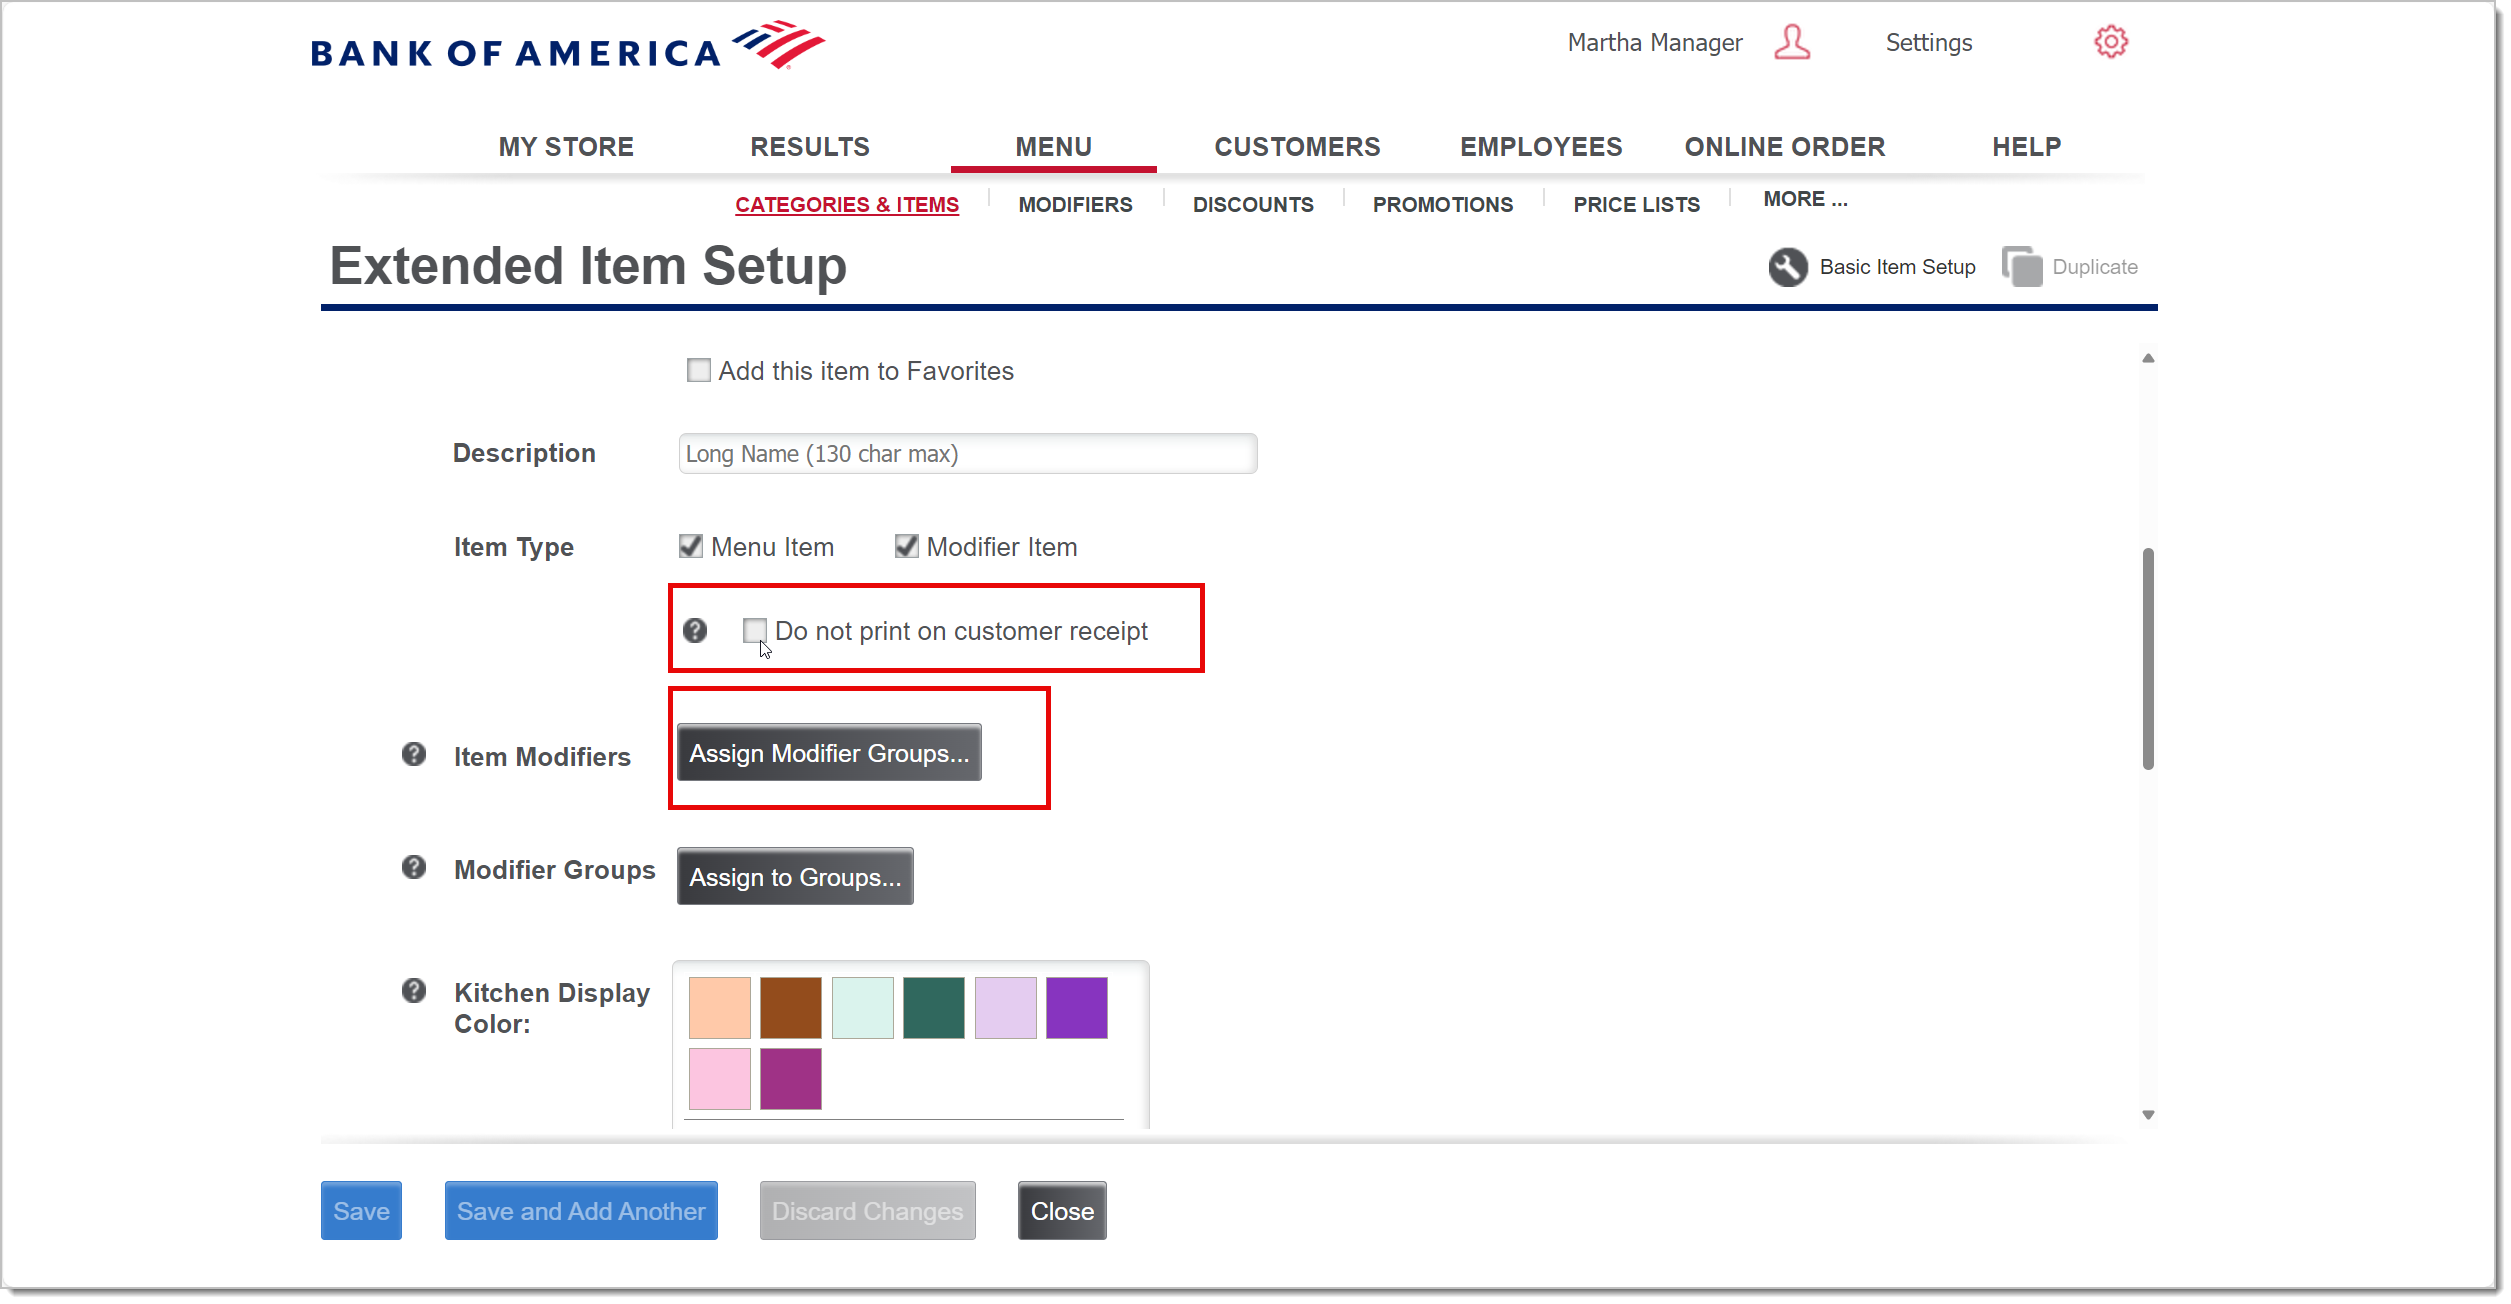
- If the item is a Menu Item, assign Item Modifiers to the item.
- (Optional) Assign a Kitchen Display Color to the item. This will color code the item when it displays on the KDS.
- (Optional) Assign a tag to the item.
- (Optional) Click Add a Variation if the item is sold in different sizes, flavors, or other variations.
- (Optional) Click Add a Barcode to assign a unique barcode to an item, then click + and either enter or scan a barcode for that item variation.

- (Optional) Assign an External ID to the item.
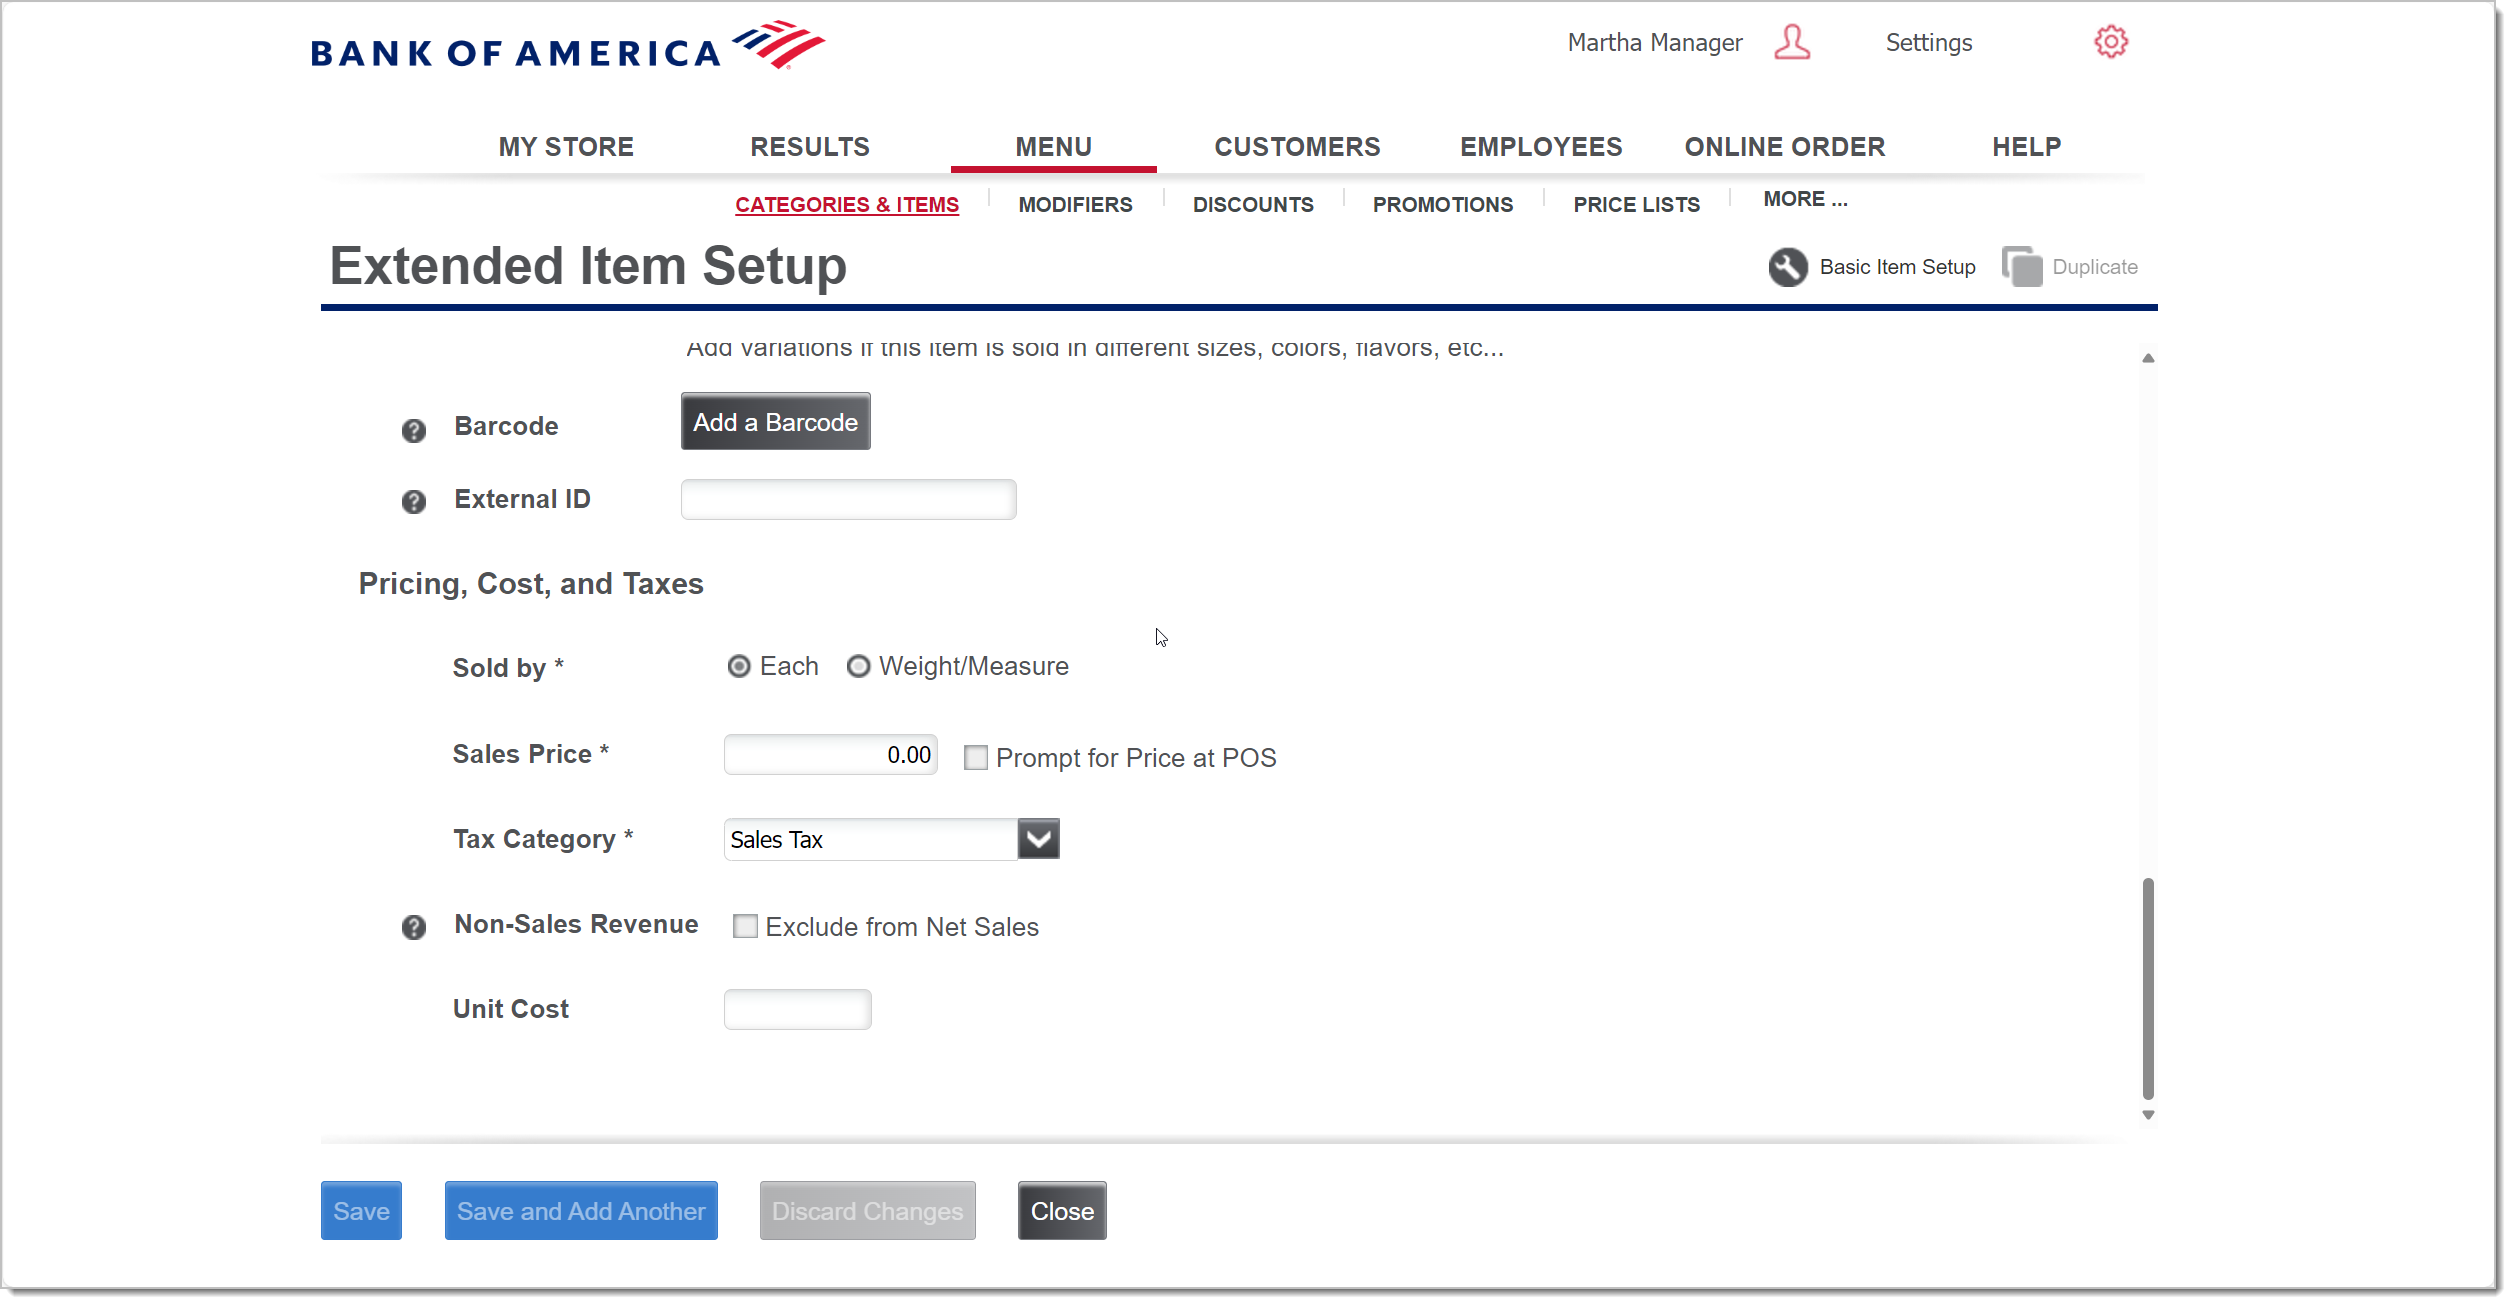
- Select whether the item is sold by Each or by Weight/Measure.
- Enter the Sales Price for the item in xx.xx format.
- (Optional) If you want the system to alert the Restaurant app user to enter a price for the item at the time of the sale, select the Prompt for Price at POS checkbox.
- Select the Tax Category for the item. The system will automatically select your default tax category, but you can choose another tax category for the item from the dropdown list.
- (Optional) Indicate that the item should be excluded from net sales calculation. A non-revenue item is something you sell or charge for in store that is not included in your Net Sales. Non-revenue items are typically tax-free items such as charity donations or delivery charges that you need to sell in the Restaurant App while keeping the revenue out of your net sales.
- Click Save or Save and Add Another to continue to add items.
Basic Item Setup
Use this Basic Item Setup to enter basic items quickly and efficiently. Basic Item Setup includes general information about the item, as well as price and tax information.
- To create an item using the Basic Item Setup
- In Back Office, select Menu tab.
- Select Categories & Items subtab.
- Select the category for the item and select Add an Item.
- Click Basic Item Setup.
- Enter an Item Name of up to 50 characters. Some names may be shortened on the Restaurant app to fit the screen.
- (Optional) Choose a Routing Group for the item from the dropdown list.
- (Optional) Update the Print Priority setting, if desired. Print Priority determines where an item prints on a chit routed to the kitchen. A priority of 1 will print the item at the top of the chit always and a priority of 100 will print it at the bottom of the list. The default setting is 50.
- (Optional) Clear the This item is available at the POS checkbox if you do not want this item to display in the Restaurant app.
- (Optional) Select Add this item to Favorites to include the item on the Point of Sale app Favorites list.
- Select whether the item is sold by Each or by Weight/Measure.
- Enter the Sales Price for the item in xx.xx format.
- (Optional) If you want the system to alert the Point of Sale app user to enter a price for the item at the time of the sale, check the Prompt for Price at POS box.
- Select the Tax Category for the item. The system will automatically select your default tax category, but you can choose another tax category for the item from the dropdown list.
- Click Save to complete basic setup.
- Click Extended Item Setup if you need to enter more information about this item, such as variations, bar codes, inventory tracking information, etc.
By default, items are displayed in alphabetical order in the Restaurant App. However, you can easily change the order using the Sort Order feature in the Back Office or by dragging and dropping in the app.
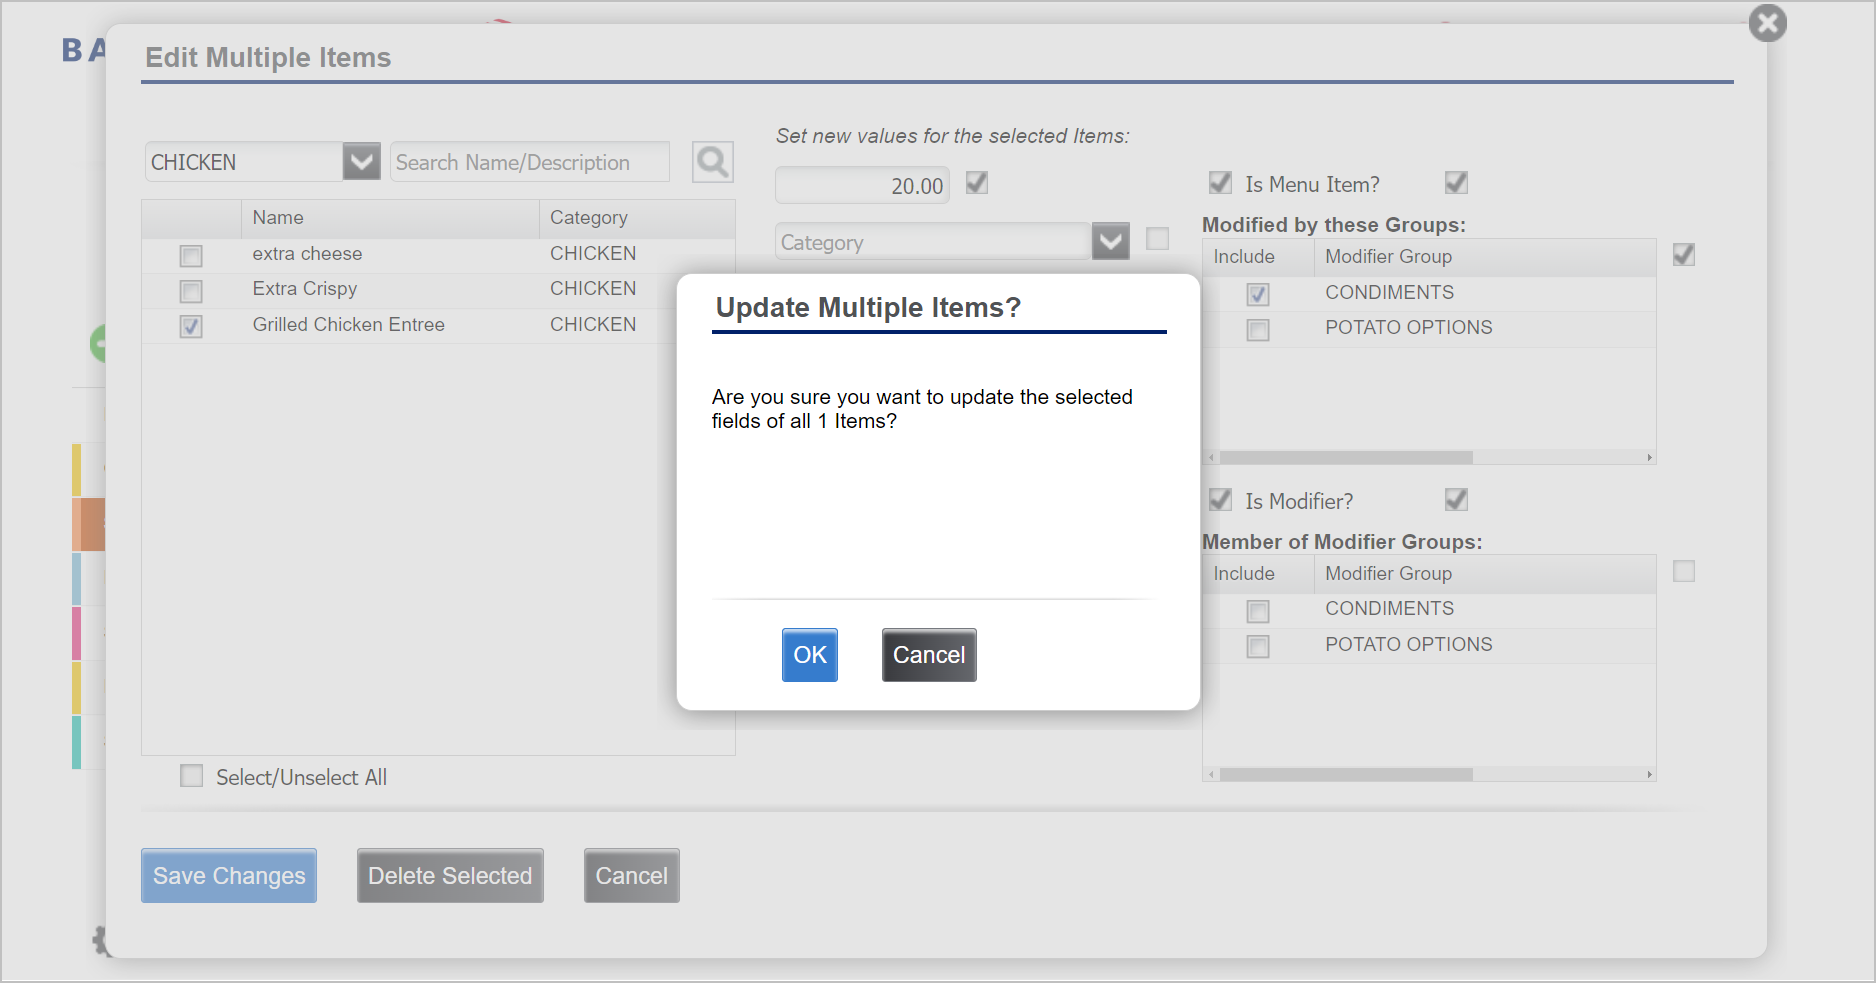
Edit multiple items
This feature allows you to select a group of items and do the updates to them at once without open each individual item record. Item attributes which can be changed using this feature are price, category, tax category, printer group, vendor, and availability at POS. This feature can also be used to delete multiple items at one time. You may also import items to setup to setup multiple items at one time.
- To edit multiple items
- In the Back Office Company View (All Stores), select the Menu tab.
- Select Categories & Items sub tab.
- Under your category list, click Edit Multiple Items.
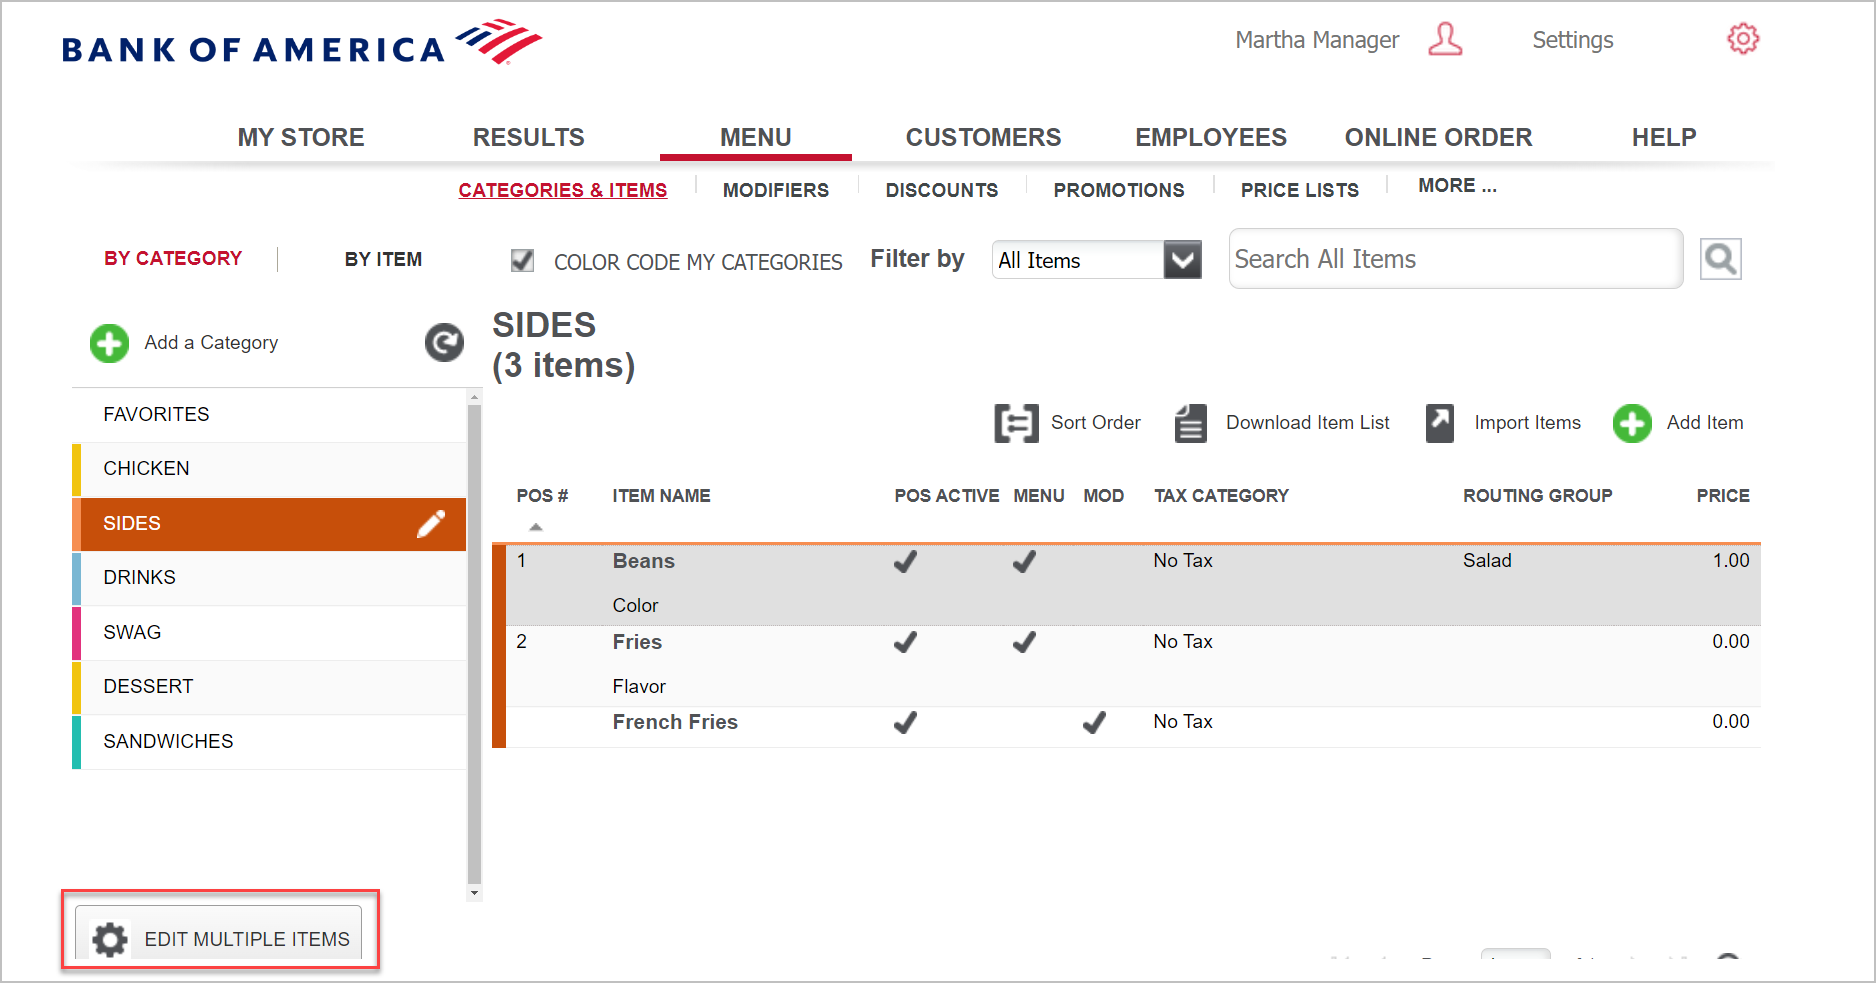
- Click Search Category and select a specific category from the dropdown list, or type a text string in Search Name/Description and click the search icon to the right to locate the items to update.
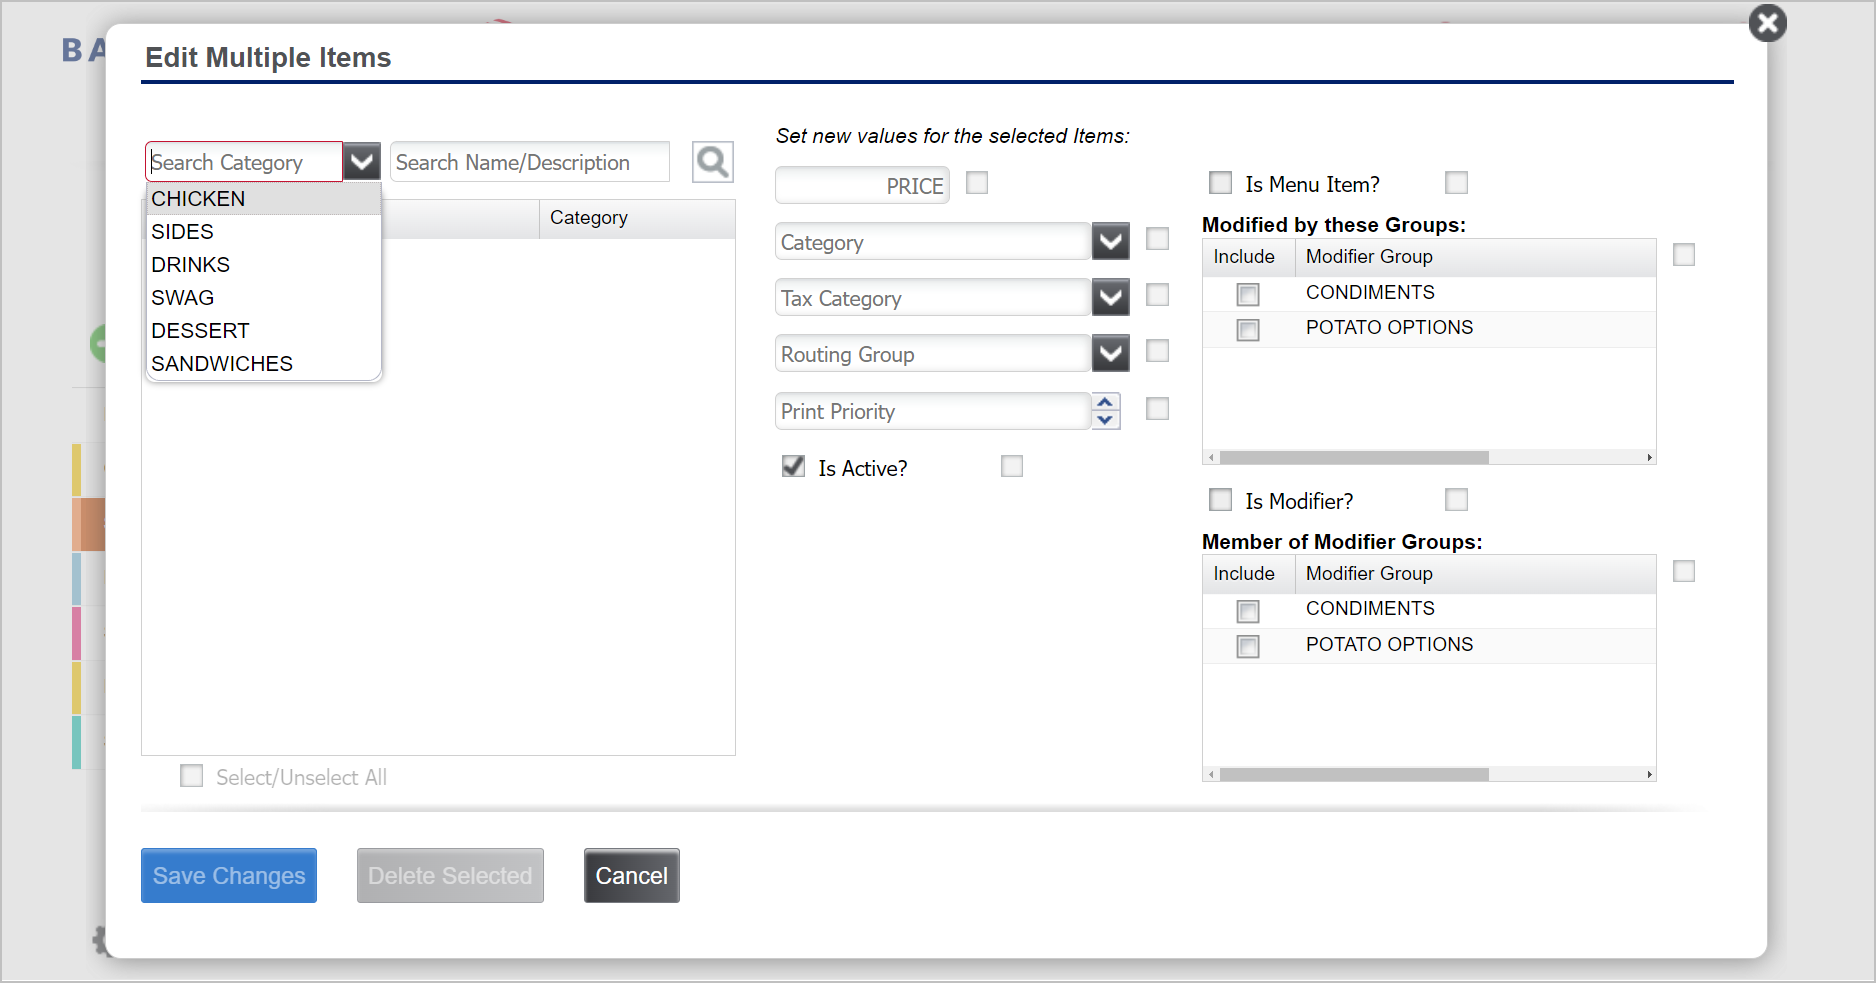
- Select the check box next to each item to change or select Select/Unselect All to easily select or clear every item appearing in the list.
- Select the new values for the selected items from the options on the right.
- Click Save Changes.
- On the confirmation message, click OK to save.
NOTE
Using this feature to update the prices for items priced by variation will result in all variation prices being updated to the entered price.
Item setup using the Restaurant App
A Restaurant App user must be assigned to a user role that has been granted access to the Category/Item Management feature to add a new category or item in the app.