Essentials Suite App Payments
Description
What's in this article?
Solution: Essentials Light | Essentials | Retail
When ready to accept a payment in the app, you can select from multiple payment types, depending on what was configured in the Back Office. You can also opt to take multiple payment types or split a payment evenly between customers.
NOTE:
Debit card payments are processed as credit cards.
- To take a credit card payment
You can accept a credit card payment on a device using a tap, dip or swipe to capture the card information.
- In the app, tap the Pay button on a transaction.
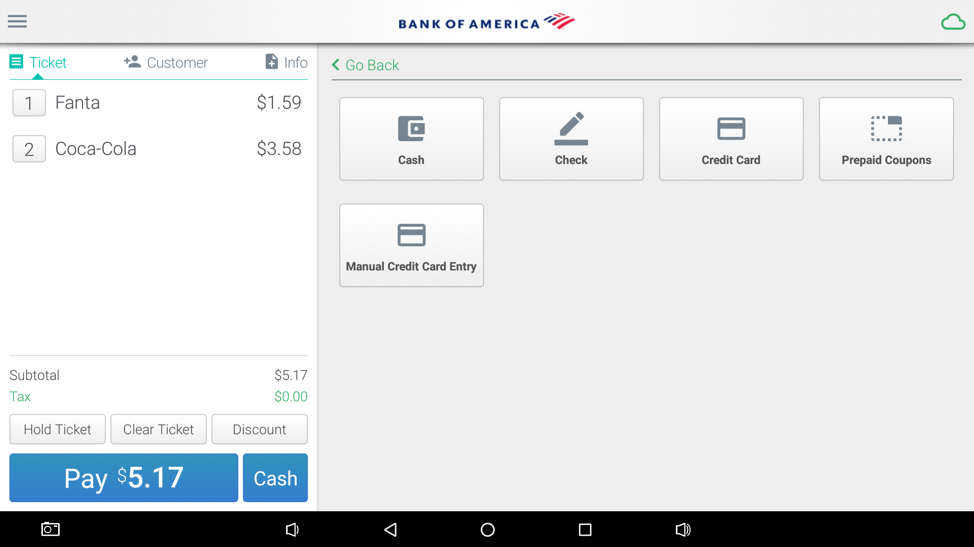
- Tap Credit Card.
- If tips are enabled, the customer is prompted to add a tip.
- When prompted, the customer inserts, swipes, or taps the credit card.
- If required, the customer authorizes the transaction by providing a signature digitally on the screen.
- The customer is prompted to make a receipt selection.
- To manually enter a credit card payment
If the Accept Manual Card Entry setting has been enabled in the Back Office, then follow these steps to manually enter a credit card payment.
- In the app, tap Checkout to display the Payment types panel.
- Tap the Manual Credit Card button.
- Enter the amount the customer is tendering.
- Tap the Done button. The customer is then prompted to complete the transaction on the payment terminal.
- To take a cash payment
- In the app, tap the Pay button on a transaction.
- Tap Cash to display the Cash Amount window.
- Enter the amount of cash the customer is tendering using one of the following methods:
- Use the numeric keypad to enter the Amount manually.
- Tap Split check to split the check among multiple payers.
- Use the numeric keypad to tap the dollar amount buttons to add the corresponding value to the Amount (i.e., $1, $5, $10, or $20).
- Tap Exact Change to set the Amount value to the Amount due value.
- Tap Next Dollar to set the Amount value to the Amount due value, rounded to the next whole dollar.
- Tap the Done button to add the payment. If the ticket is fully paid, the Receipt screen appears, allowing you to send a receipt to the customer via email, or print a receipt, or open the cash drawer without printing a receipt. This screen also shows any change due to the customer.
- To take a check payment
- In the app, tap the Pay button on a transaction.
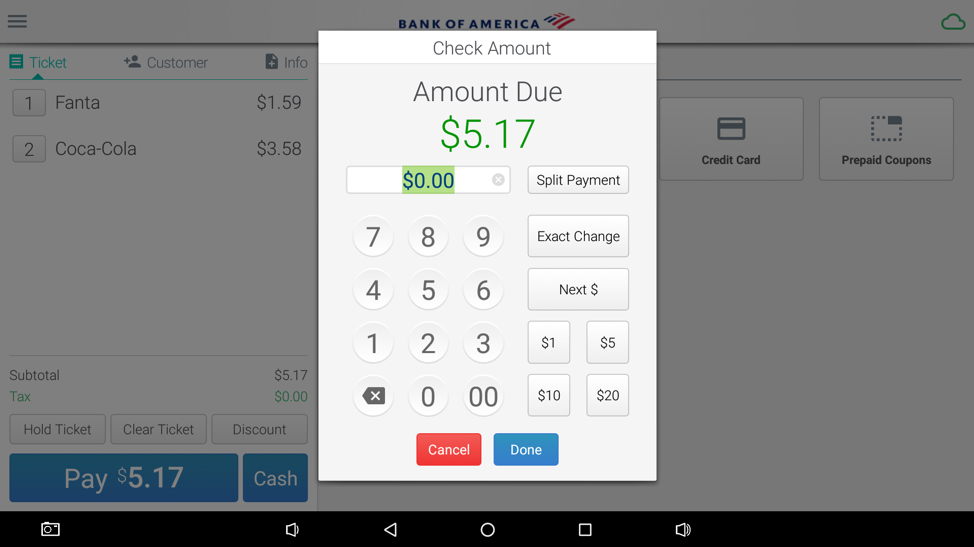
- Tap Check.

- Enter the amount on the check that the customer is tendering using one of the following methods:
- Use the keypad to enter the Amount manually.
- Tap Split check to split the payment due among multiple payers.
- Tap a dollar amount button to add the corresponding value to the amount (i.e., $1, $5, $10, or $20).
- Tap Exact Change to set the Amount value to the Amount due value.
- Tap Next Dollar to set the Amount value to the Amount due value, rounded to the next whole dollar.

- Tap Done to add the payment. If the ticket is fully paid, the Receipt screen appears, allowing you to send a receipt to the customer via email, or print a receipt, or open the cash drawer without printing a receipt. This screen also shows any change due to the customer.
- To accept multiple payment methods
Customers may request to pay for their ticket using two different payment methods such as multiple credit cards, a gift card, and cash, etc. For example, the ticket is $20 and the customer wants to pay $13 on their credit card and the remainder in cash.
NOTE:
If you do accept multiple payment types for the transaction, accept cash last to see the change due.- In the app, tap the Pay button on a transaction.
- Tap the first payment method.
- Change the default full payment amount to the amount to pay using the first payment method.
- If tips are enabled, enter the tip.
- Complete the payment according to the payment method.
- When the balance due appears, tap Pay again and select the next payment method.
- Tap the Done button to take the payment.
- When the ticket is fully paid, the Receipt screen appears, allowing you to send a receipt to the customer via email, or print a receipt, or open the cash drawer without printing a receipt. This screen also shows any change due to the customer.
- To split a payment between customers
Splitting a payment allows you to equally divide a ticket by a specified number of people. It will not break up the items on the ticket by the individual customer.
NOTE:
If any customers are paying by credit card, the signature screen will not be shown until all payments have been entered. The receipt will show all the payment transactions. If you have customers paying with credit cards and with cash, we recommend you process the credit card customers first.- In the app, tap the Pay button on a transaction.
- Tap Split Payment.
- Enter the Number of people to split the check between.
NOTE:
If the ticket is an odd dollar amount, the additional amount will be added to the last customer who pays. - Tap Done. The system will calculate the per-person amount and return you to the Amount screen.
- Take the payment from the first customer and select the payment type. When complete, tap Done. The Ticket screen will show the balance remaining.
- Repeat this step until all customers have paid their portion, and the Balance Due is $0.00.