Back Office Email Marketing
Description
What's in this article?
Solution: Essentials | Retail | Restaurant
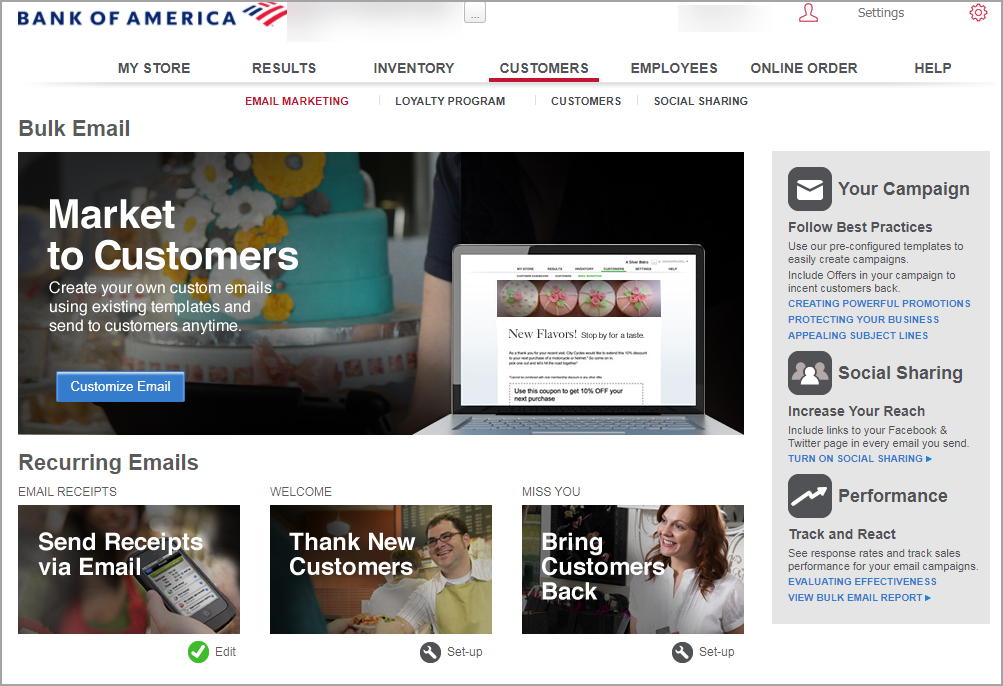
You can create email messages that help you market to your customers. You can use this feature to let customers know about upcoming events, welcome new customers, touch base with customers who haven’t visited recently and provide soft copies of receipts rather than printed copies. Include special offers in these email messages to entice a return visit to your restaurant and to assist you in tracking the effectiveness of your email marketing campaign.
Marketing emails and recurring emails for receipts, welcome, or miss you emails are created the same way. Select the email marketing message you wish to create. Each email message type uses a designer tool to assist you in creating the message. Although all types share basic similarity, each contains settings specific to that message type. Each email message type can contain up to three sections: image, text, and offer. If you do not configure a section, it does not appear in your email message.
| Option | Description |
|---|---|
| Market to Customers (Bulk Email) | Bulk email option to send a marketing campaign to a category or categories of customers. |
| Send Receipts via Email | Send an emailed receipt in lieu of a paper receipt. |
| Thank New Customers (Welcome) | Send a welcome email to new customers when they provide you with their email address. |
| Bring Customers Back (Miss You) | Send a Miss You email to encourage customers to return. |
| Campaigns, social sharing, and performance | Tips and tools provided by the Back Office to assist you in creating powerful, appealing email messages, use social sharing, and to track the effectiveness of your email campaign. |
IMPORTANT!
To ensure you are adhering to email marketing laws, make sure you have the customer's permission to email them before including them in any email marketing campaigns.
Bulk marketing email
These are marketing messages to your customer base. Create a custom message to send to all customers, or to a select category of customers, letting them know about upcoming events and special menu offerings.
- Use the Bulk Email feature to broadcast emails to up to 2,500 customers. If you have more than 2,500 customers, the system will send the email to the 2,500 customers with the most recent purchases.
- You can also choose to send a bulk email to one or more customer categories (with valid email addresses) by selecting the More option in the To field to open the Select Recipients screen. We highly recommend using categories to create targeted email campaigns.
- Unlike the other marketing email messages, once you are satisfied with your bulk email and it has passed the spam check, as soon as you click Send Email, the system will send your bulk email immediately.
NOTE:
For multi-site customers, if you want to send a bulk email message to customers at a particular store, create a customer category using your store names and then assign the customers at that store to that store's customer category. If you do not select categories, only the most recent 2,500 customers will be messaged.
Receipt email
Email Receipts creates a custom receipt to send to customers, in lieu of a printed receipt, using an email message. POS operators have the option to send the customer's receipt via email. Using this feature allows you an extra chance to connect with your customers and send them offers. Since you don't want to risk your customers not receiving a receipt, the receipt email is enabled by default and it cannot be disabled.
If you do not customize the receipt for your store, the customer will receive a simple, default receipt by email.
NOTE:
Even if a customer has requested to opt out of email marketing, receipt emails will still be sent, allowing you to continue to reach these customers. If you are working in an Offline Mode (not connected to the internet), the system will send the receipt emails once your POS device is online.
Welcome email
Create a custom email message to thank new customers and welcome them. The system automatically sends the message to a new customer as soon as you add their email address to your customer database. Use the Welcome Email feature to welcome customers to your store and to also entice them to return by attaching an offer or coupon to use on their next visit to your store. Once you select Turn Email ON, the system will automatically send the welcome email to your customers as soon as you enter their email address. You can come back and make changes to your welcome email at any time.
When a new customer provides an email address, you can automatically send a welcome email. Including an offer or coupon to use on their next visit will entice them to return.
Miss You email
Use the Miss You Email feature to reach out to your customers who have not made a purchase in a configurable number of days. The system will count the number of days since a customer made a purchase and will then send the customer the Miss You Email.
The purpose of the Miss You Email is to entice the customer to come back to your store and make another purchase. Because of this, it's a good idea to attach an offer to this email message.
Once you select Turn Email ON, the system will automatically send the Miss You Email to your customers based on their last purchase. There's nothing else you need to do. You can come back and make changes to your Miss You Email at any time.
Spam check
Spam Check calculates the likelihood a spam checker may capture your email marketing message. Click Spam Check after creating your email message to determine which, if any, spam triggers exist in your email message. The subject and content of your email are evaluated against hundreds of rules.
Each trigger has an associated point value associated with it that we use to calculate a spam score for your email message that allows us to let you know if your marketing email has a low, medium, or high risk of being tagged as spam. If your email returns a high spam score, the system will not send the email until you make changes.
| Spam Button | Spam Score | What you should do |
|---|---|---|
 | Low | Send the email to your customers. |
 | Medium | You can send your message; however, the chance exists that your customer may not receive your email message. Review your email message and modify where necessary. |
 | High | The system will not send your email message when the spam score remains High. Review the identified triggers, modify your email message, and run Spam Check again. Confirm that your company information is configured. |
 | Unknown | A spam check hasn't been done yet. Click the Check Spam Score button to check your email. |
To lower your spam check score, try the following tips:
- Ensure your email does not consist solely of images.
- Avoid using the word Test in the subject line.
- Avoid using Dear _ in the subject line or in the introduction of the message.
- Do not include “Money back guarantee” anywhere in the message.
- Avoid excessive exclamation points.
- Avoid all capital letters.
Test email message
Prior to sending your email message to your customers, you can send a test email message to a maximum of five email addresses. Use Test Email to verify the formatting of your email message on different email clients.