A Secure Acceptance profile is required for Hosted Payments Page (HPP) and Checkout API integrations to the Bank of America Gateway. Once created, a profile must be promoted to Active to go live. Both HPP and Checkout API integration methods require a Secure Acceptance profile and will go through the same steps for profile creation. If you plan to test your integration in the Demonstrations & Certification Environment (DCE), follow the same steps below to create a profile in the DCE for your test account by logging in to DCE instead of your Merchant Services account in online banking.
Create a Secure Acceptance profile
Create a Secure Acceptance profile for your HPP or Checkout API integration.
- To create a Secure Acceptance profile
- Log in to your Merchant Services account in Business Advantage 360 online banking. If testing prior to going live, log in to the DCE.
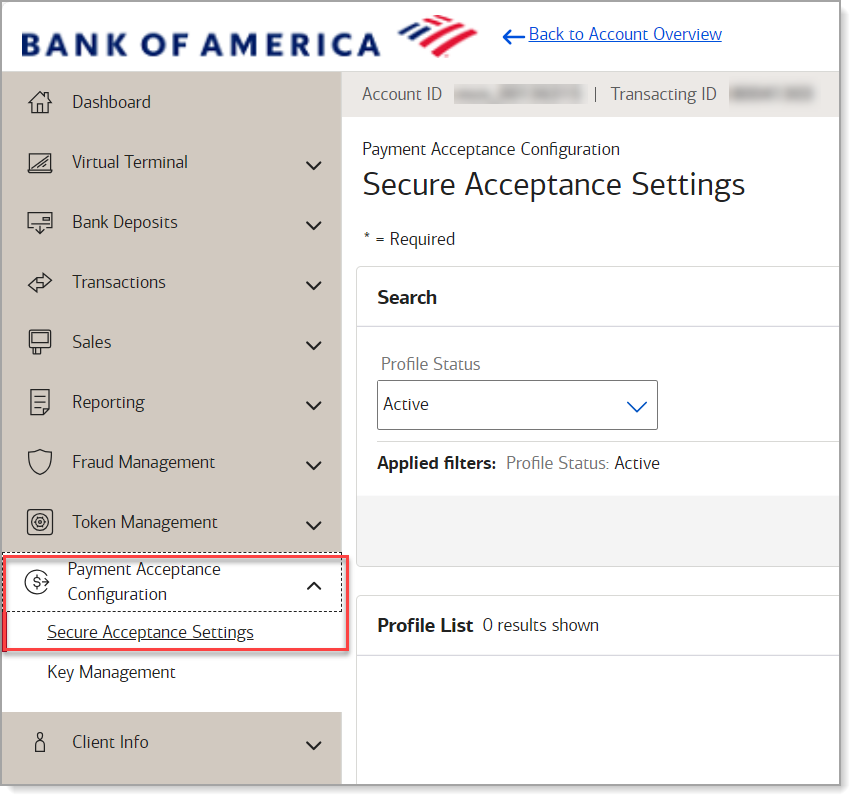
- In the left navigation pane, select Payment Acceptance Configuration > Secure Acceptance Settings. The Secure Acceptance Settings page appears.
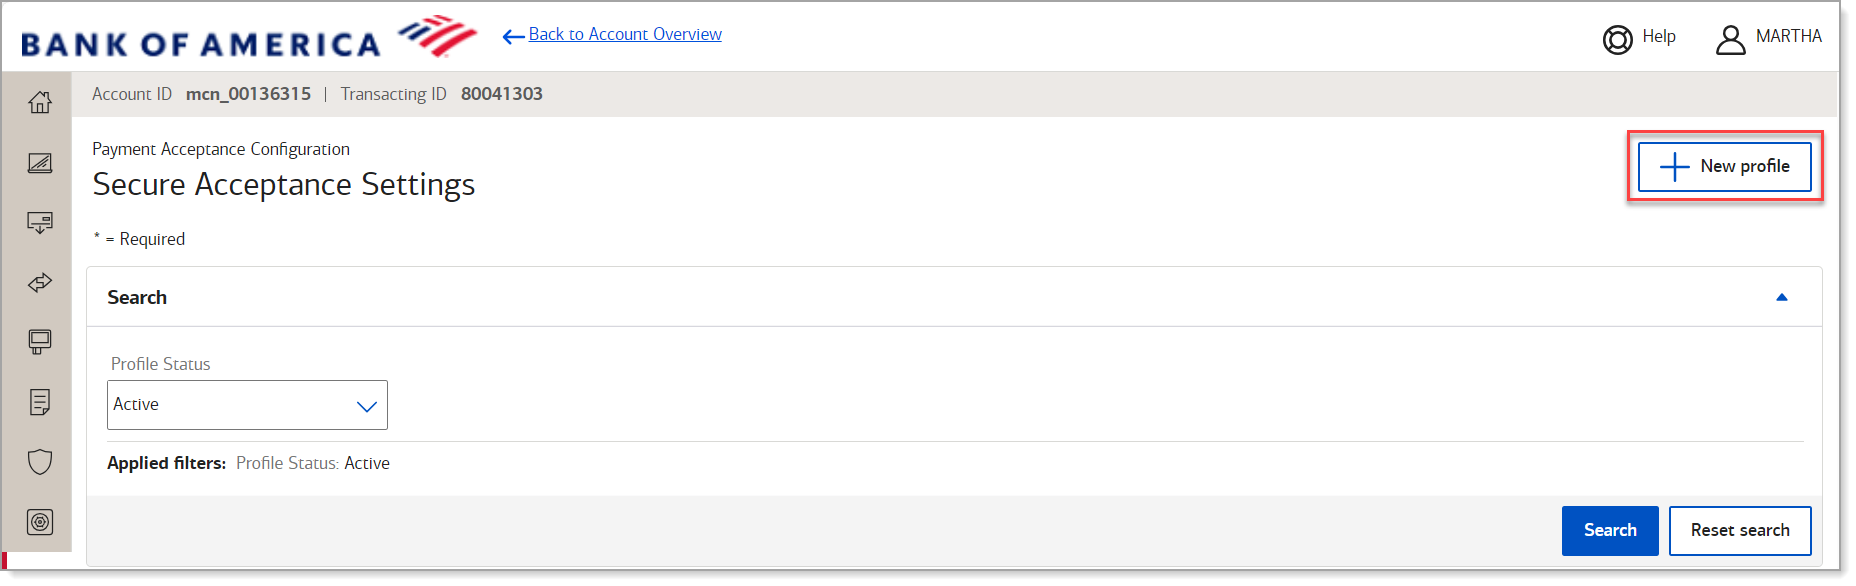
- Click New Profile.
- In the Create Profile panel, update profile details as described in the image below, selecting the integration method you are using.
NOTE: Verbose data is not supported.
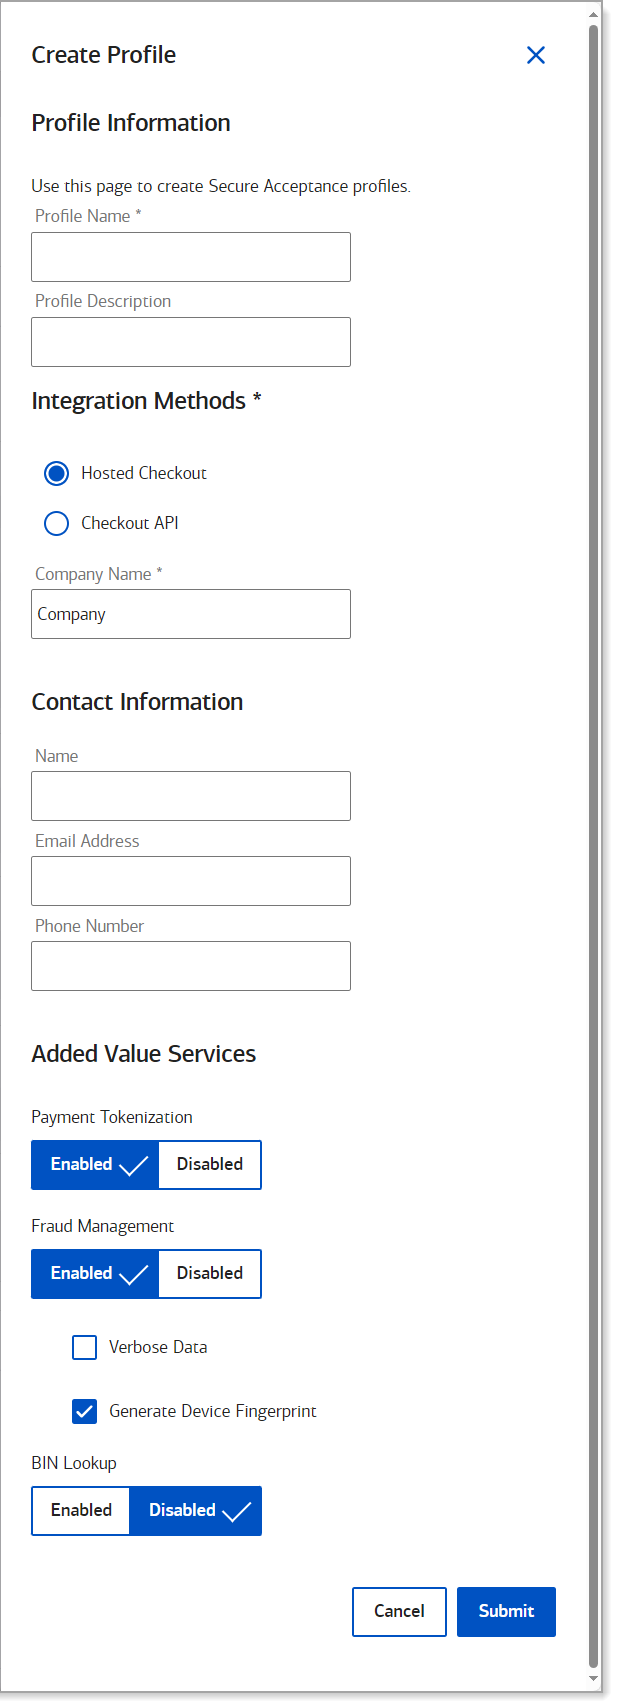
Table showing field name and description| Field | Description |
|---|
| Profile name and description | A profile name is required and cannot exceed 40 alphanumeric characters. The profile description cannot exceed 255 characters. |
| Integration Method | Select Hosted Payments Page or Checkout API. |
| Company Information | Company name, email and phone number. The company name cannot exceed 40 alphanumeric characters. |
| Added Value Services | Leave Added Value Services options as shown, with Payment Tokenization and Fraud Management enabled, Verbose Data unchecked, Generate Device Fingerprint enabled, and BIN Lookup disabled. |
- Click Submit. The profile is created as Inactive. Prior to going live, you will need to promote a profile to active.
- To configure a Secure Acceptance profile
- Log in to your Merchant Services account in Business Advantage 360 online banking.
NOTE: If testing prior to going live, log in to the DCE instead of Merchant Services online banking.
- In the left navigation pane, select Payment Configuration > Secure Acceptance Settings. The Secure Acceptance Settings page appears.
- From the Profile Status dropdown list, select Inactive to view your inactive profiles.
- In the More column, select … > Edit Profile, the click Confirm in the popup dialog box to confirm that you want to edit the profile.
- Edit the profile configuration, as needed, clicking Save after editing each tab:
- General Settings
Edit General settings as needed. The General Settings are basic information about the name and format of the profile.
IMPORTANT! You cannot change the Integration method once the profile is created.
- Payment Settings
Card types are defaulted based on setup at boarding. These cannot be changed, but a card type can be removed from a profile.
For transactions that fail to return an Address Verification System (AVS) or a Card Verification Number (CVN) match, you can enable Secure Acceptance to perform an automatic authorization reversal. An automatic reversal releases the reserved funds held against a customer's card.
Fails AVS Check – automatically reverse an authorization if address verification fails during the transaction.
Fails CVN Check – automatically reverse an authorization if card verification number (aka CVV) fails during the transaction.
- Security
Secure Acceptance integrations create the security key within the profile (not using Key Management). See Bank of America Gateway Security Keys for more information on how to generate the keys.
- Payment Form (HPP Only)
Set up checkout steps and which fields to include in billing and order review forms. The most common payment practices are selected as defaults in the Payment Form tab.
- Notifications
Select desired Merchant Notifications:
Field and description.| Field | Description |
|---|
| Merchant POST URL | Select to post notifications to a specific URL. Type URL in space provided. NOTE: http:// or https:// must be included in URL. www is optional. |
| Merchant POST Email | Select if the merchant wants the merchant notifications to post to an email. Only one email address may be added here. If more than one email address is required, a group email address should be used. |
| Customer Notifications | Email Receipt to Customer sends customers automated email receipts.
If selected, the Customer Notification Details must be entered:Sender Email Address Sender Name (Merchant’s name) Send a copy of email receipt to – enter email address to receive a copy of merchant receipt Display Company Logo on Notification option Standard or Custom Email receipt – select one option. |
- Customer Response
Provides options for transaction response.
Field and description.| Field | Description |
|---|
| Transaction Response Page | Choose who will host the response page. If Hosted By You, enter the URL for the response. |
| Transaction Response Message | Choose a number from the Decline Limit dropdown list to set the number of times a customer can retry a declined transaction. Maximum is five. |
| Custom Cancel Response Page | Choose who will host the cancel response. If Hosted By You, provide a URL for the response. |
| Customer Redirect after Checkout | Enter the redirect URL of the web page. This web page is displayed to the customer after the checkout process is completed. |
- Branding (HPP Only)
| Options to display a header, change the header color, and include a logo with maximum size of 840px wide by 60px high. You can also customize the background color, text color and type face of the main body of the checkout page, decide whether to customize the total amount section of the checkout page, the progress bar color, and the background color, text color and button text of the Pay/Finish button. The footer may also be customized to include your logo. |
- When complete, the edited profile will be inactive. To use the profile, promote it to Active.
Payment method configuration
You must configure at least one payment method before you can activate a profile.
A payment method selection page is displayed as part of the checkout process for any of the following scenarios:
- Multiple payment methods are enabled for the profile, and no payment_method field is included in the request.
- payment_method=visacheckout is included in the request.
- Visa Checkout or Visa Secure Remote Commerce (SRC) is the only enabled payment method for the profile.
NOTE:
Visa Checkout and Visa SRC are forms of Digital Payments, which are not available for Bank of America merchants at this time. Visa SRC uses Visa Checkout services, Business Center labels, and API fields.
You can skip displaying the payment method selection page by specifying card as the only available payment method. Customers can change the payment method during the checkout process.
Adding card types and currencies
For each card type you choose, you can also manage currencies. Choose only the types of payment cards and currencies supported by Bank of America.
The card verification number (CVN) is a three- or four-digit number that helps ensure that the customer possess the card at the time of the transaction.
- To add a card type or currency
- Log in to your Merchant Services account in Business Advantage 360 online banking.
- On the left navigation pane, select Payment Acceptance Configuration > Secure Acceptance Settings.
- Select a profile from the list. The General Settings page appears.
- Click Payment Settings. The Payment Settings page appears.
- Click Add Card Types. The list of card types appears.
- Select each card type that you want to offer to the customer as a payment method.
- Click the Settings icon for each card type. The card settings and currencies lists appear.
- Select CVN Display to display the CVN field on Secure Acceptance. The customer decides whether to enter the CVN. Bank of America recommends displaying the CVN to reduce fraud.
- Select CVN Required. The CVN Display option must also be checked. If this option is checked, the customer is required to enter the CVN. Bank of America recommends requiring the CVN to reduce fraud.
- Choose the currencies for each card.
NOTE: By default, all currencies are listed as disabled. You must select at least one currency. Contact your merchant account provider for a list of supported currencies. If you select the Elo or Hipercard card type, only the Brazilian Real currency is supported.
- Click Submit. The card types are added as an accepted payment type.
- Click Save.
Configuring payer authentication
Payer Authentication prevents unauthorized card use and provides added protection from fraudulent chargeback activity.
- To configure payer authentication (future use)
NOTE:
3D Secure is not yet available.
- In the left navigation panel, choose Payment Configuration > Secure Acceptance Settings. The Secure Acceptance Settings page appears.
- Select a profile. The General Settings page appears.
- Click Payment Settings. The Payment Settings page appears.
- Choose a 3D Secure version. If you choose 3D Secure 2.0 and the card issuer is not 3D Secure 2.0 ready, some transactions might still authenticate over 3D Secure 1.0. The payer_authentication_specification_version reply field indicates which version was used.
- Click Save. The card types that support payer authentication are:
- Amex
- Cartes Bancaires
- Diners Club
- Discover
- JCB
- Mastercard
- Maestro (UK Domestic or International)
- Visa
Automatic authorization reversals
For transactions that fail to return an Address Verification System (AVS) or a Card Verification Number (CVN) match, you can enable Secure Acceptance to perform an automatic authorization reversal. An automatic reversal releases the reserved funds held against a customer's card.
- To enable automatic authorization reversals
- Log in to your Merchant Services account in Business Advantage 360 online banking.
- On the left navigation pane, select Payment Acceptance Configuration > Secure Acceptance Settings. The Secure Acceptance Settings page appears.
- Select a profile. The General Settings page appears.
- Click Payment Settings. The Payment Settings page appears.
- Select Fails AVS check. Authorization is automatically reversed on a transaction that fails an AVS check.
- Select Fails CVN check. Authorization is automatically reversed on a transaction that fails a CVN check.
- Click Save. When the AVS and CVN options are disabled and the transaction fails an AVS or CVN check, the customer is notified that the transaction was accepted. You are notified to review the transaction details.
Customer response page
You must configure the customer response page before you can activate a profile.
You can choose to have a transaction response page displayed to the customer at the end of the checkout process, and a cancel response page displayed during the checkout process. Enter a URL for your own customer response page, or use the Bank of America hosted response pages. Depending upon the transaction result, the Bank of America hosted response pages are Accept, Decline, or Error. Review declined orders as soon as possible because you might be able to correct problems related to address or card verification, or you might be able to obtain a verbal authorization. You can also choose to display a web page to the customer after the checkout process is completed.
- To configure a Bank of America hosted response page
- In the left navigation panel, choose Payment Configuration > Secure Acceptance Settings. The Secure Acceptance Settings page appears.
- Choose a profile. The General Settings page appears.
- Click Customer Response. The Customer Response page appears.
- Under the Transaction Response Page heading, check Hosted by Bank of America.
- Under the Transaction Response Message heading, choose a number from the Retry Limit dropdown list. The maximum number of times a customer can retry a declined transaction is five.
- Under the Customer Redirect after Checkout heading, enter the redirect URL of the web page. This web page is displayed to the customer after the checkout process is completed.
- Click Save. The Profile Settings page appears.
- To configure a custom hosted response page
- In the left navigation panel, choose Payment Configuration > Secure Acceptance Settings. The Secure Acceptance Settings page appears.
- Choose a profile. The General Settings page appears.
- Click Customer Response. The Customer Response page appears.
- Under the Transaction Response Page heading, check Hosted by You.
- Enter the URL for your customer response page. Use port 80, 443 or 8080 in your URL.
Only port 443 should be used with a HTTPS URL. Parse the transaction results from the URL according to the reason coded ( ), and redirect your customer to the appropriate response page. See Appendix A, "Reason Codes" of the Hosted Payments Page Integration Guide. - Under the Transaction Response Message heading, choose a number from the Retry Limit dropdown list. The maximum number of times a customer can retry a declined transaction is 5.
- Under the Customer Redirect after Checkout heading, enter the redirect URL of the web page. This web page is displayed to the customer after the checkout process is completed.
- Click Save.
- To configure a custom Bank of America hosted response page
- In the left navigation panel, choose Payment Configuration > Secure Acceptance Settings. The Secure Acceptance Settings page appears.
- Choose a profile. The General Settings page appears.
- Click Customer Response. The Customer Response page appears.
- Under the Custom Cancel Response Page heading, check Hosted by Bank of America.
- Click Save.
- To configure a custom cancel response page
- In the left navigation panel, choose Payment Configuration > Secure Acceptance Settings. The Secure Acceptance Settings page appears.
- Choose a profile. The General Settings page appears.
- Click Customer Response. The Customer Response page appears.
- Under the Custom Cancel Response Page heading, check Hosted by You.
- Enter the URL for your customer response page. Use port 80, 443, or 8080 in your URL.
Only port 443 should be used with a HTTPS URL. Parse the transaction results from the URL according to the reason code (), and redirect your customer to the appropriate response page. See Appendix A, "Reason Codes," of the Hosted Payments Page Integration Guide.
Activate/deactivate a profile
Activating or promoting a profile makes the profile available for use during checkout. Until the profile is completed and activated, it remains inactive, and you can make updates. If necessary, you can also deactivate an active profile.
You must complete the required settings described in each of these sections before you can activate a profile: