Merchant Services Account Reports
Description
What's in this article?
There are several ways for you to generate, view and export reports in Merchant Services, as well as create and manage report subscriptions. Some users may not have access to reports depending on their merchant entitlement within online banking. Reporting is based on authorization and authorization/capture requests only and are not related to batch settlement, funding, and/or fees.
Authorization reporting is available for 6 to 18 months depending upon the report. Transactions can be searched using default date ranges or custom date ranges up to a maximum of 3 months. Reports are available for 16 months past the last date represented in the report. For example, if a report covers January 1-31, the report is saved for 16 months after January 31.
Payment Batch Summary online report
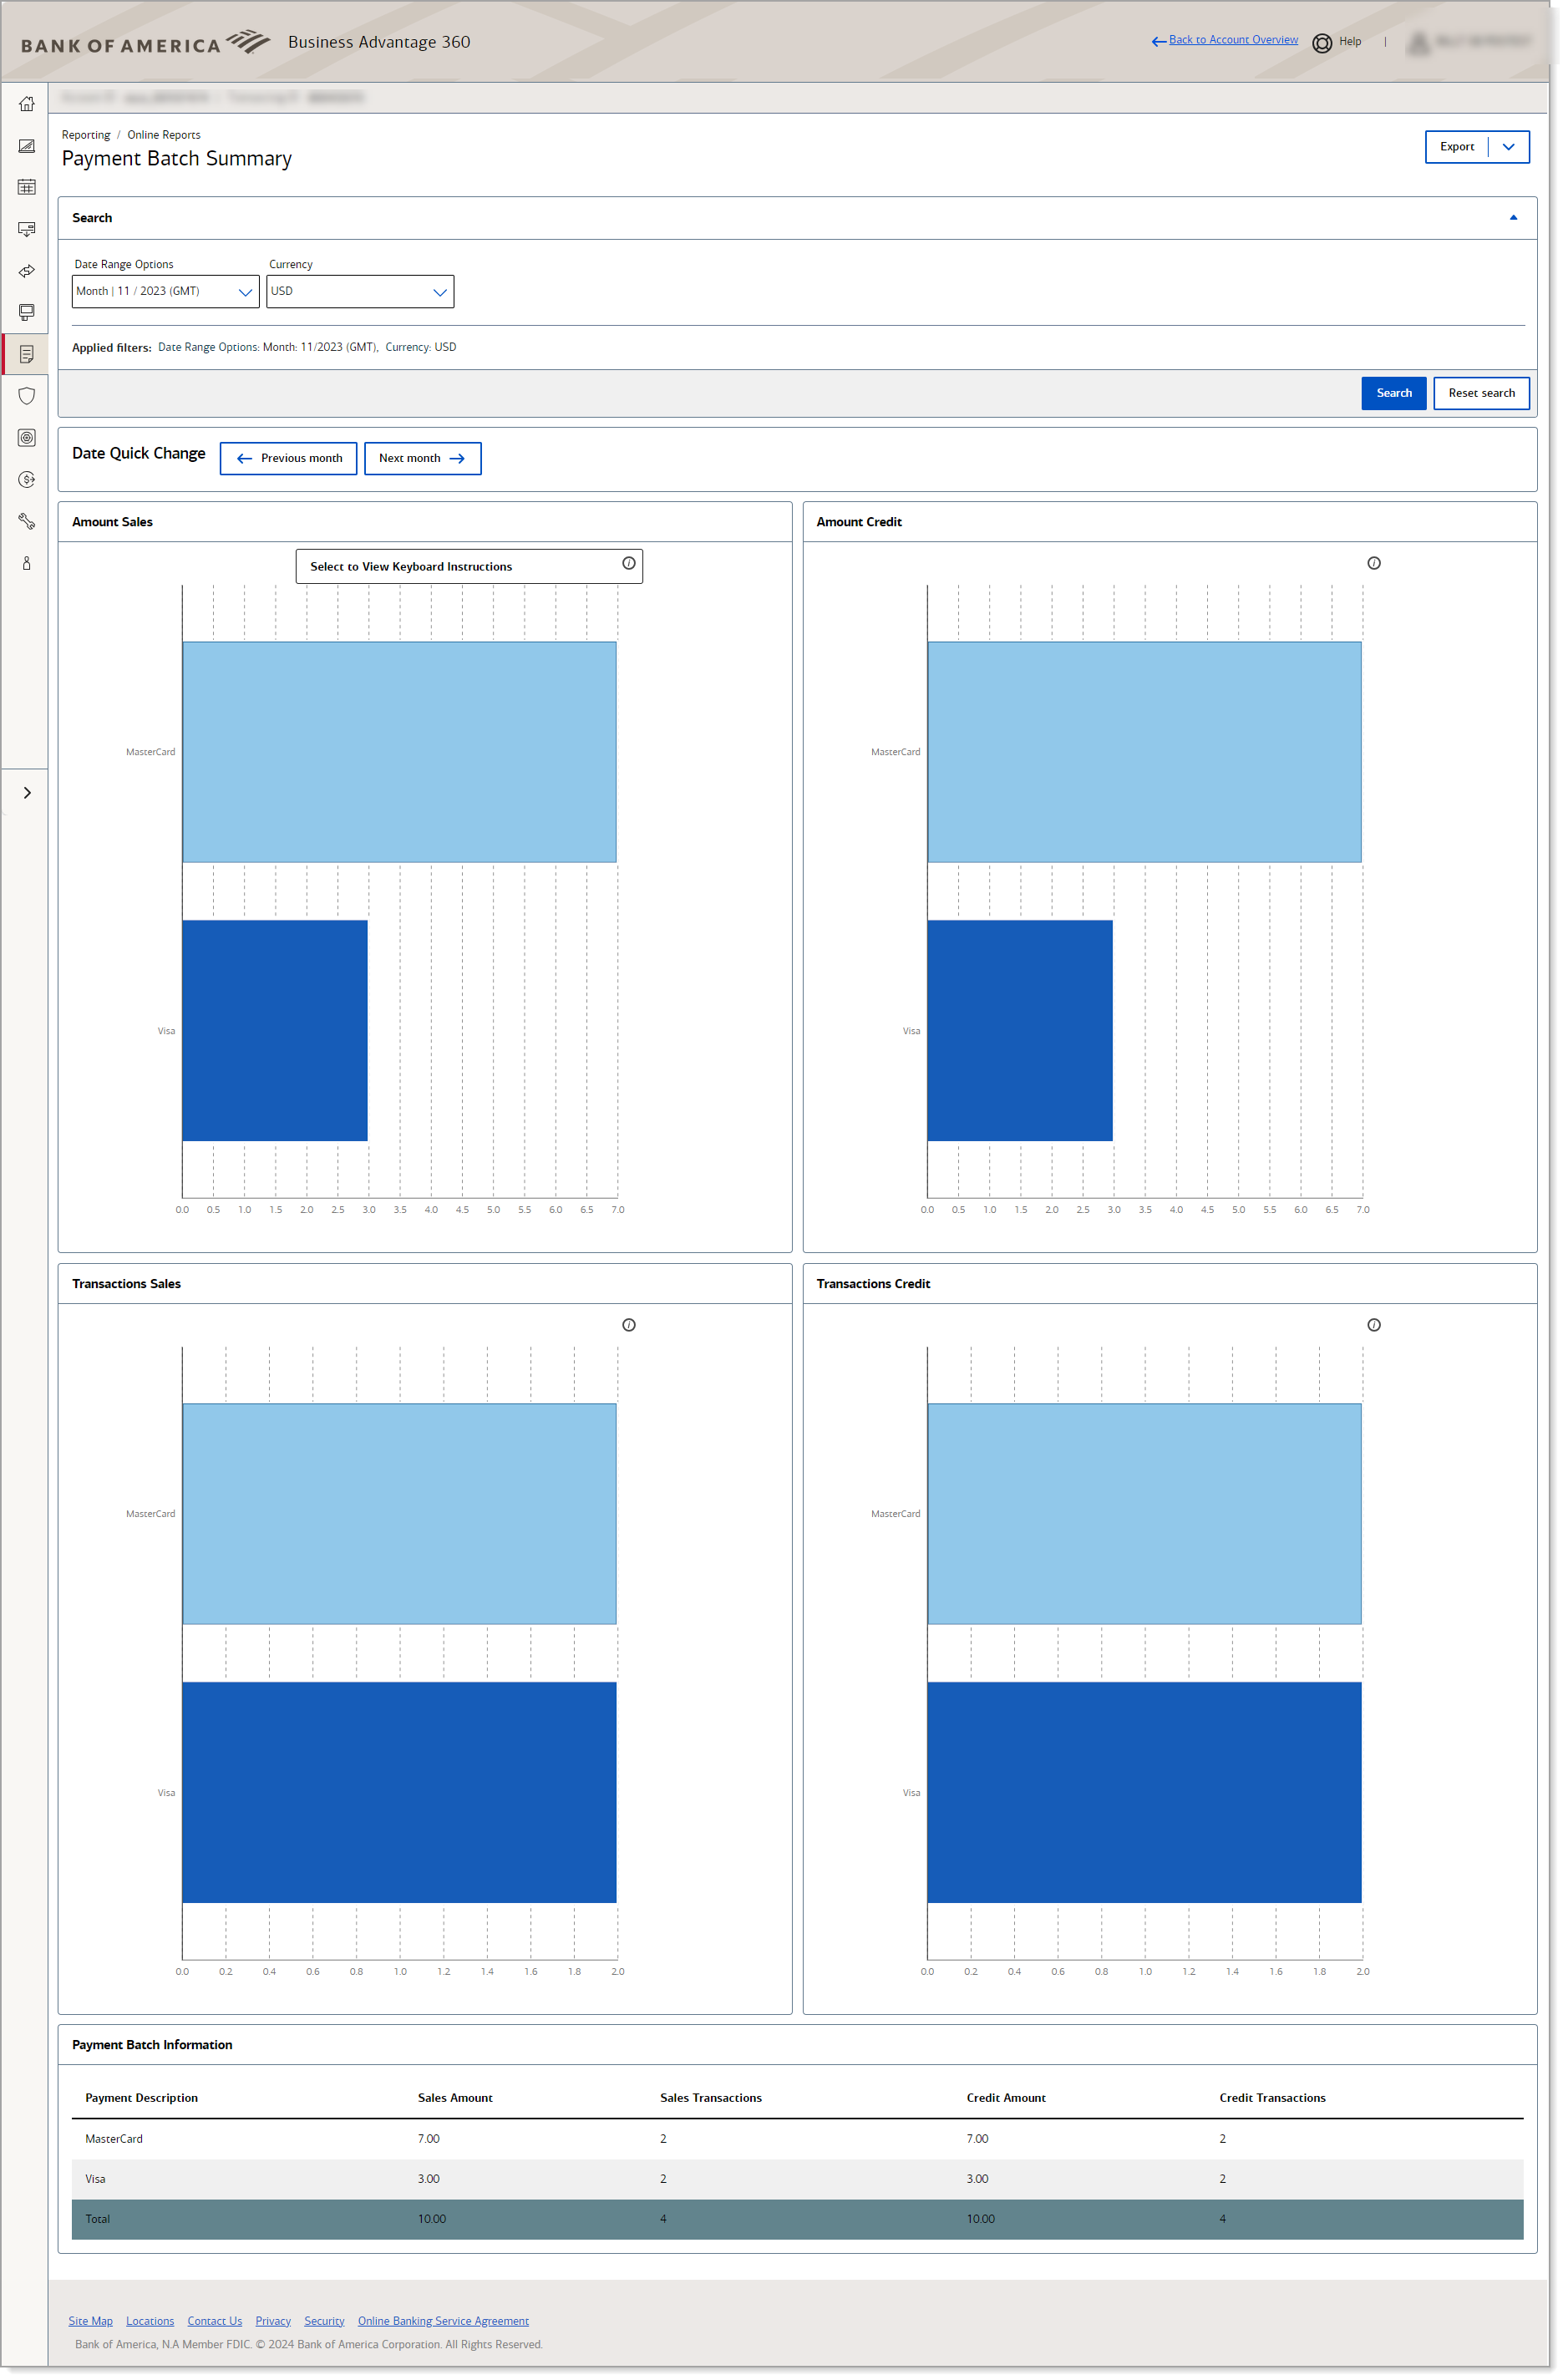
The Payment Batch Summary report shows total sales and refunds by currency and payment method. For record-level reporting, use the Downloadable Reports. By default, the report includes data for one day, but you can also choose to view by the week or month. If desired, you can export the data to either a .csv or .pdf file.
- To view the Payment Batch Summary report
- Log in to your Merchant Services account in Business Advantage 360 online banking.
- In the left navigation panel, click Reporting > Online Reports > Payment Batch Summary.
- In the Search toolbar, select the Date Range Options you want to include in the report. You can also use the Date Quick Change to look forward and back by the selected Date Range Option.
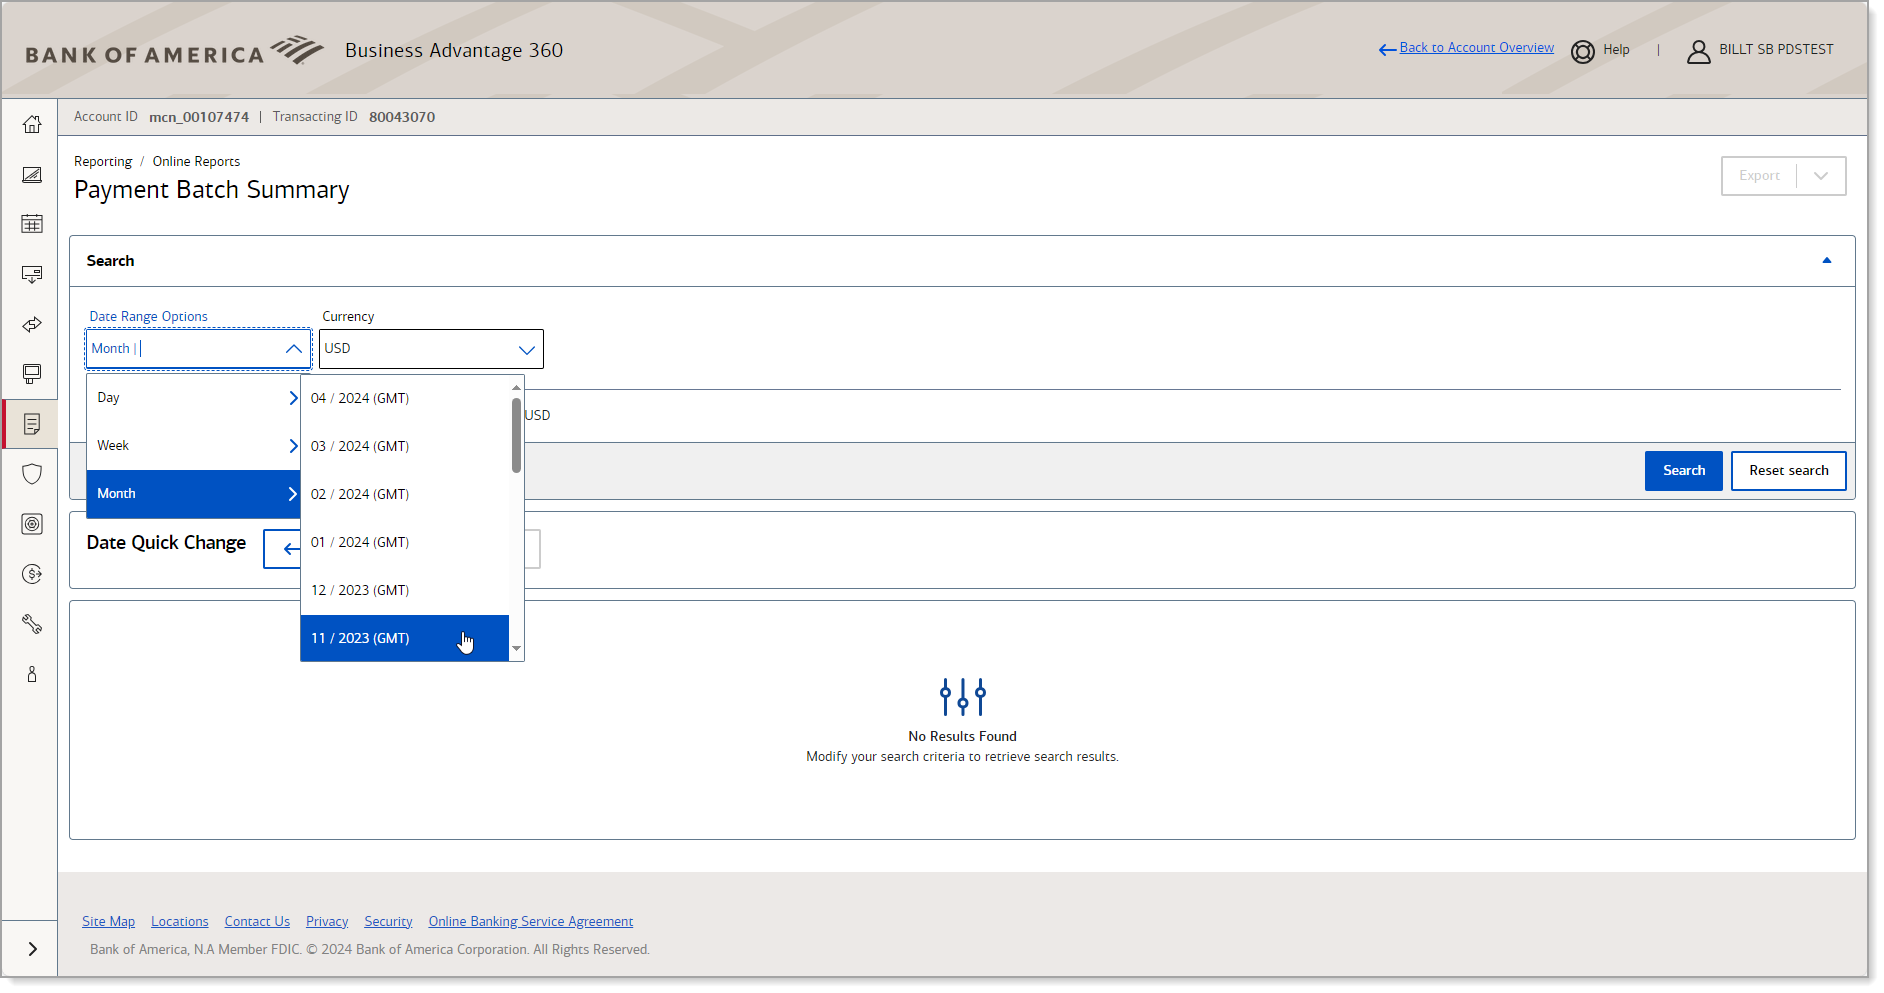
- (Optional) Select the currency of the transactions you want to include. Only USD is currently supported.
- (Portfolio users) Select the Merchant ID for whom you want to view data if applicable.
- Click Search to generate the report.
- To export report, in the left navigation select Export and choose an export format.
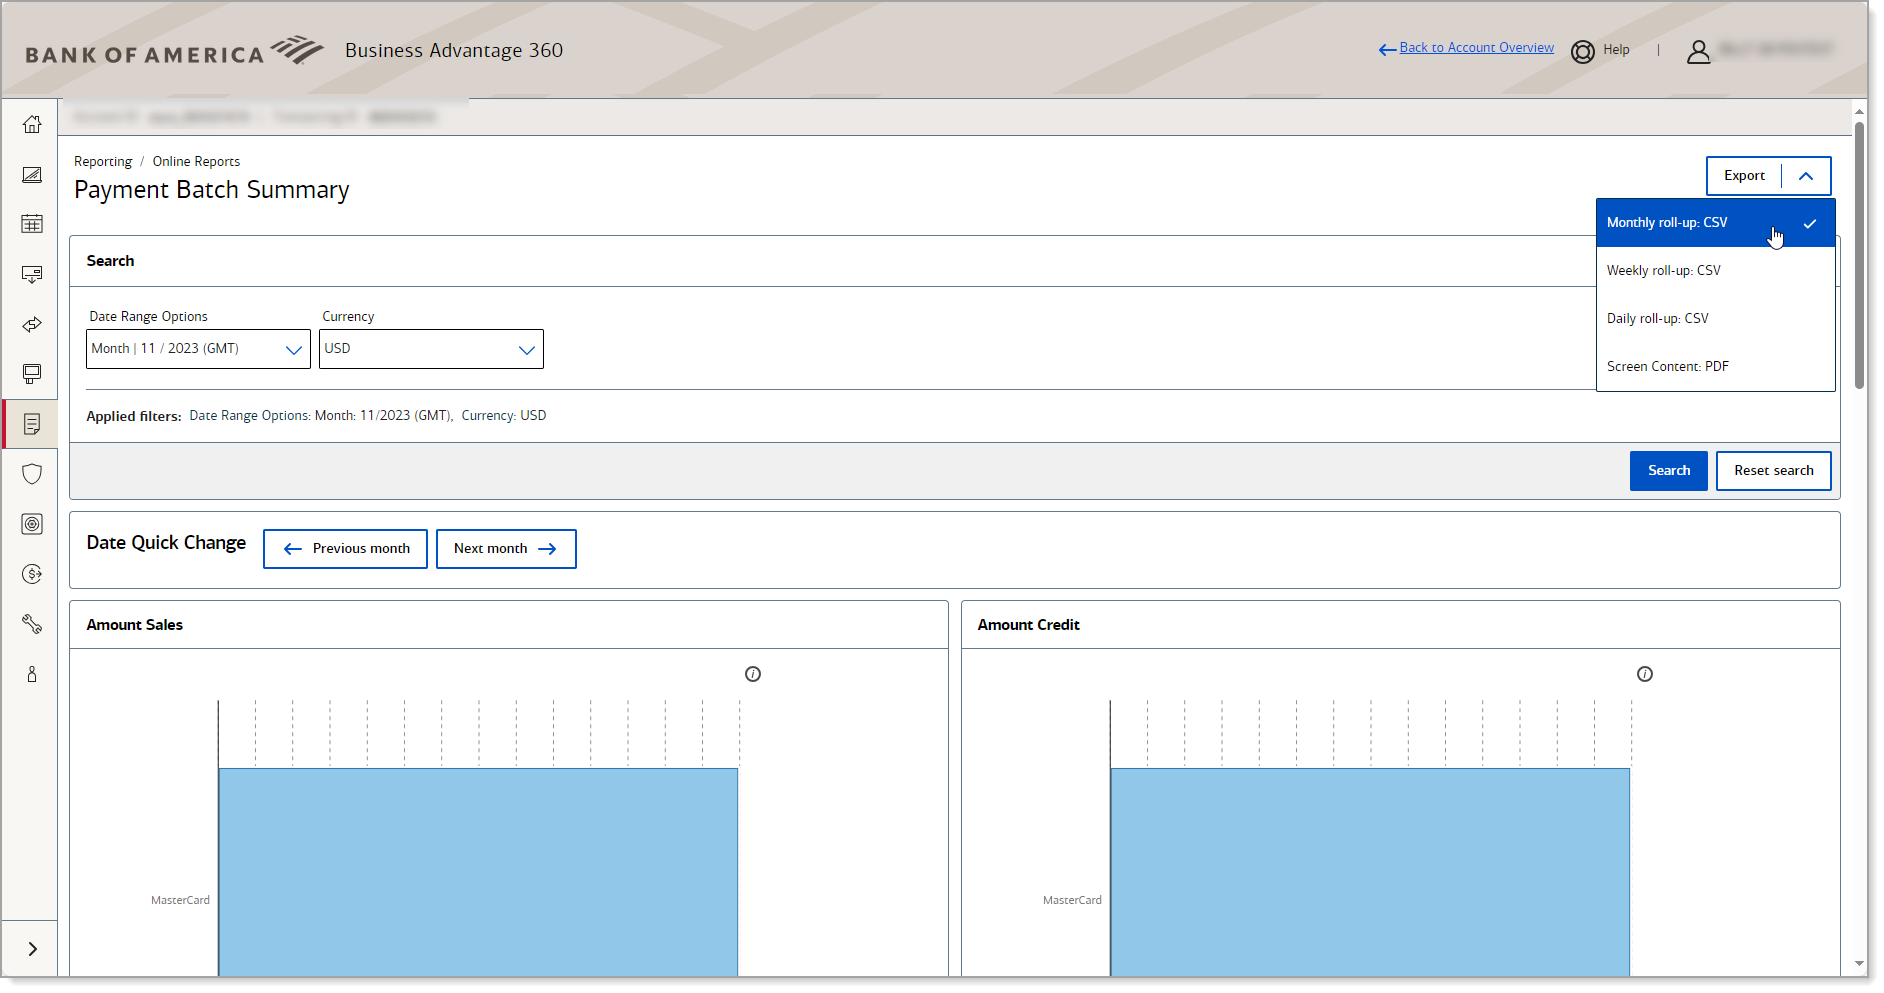
- Follow your browser’s instructions to open and save the file.
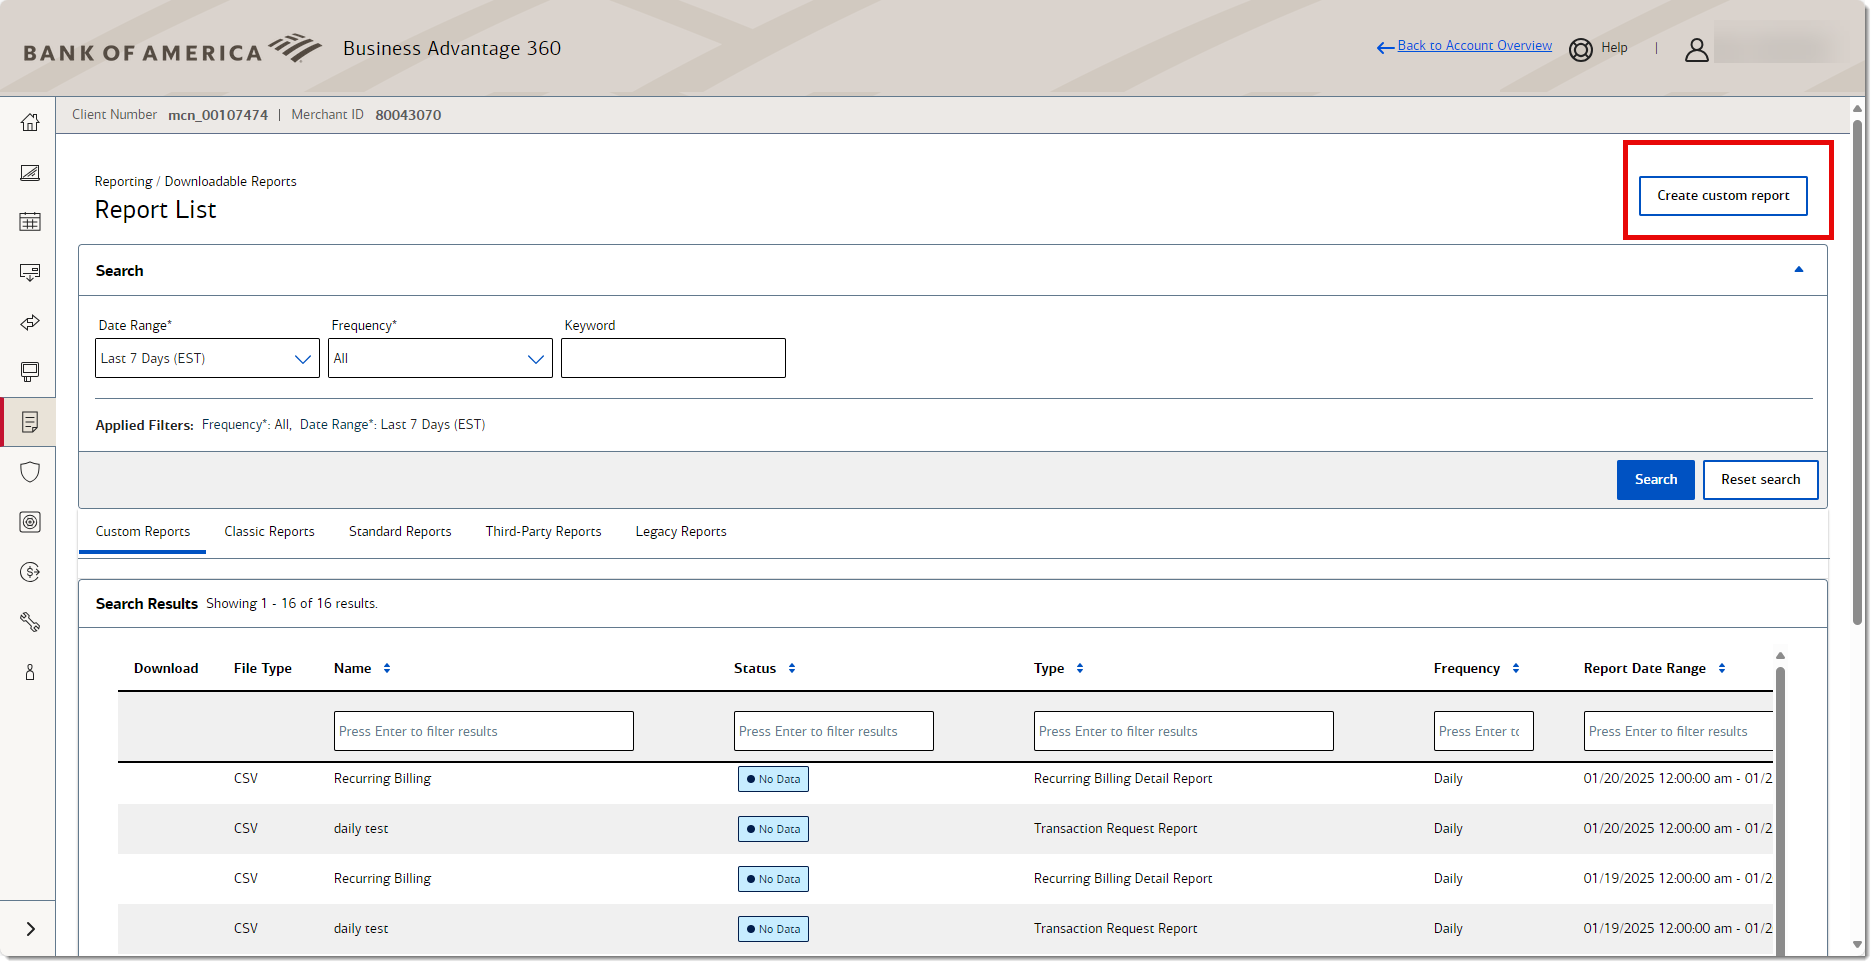
Downloadable reports list
Access downloadable reports from Reporting > Downloadable Reports > Reports List. You can use the Standard reports available to you, or create custom reports that fit your needs. There are several reporting options for you to access and download your transaction data:
- Standard reports — Track and reconcile your payment activity.
- Custom reports — Use building blocks to create reports for your specific needs.
- Specialized reports —Track and review how you use additional services such as Fraud Management, Account Updater, and Recurring Billing.
You can download any report after the report request is complete and your file becomes available. Daily recurring reports are available for download within six hours of the report start time. Weekly, monthly, and one-time reports might take longer than six hours to generate.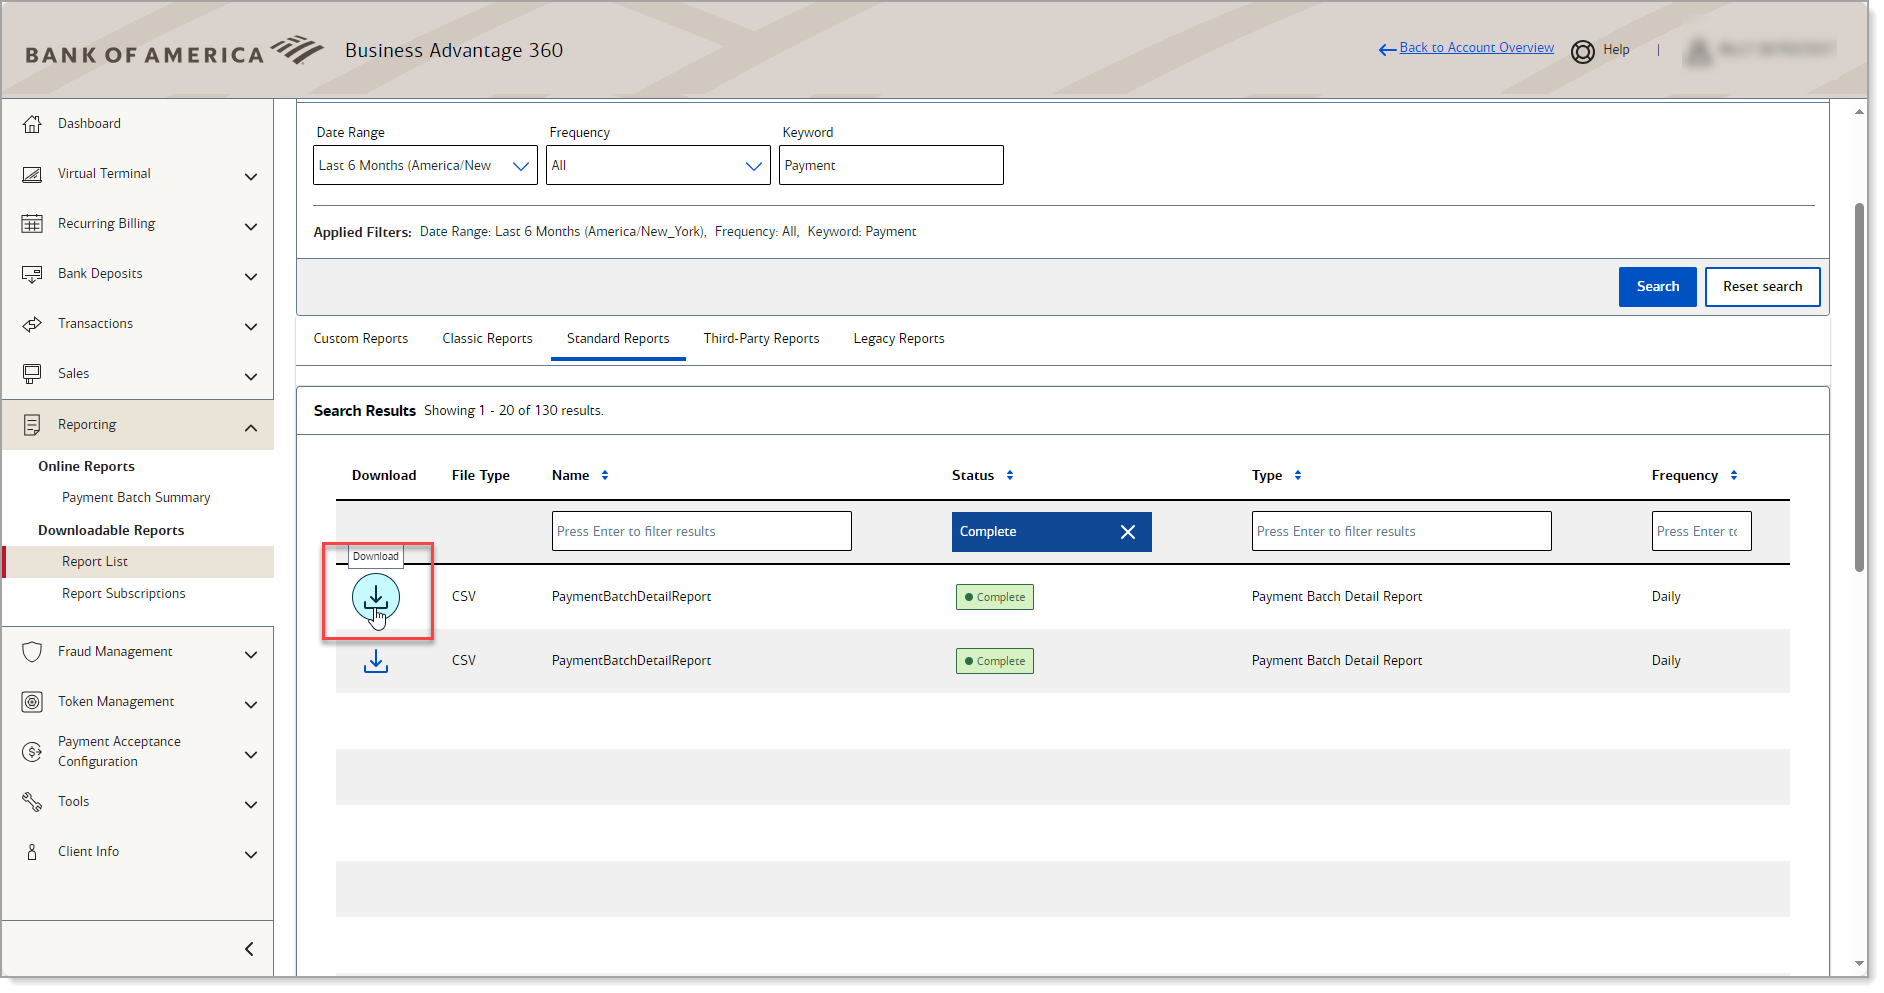
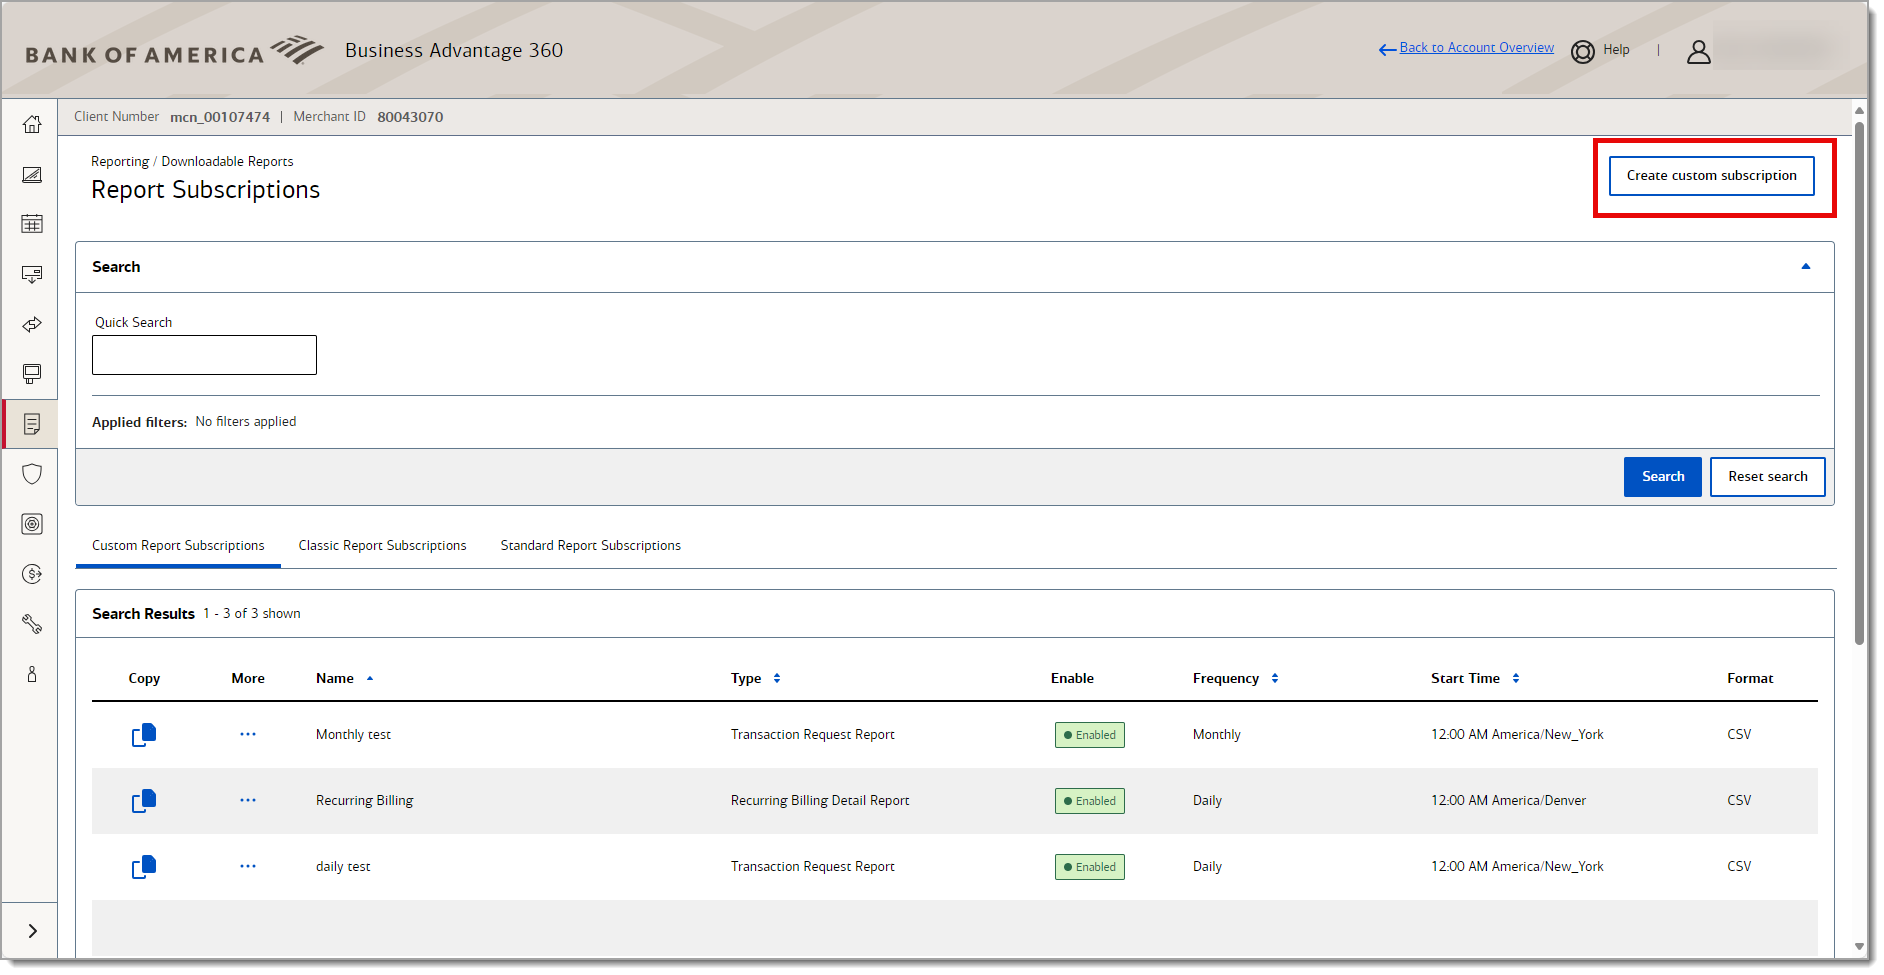
Create a custom report subscription
A report subscription is a template that describes the attributes of a report, including how often it runs and the period of time it spans. After your report subscription is generated, it is available for download on the Report List page. In addition to choosing from available fields, you can customize the following attributes of a recurring subscription:
A recurring daily report has an SLA of 6 hours. All other report generating timeframes will be based on length of report, time of day the report is run, etc. Up to twenty report subscriptions can be maintained at any given time. Three reports can be run at any given time
- To create a report subscription
- Log in to your Merchant Services account in Business Advantage 360 online banking.
- On the left navigation pane, select Reports > Downloadable Reports.
- Click Create custom report in top right corner.
NOTE: You may create also create a new subscription by selecting Reporting > Report Subscriptions and then clicking Create custom subscription in the top right corner instead.
- (Partners/Account Level Users Only) Under Account Setup, select whether to base the report on data from a specific merchant, or a group of merchants, and then choose an available value in the Merchants or Groups list. To create a report that includes all merchants or groups, use the default value.
- In the Basic Report Setup section, enter the following:
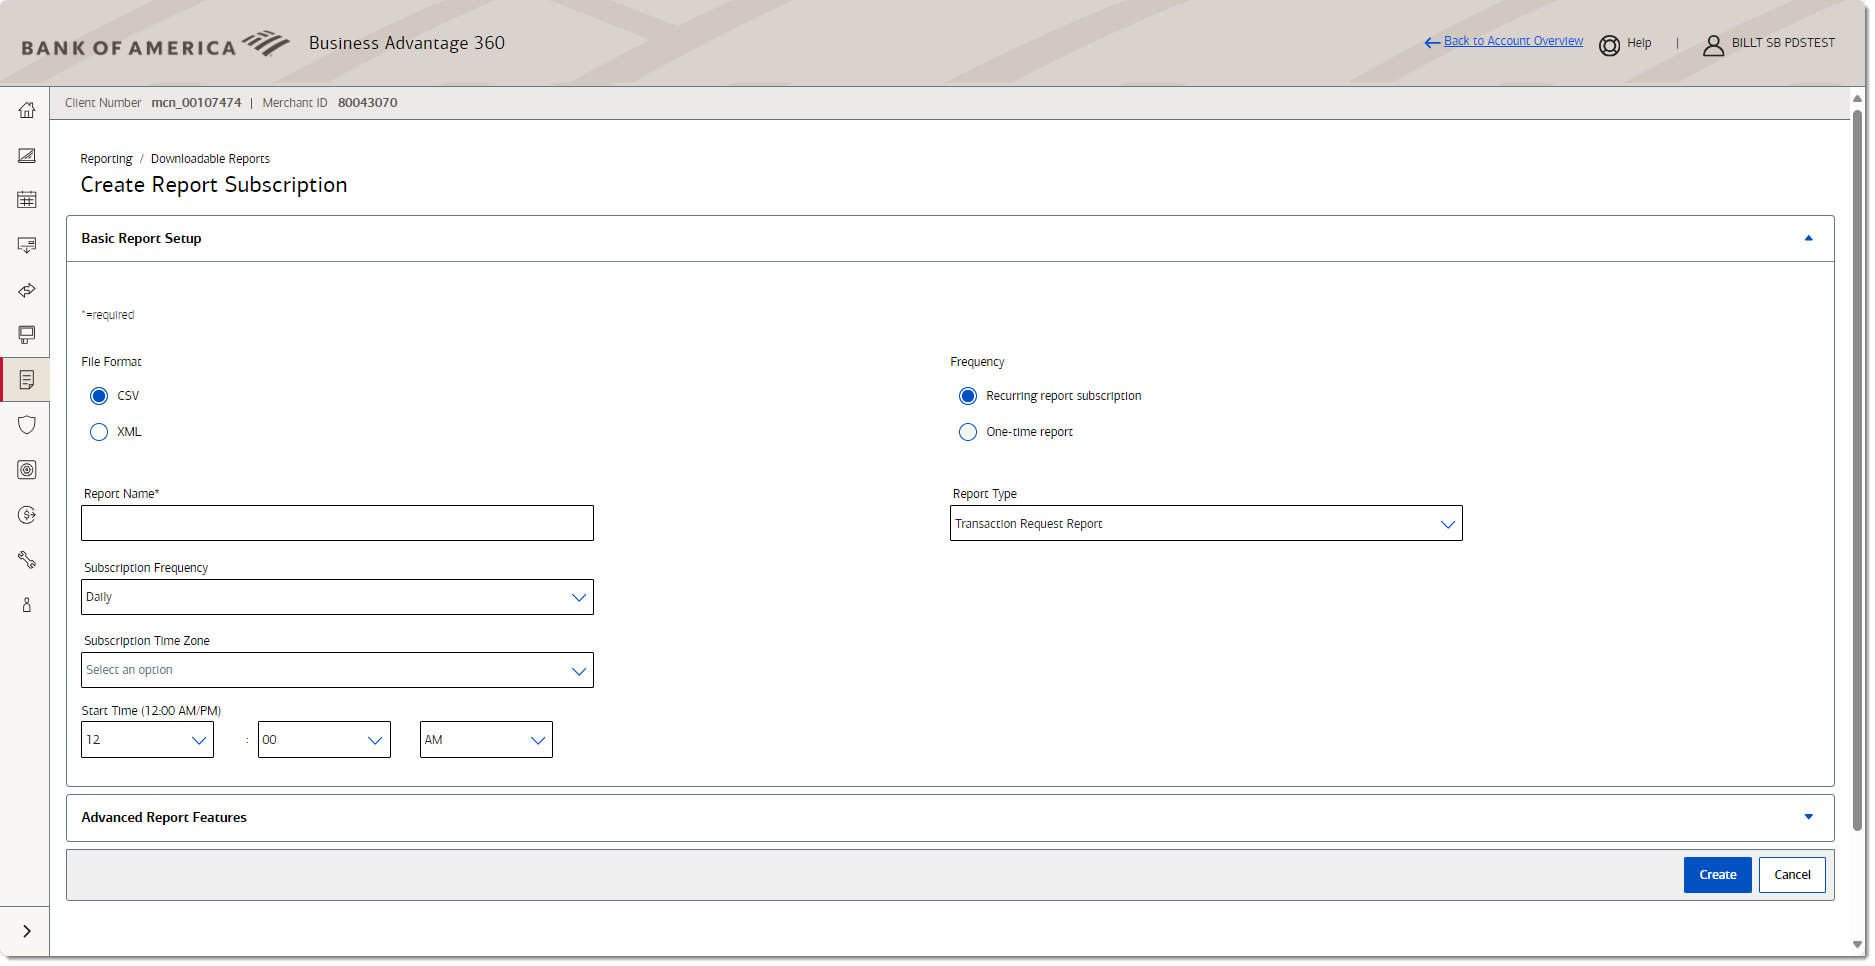
table showing options and their descriptions Option Description File Format The format of the generated report: either .xml or .csv Frequency Choose whether to create a recurring report that runs at the specified Subscription Frequency or to create a one-time report. The available fields below will change based on this selection.
Recurring reports generate moving forward while one-time reports can be created to pull historical data (up to a one-month period).Report Name Required. A unique name for the report. The name cannot be changed once the report is created. Report Type The type of report. The type cannot change after the report is created. Choose a report type from the dropdown list. Report options include:
- Transaction Request
- Transaction Exception Detail
- Processor Events Detail
- Tax Detail
- Recurring Billing Detail
- Network Token Life Cycle ManagementSubscription Frequency If the report is recurring, select how often the report should run: one-time, daily, weekly, or monthly. Start Date If the report is a one-time report, select the date to begin running the report. Start Time Select a time to begin running the report. Subscription Time Zone Select the time zone for the report start time. End Date If the report is one-time, select the end date for the reporting period. - To change any of the default fields included in your report, expand Advanced Report Features section, and then perform one or more of the following actions (available actions are based on the services you use):
table showing options and their descriptions Option Description Credit Amounts Select Display credit amounts as a negative if you want credits to appear as negative amounts (for example: -1390.00). Naming Convention Select how you want the field names to appear in the report:
SOAPI displays most field names in camel case (for example: FirstName)
SCMP displays most field names with underscores (for example: first_name).Application Select one or more types of applications you want to include in the report. Leave blank to include all types. Connection Method Select one or more connection methods to use. Report Fields Customize the fields:
Reorder fields by clicking the up or down arrows or the Order dropdown list.
Select the Remove icon to remove the field.
Click Add report fields at bottom of the list to select additional fields to add to the report. Select the desired fields and then scroll down and click Save at the bottom of the page.
Enter text matching a field name you want to find in the Search field, You can select select all or add or remove fields to display in your report by checking the box to add a field or unchecking the box to remove a field. Click Save when desired fields are selected. - When you are done, click Create. The Manage Report Subscription page appears, and the new subscription appears in the Custom Reports Subscriptions List.