POS Bridge Solution for Oracle Simphony Pay at Table Transactions (Beta)
Description
What's in this article?
Bank of America's POS Bridge is middleware that can reside on the Portable A920 payment terminal to connect an Oracle Simphony POS workstation to the A920 so payments can be processed on the Bank of America platform.
Payment terminals using POS Bridge are shipped preloaded and ready to use for Pay at Counter transactions. To enable Pay at Table transactions, additional configurations and credentials must be set for the terminal. Contact us for assistance.
Set up Pay at Table
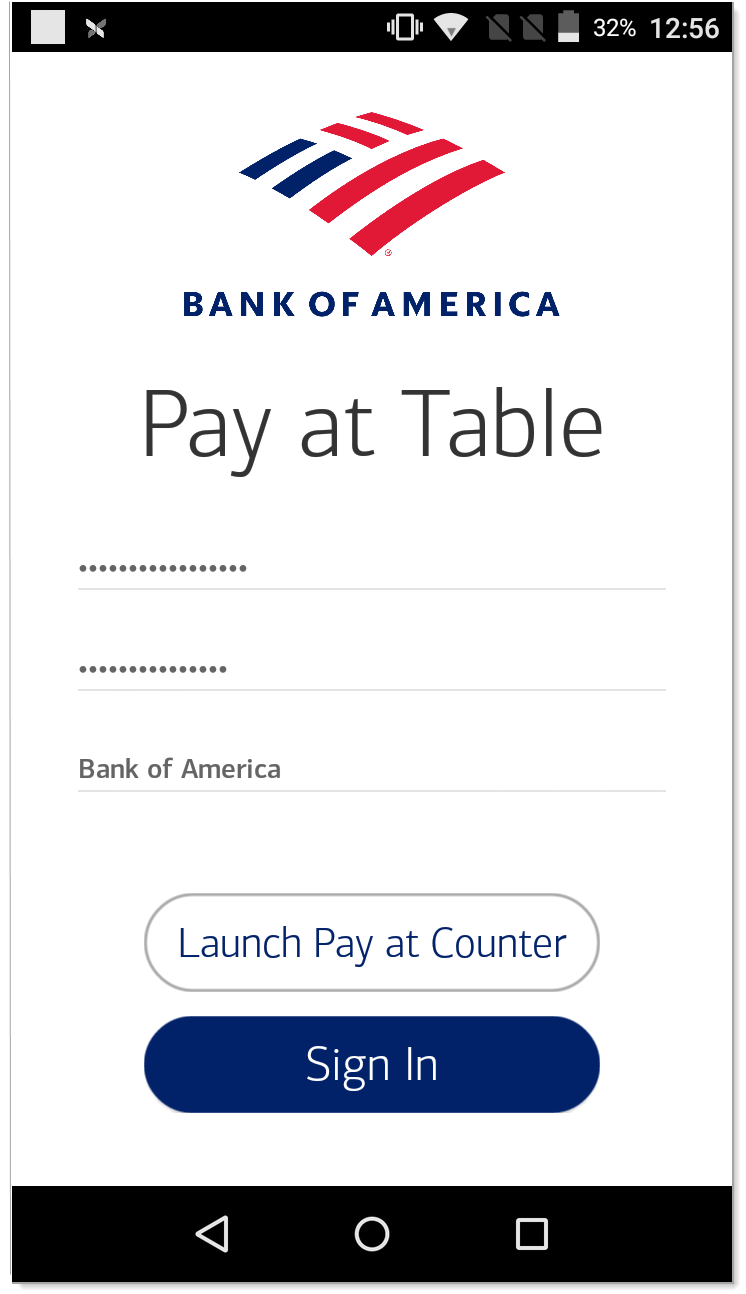
Initial sign-in to POS Bridge must be completed before being able to take payments using Pay at Table. After configurations have been set and credentials have been pushed to your terminal, tap Sign In.
NOTE:
Sign-in for Pay at Table expires upon 28 days of inactivity. If your sign-in expires, contact us for assistance.
Launch Pay at Table
- To launch Pay at Table
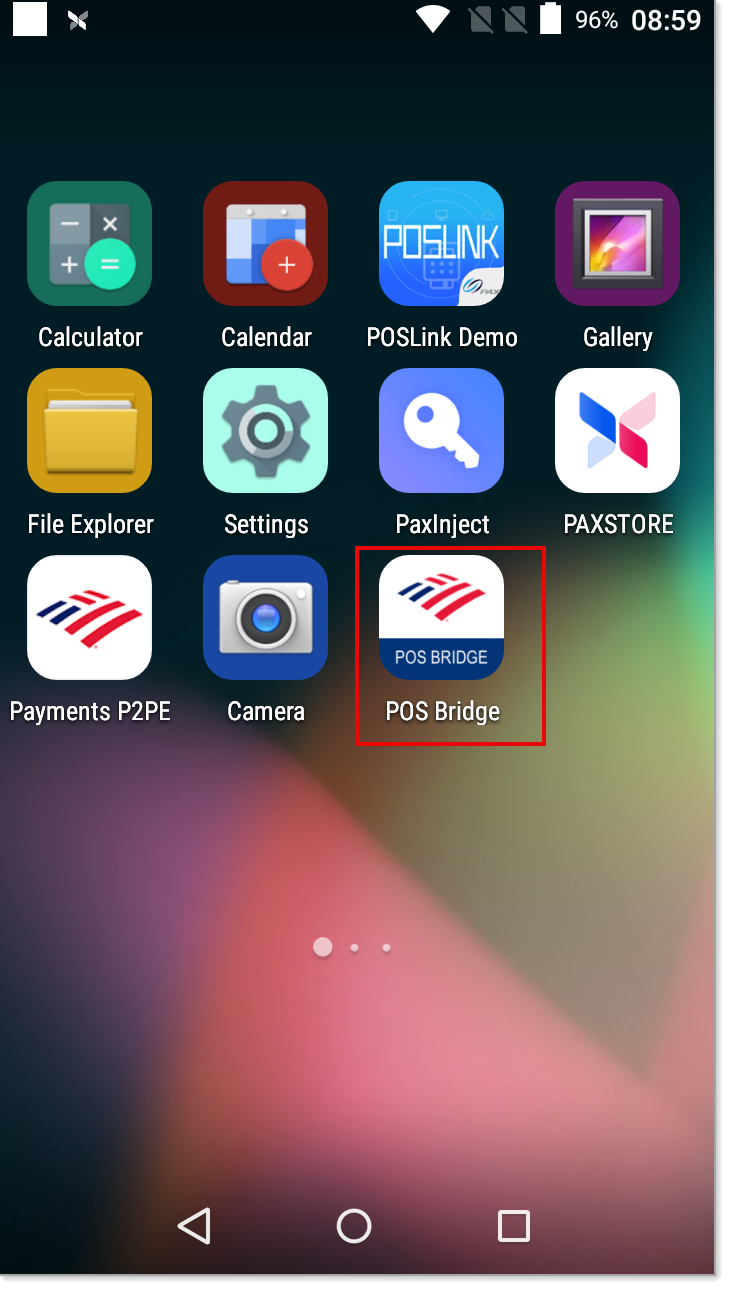
- Tap the POS Bridge app.
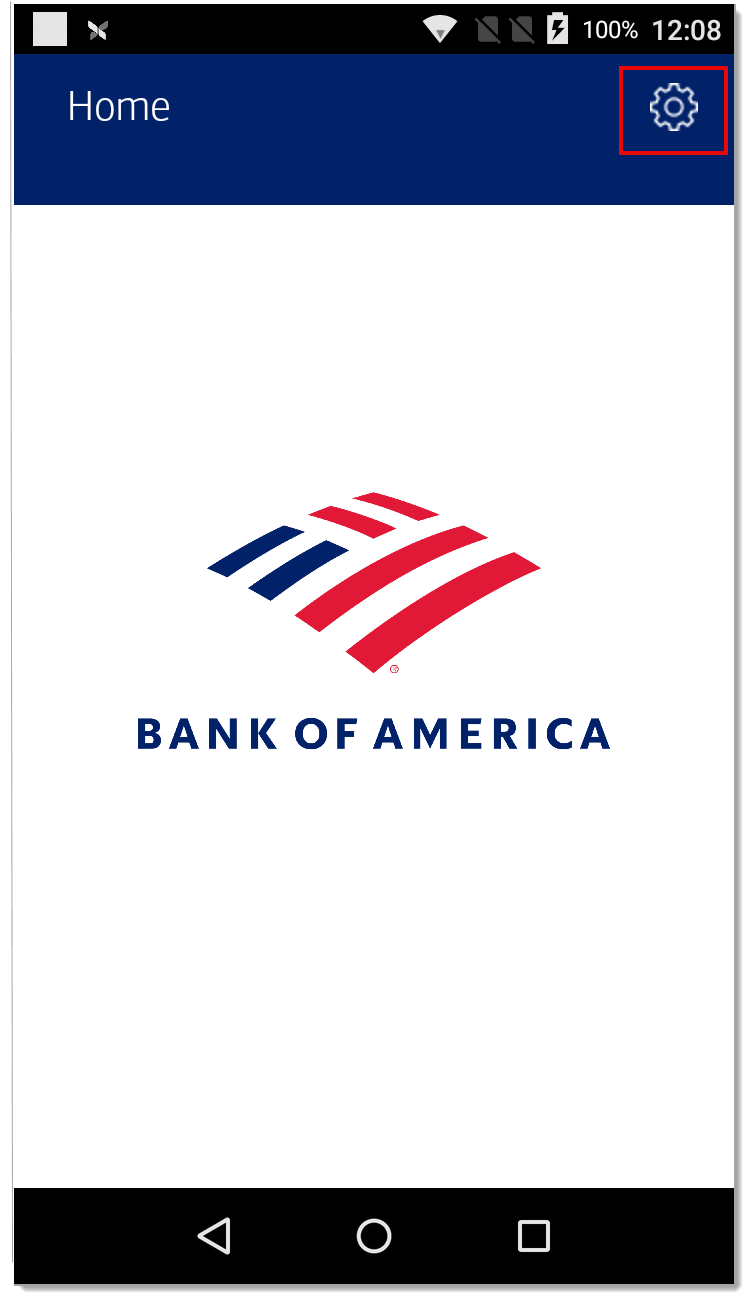
- On the Home screen, tap the Settings icon in the upper right corner.
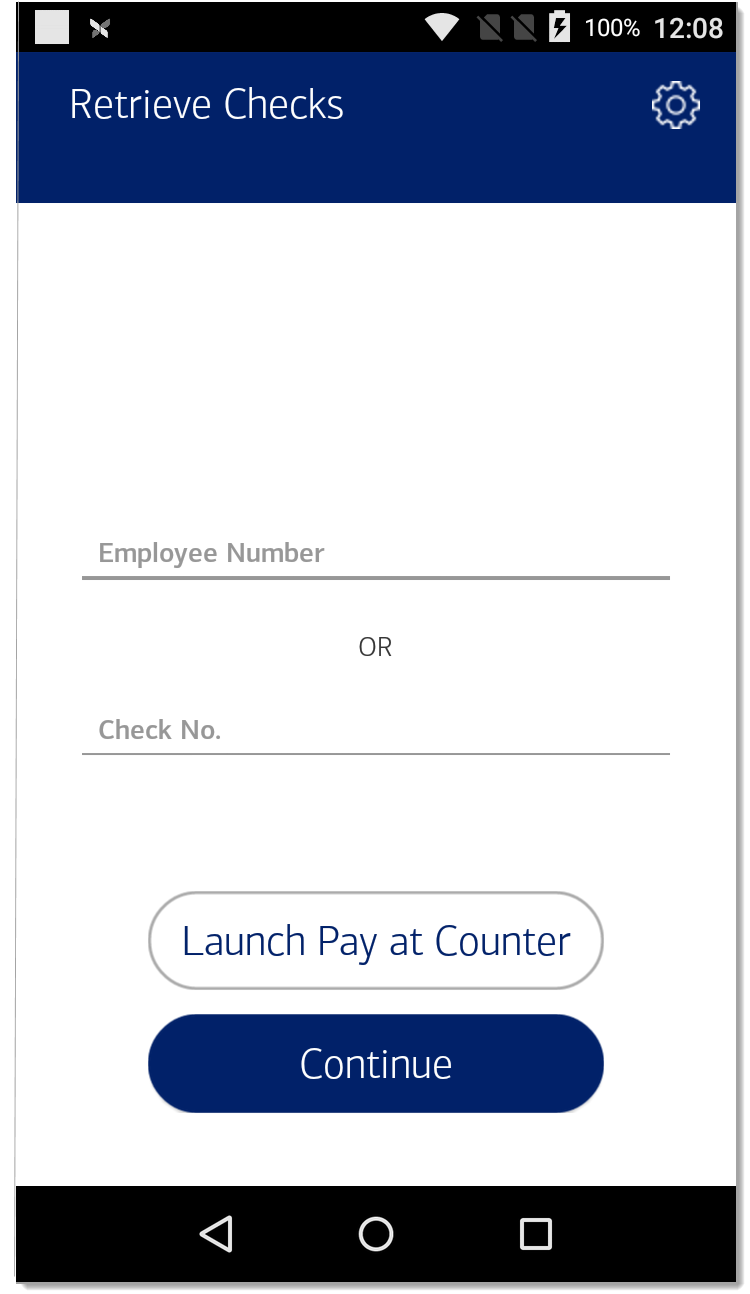
- Select Launch Pay at Table. POS Bridge displays the Retrieve Checks screen where you can search for a list of open checks by entering an employee number, or you can search for a specific check by entering the check number.
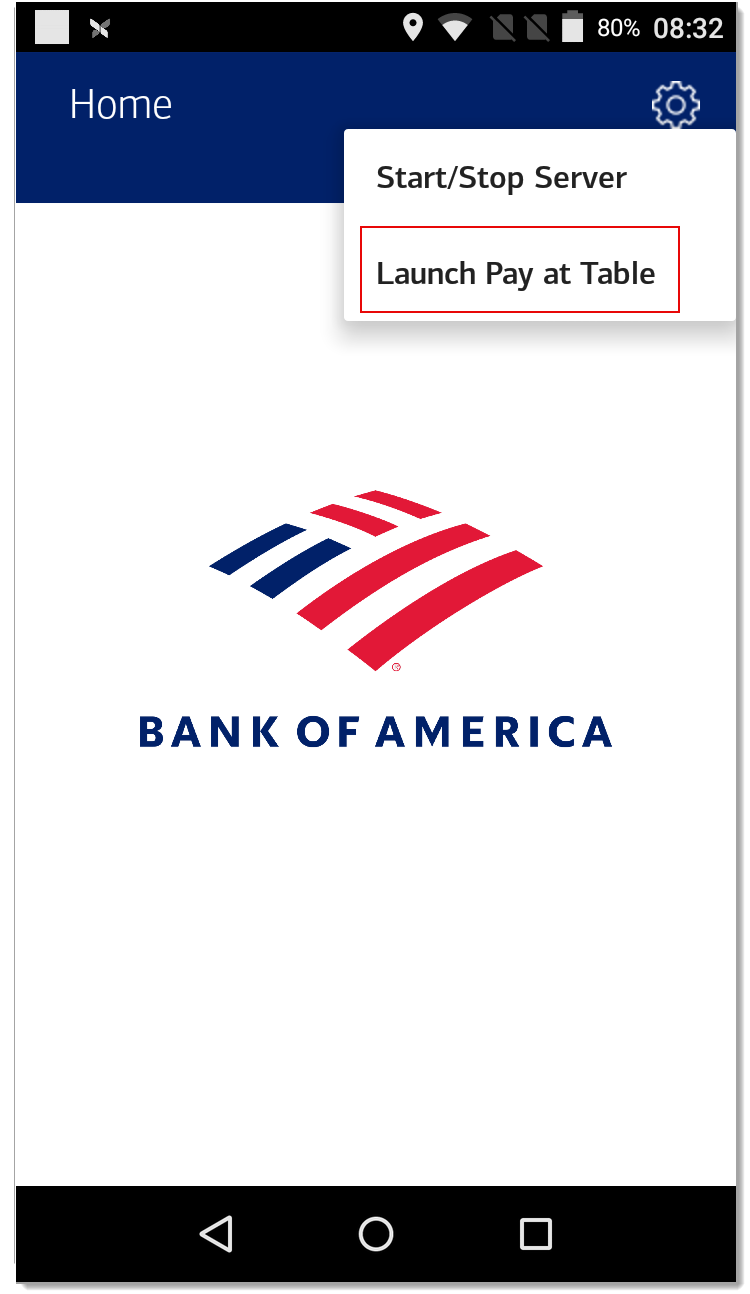
NOTE: After sixty seconds of inactivity, POS Bridge returns to the Home screen where you will have to re-launch Pay at Table from the Settings menu.
- Tap the POS Bridge app.
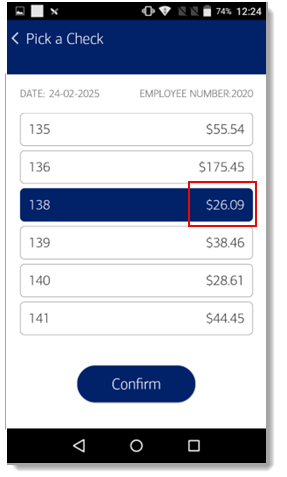
Retrieve a check
You can retrieve a list of open checks under an employee number or search for a specific check using the check number.
- To retrieve a list of open checks
- Launch Pay at Table.
- On the Retrieve Checks screen, enter an Employee Number and tap Continue.
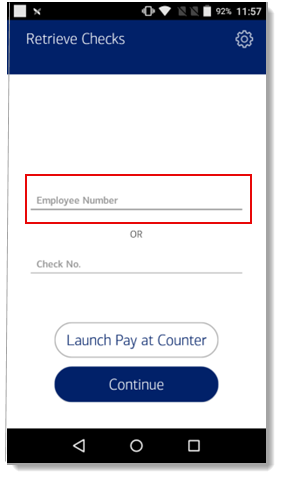
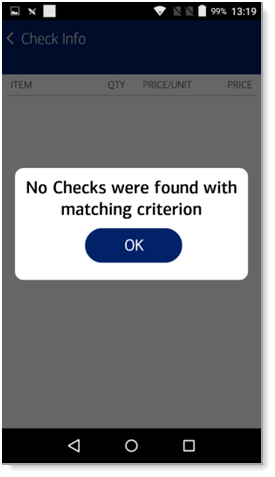
NOTE: If you know the specific check number you wish to retrieve, enter the check number. If either the employee number or check number is entered incorrectly, an error message displays. The below error message is specific to entering an incorrect employee number.

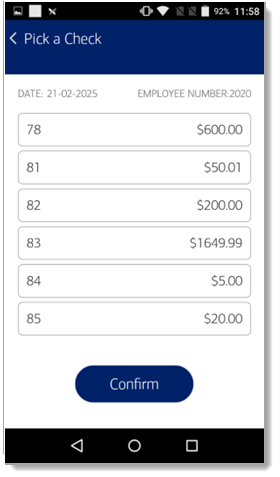
- The Pick a Check screen displays a list of open checks under an employee number.
- To retrieve a specific open check
- Launch Pay at Table.
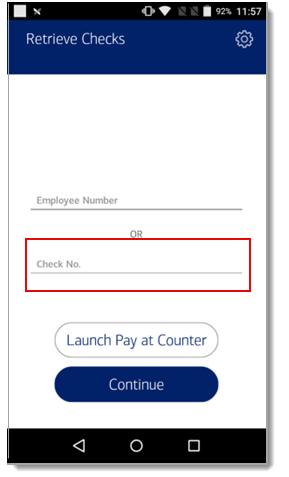
- On the Retrieve Checks screen, enter the check number in the Check No. field, then tap Continue.
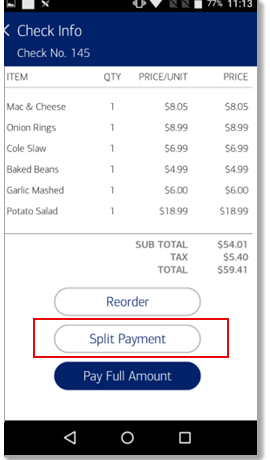
The check information displays.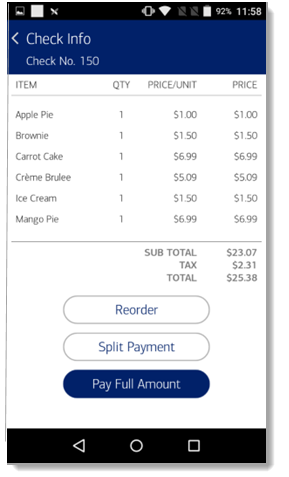
NOTE: If the check number is entered incorrectly, an error message displays.
Complete a sale
Magnetic stripe, chip and contactless (tap) transactions are supported.
To complete a sale
- Retrieve a check.
- Tap Pay Full Amount.
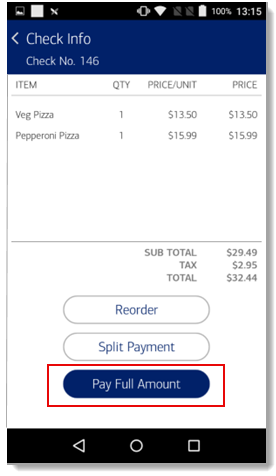
NOTE: If requested, tap Split Payment and follow the prompts.
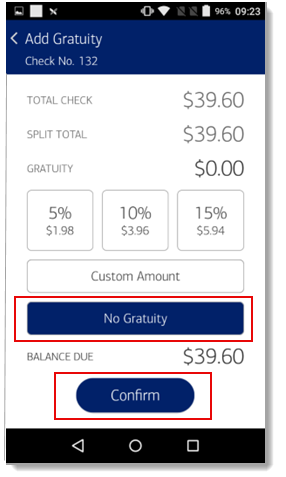
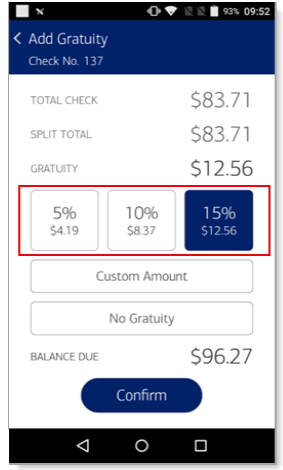
- Select the desired tip option (preset, custom, or no gratuity), then tap Confirm.
NOTE: By default, a preset tip option is selected.
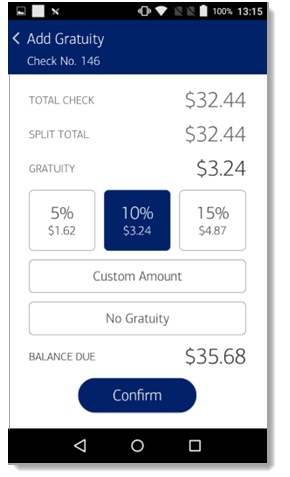
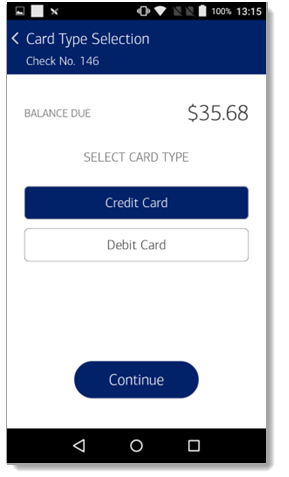
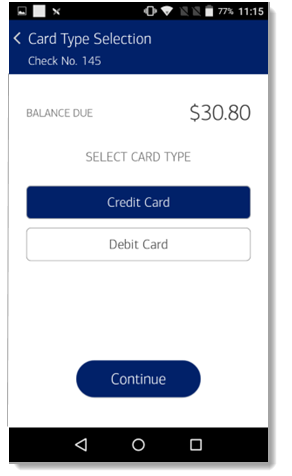
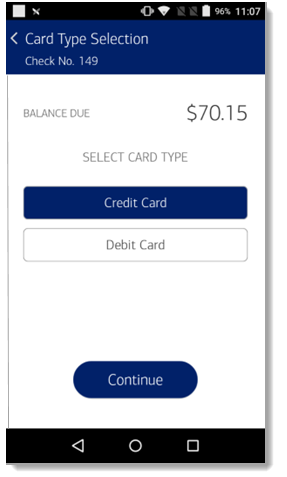
- Tap the card type, then tap Continue.
NOTE: If a tip was not already added, a tip prompt will appear again.
- To add a tip, enter the tip amount and tap Confirm.
- To skip tipping, tap Confirm to progress to the next screen. - Swipe, insert or tap the card. The terminal displays a message stating that the transaction is processing:

NOTE: If debit was selected as the card option, the terminal will prompt for a PIN. Instruct the cardholder to enter the PIN and tap Confirm.
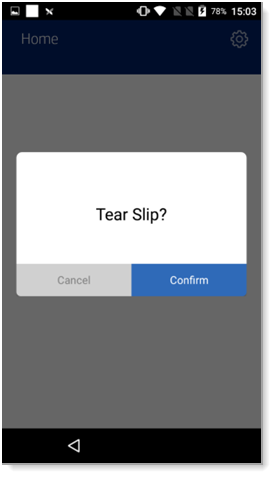
- Your payment terminal will first print a merchant copy. Tear off the merchant receipt and tap Confirm to print the customer copy; otherwise, if the customer does not want a copy, tap Cancel.

- If a chip card was inserted, a "Please Remove Card" prompt displays.

The transaction result displays: "Transaction Success" or "Payment Declined".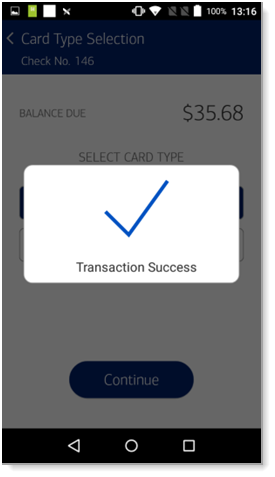
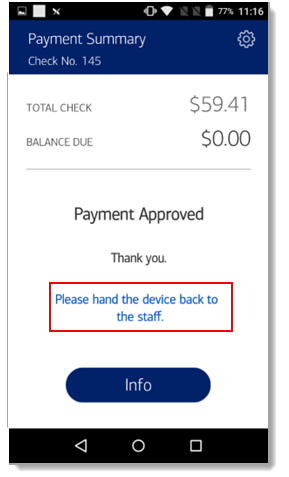
The Payment Status screen displays the message: "Payment posted successfully".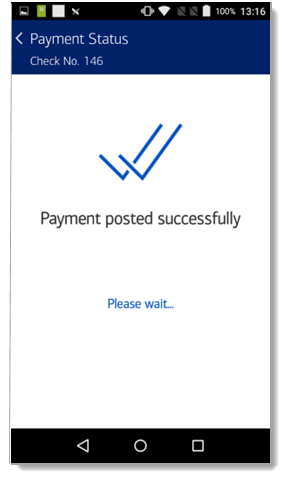
The Payment Summary screen displays a payment approval message and instructs the customer to return the device to the staff.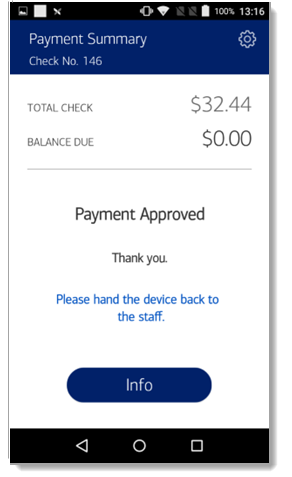
The transaction will complete by returning to the Retrieve Checks screen. - (Optional) Tap Info to view additional transaction information before the terminal returns to the Retrieve Checks Screen.

- (Optional) Tap Back to return to the Payment Summary screen.
Split payment
Pay at Table allows for splitting payments equally among seats, or by amount.
- To split payment
- Retrieve a check.
- Tap Split Payment.
- Choose to split the payment equally among seats or by amount.
- To split payment equally among seats
Tap the Seats tab and enter the number of seats in the Enter Seats to split field, then tap Confirm Seats.
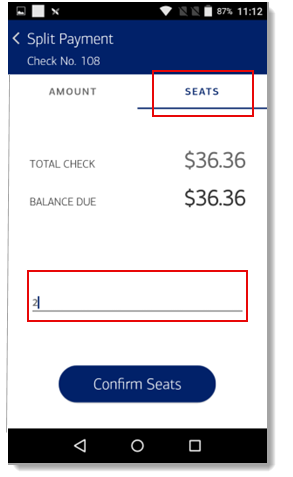
NOTE: The default number of seats for splitting a check is set at a maximum of 10 seats and for a minimum amount of $10.01 per seat. If you enter more seats than the default of 10 and the amount per seat goes below $10.01, a notification will appear.

- To split payment by individual guest amount
Tap the Amount tab and enter the amount in the Enter amount to split field, then tap Confirm Amount.
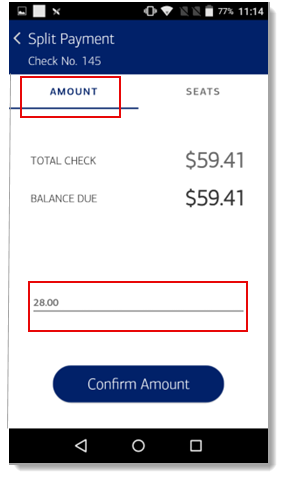
NOTE: Each split amount must be equal to or higher than $10.01 per guest. If the amount of any guest split falls below $10.01 a notification message will appear. If you would like to configure a higher split amount, please contact us.
Example: For a $100 check split between 10 seats, you can split the check between the first 9 seats at $10.01, however, the 10th seat amount will be $9.91, which will produce a notification for that seat.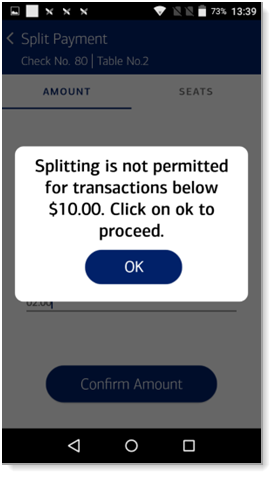
The Add Gratuity screen appears for the first time.NOTE: By default, a preset tip option is selected.
- To split payment equally among seats
- Select the desired tipping option (pre-set, custom amount or no gratuity), then tap Confirm.
- Tap the card type, then tap Continue.
NOTE: If no gratuity was selected, a tip prompt will appear again.
- To add a tip, enter the tip amount and tap Confirm.
- To skip tipping, tap Confirm to progress to the next screen. - Swipe, insert or tap the first guest's payment card.
NOTE: If debit was selected as the card option, the terminal will prompt for a PIN. Instruct the cardholder to enter the PIN and tap Confirm.
The terminal displays a message stating that the transaction is processing.
- Your payment terminal will first print a merchant copy. Tear off the merchant receipt and tap Confirm to print the customer copy; otherwise, if the customer does not want a copy, tap Cancel.

- If a chip card was inserted, the "Please Remove Card" prompt displays.

The transaction result displays: "Transaction Success" or "Payment Declined".
The Payment Status screen displays the message: "Payment posted successfully".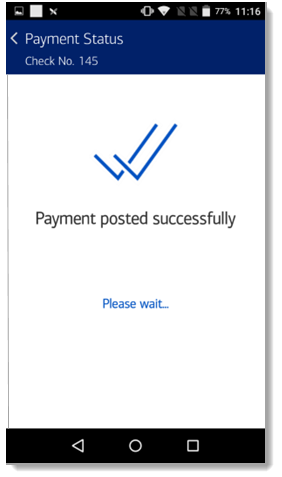
The Payment Summary screen displays a payment approval message and instructs for the device to be handed to the next guest with the remaining balance.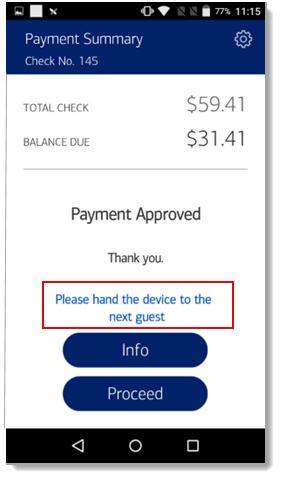
- Tap Proceed to start the process for the next, and any remaining, guests. The Payment Summary screen will show a zero "$0.00" balance due and a message instructing the customer to return the device to the staff.
Tipping
Several tipping methods are supported, such as: preset percentage, custom tipping by dollar amount, and custom tipping by percentage. A no gratuity option is also available.
- To skip or add a tip
- Retrieve a check.
- Follow steps to Complete a sale and at the Add Gratuity screen, select a tipping method:
- To skip tipping
Tap No Gratuity, then tap Confirm.
- To add a tip using a preset percentage
Tap the desired preset percentage, then tap Confirm.
NOTE: By default, a preset tip option is selected. The default preset percentages are to 15%, 18% and 20%. If you would like to set your own specific percentages, contact us.
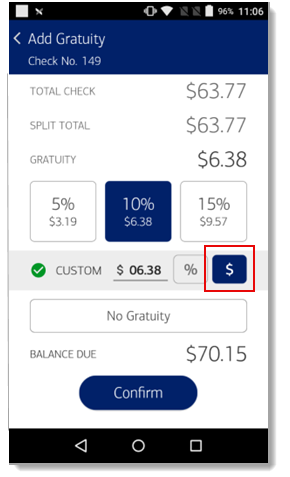
- To add a tip using a custom amount
Tap Custom Amount and choose to tip using either a custom dollar amount or a custom percentage amount.
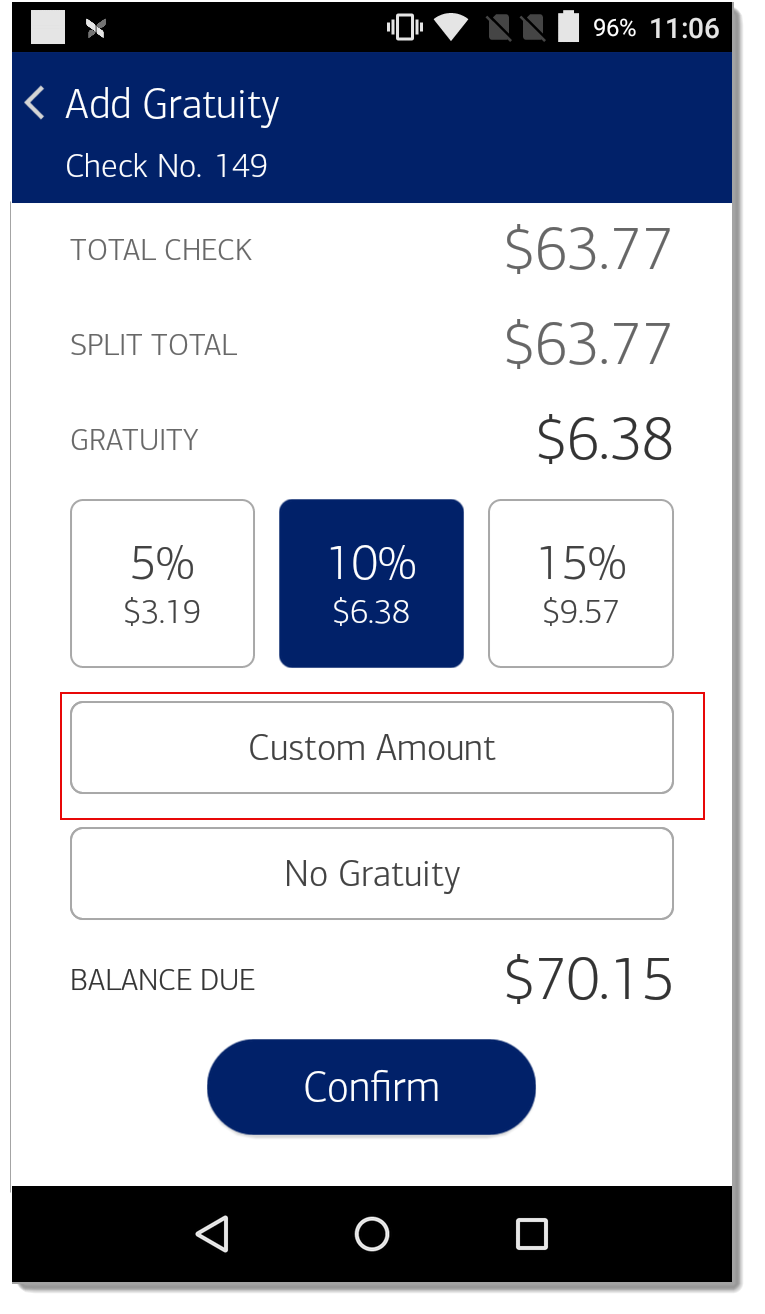
- To tip using a custom dollar amount
Tap $ and enter the gratuity dollar amount, then tap Confirm.
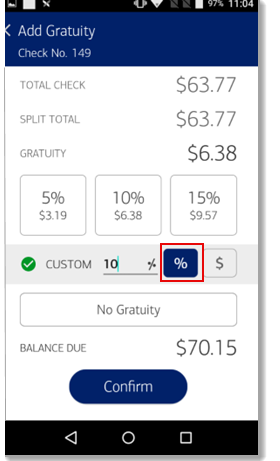
- To tip using a custom percentage amount
Tap % and enter the gratuity percentage, then tap Confirm.
- To tip using a custom dollar amount
- To skip tipping
- Tap the card type, then tap Continue.
- Complete the steps to Complete a sale.
Reorder
Pay at Table supports reordering items on an open check. Removal of items from an open check is only supported at the Simphony POS level.
- To reorder items on a check
- Retrieve a check.
- Tap Reorder.
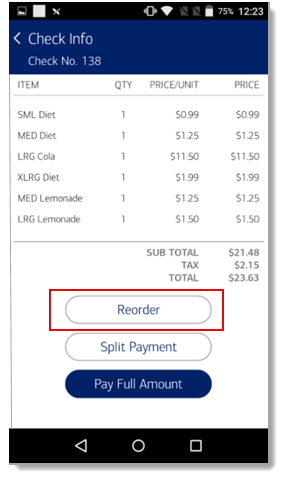
- Controls will appear to add items to the order. Tap + next to each item to be reordered.
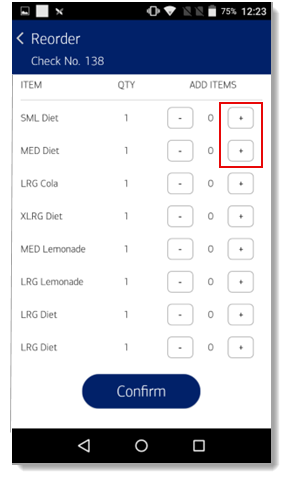
The Add Items count will update.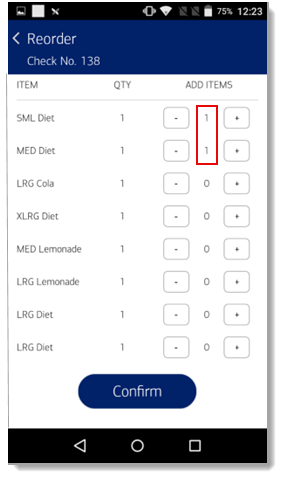
- Tap Confirm to complete the reorder. The "Reorder Successful" message displays.

- Tap OK to refresh the check information. The reordered items will be added to the bottom of the item list.

- Tap the left arrow navigation icon in the upper left (next to Pick a Check), to return to the list of open checks. The check with the reordered items displays in the list with an updated total amount.
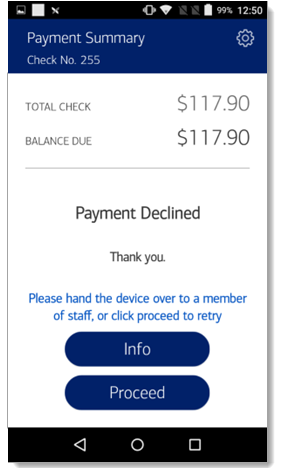
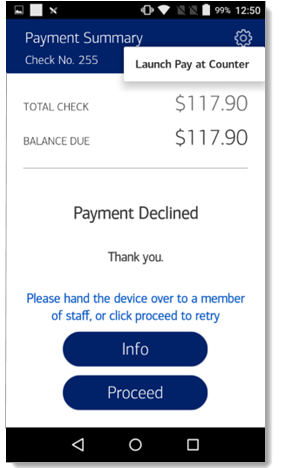
Declined transactions
With Pay at Table, you can attempt to process a transaction up to a maximum of three times before requesting the customer pay at the counter using another form of payment.
If a transaction is declined, it means the customer's issuing bank didn't approve the payment, likely due to insufficient funds, a problem with the card, or other reasons, and the customer should contact the issuing bank to resolve the issue.
- To retry declined transactions
- When attempting to complete a sale and the Payment Status screen displays the "Payment Declined" message, tap Continue.
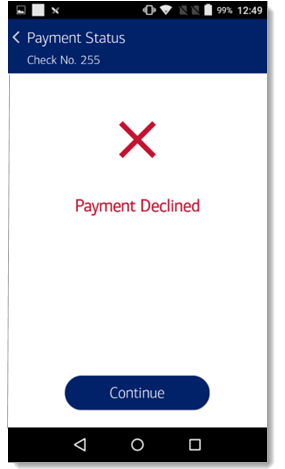
- Tap Continue to advance to the Payment Summary screen.
NOTE: The android back button is disabled. If you tap it to go back to the previous screen after the transaction is declined, the application will show the message below:

If this message is received, tap OK to close the pop-up. - (Optional) Tap Info to view additional transaction information. The status will show as "Decline".

- (Optional) Tap Back to return to the Payment Summary screen.
NOTE: You can exit Pay at Table at any time by clicking Exit in the settings menu.
- Choose to retry payment with another card using Pay at Table or switch to Pay at Counter.
- To continue with Pay at Table
Tap Proceed and retry the steps to complete a sale.
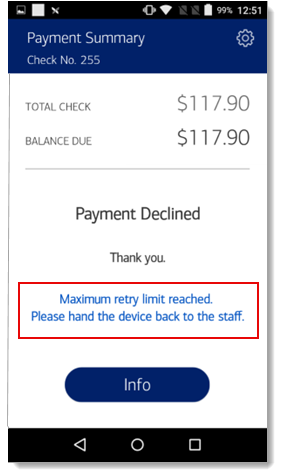
NOTE: You can attempt the transaction a maximum of three times, regardless of what card is used. If the transaction declines on the third attempt, the Payment Summary screen will display a "Payment Declined" message and advise that the maximum retry limit has been reached. Your customer will then be required to use another form of payment at the counter.
NOTE: Tapping Exit in the settings menu returns you to the Retrieve Checks screen. If you tap Proceed, you can attempt the transaction again with Pay at Table using another card.
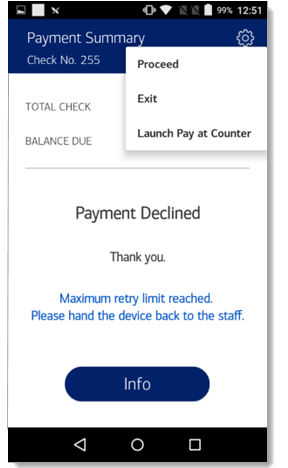
- To continue with Pay at Counter
To switch to Pay at Counter to retry a declined transaction(s), tap the Settings icon, then tap Launch Pay at Counter to exit Pay at Table. The customer can then Pay at Counter using another form of payment.
- To continue with Pay at Table
- When attempting to complete a sale and the Payment Status screen displays the "Payment Declined" message, tap Continue.