Merchant Services Account Recurring Billing
Description
What's in this article?
NOTE:
If you use the Point of Sale Solution, manage Recurring Billing from your Point of Sale Back Office.
Recurring Billing is a value-added service that allows you to accept recurring payments, either for subscriptions or payment plans. Common ways to use recurring billing include:
- Collecting regular, recurring fees, like gym memberships
- Set up a payment plan to allow customers to make recurring, equal payments over a set time
- Offer subscription services, like product of the month clubs
When your customers sign up with you for a subscription or a payment plan, you assign their customer token to a Recurring Billing plan to start on the date you select. You can then automatically process recurring payments from your customers without storing any customer or payment information, which protects sensitive cardholder information and can prevent the theft of payment card information from the your system.
Setting up Recurring Billing will require two things:
- Recurring Billing Plan
Recurring Billing plans are plans that you set up that have attributes like setup fee, billing amount and billing frequency that you want to use over and over again.
Example: You could set up a “gold” plan that charges your customer $10 a month ongoing, with no end date. Or you could set up a plan that charges your customer $5 a month for a total of 6 months. The billing frequency and billing period unit cannot be changed once a plan is created. - Subscriptions
Subscriptions are created from a customer token. You can use a customer token that you've already created or create a new customer token when you create the subscription. A customer token securely stores the customer's information. Once the subscription is created, the plan associated with the customer to bill a specific amount at a specific frequency will begin. The start date selected when creating the subscription cannot be changed; however, you can change the plan associated with the subscription at a later date.
Example: You create a subscription for your customer “John Doe” by assigning John Doe’s customer token to the Gold Plan. If the Gold Plan is set to bill monthly and you create the new subscription to start on 5/30, the plan will begin billing each month on that date. An active subscription can be assigned to a different plan at any time, but you will not be able to change the date of billing.
NOTE:
Recurring Billing can collect scheduled payments from customers. It cannot disburse payments.
Payment plans
A plan must be created within the Recurring Billing section of a your Merchant Services account, in order to set up a Recurring Billing event. If you have not signed up for Recurring Billing with your Merchant Consultant, you will not see the Recurring Billing section of your Merchant Services account. Plans contain information that specifies the billing amount and billing frequency for the recurring transactions. You can create multiple plans. The Recurring Billing subscription will link your customer's token information to a plan.
There are two types of plans that can be created:
- Recurring: To process payments on a specific frequency with no specified end date to the payments and no specified number of payments.
- Recurring with End Date: To process a specific number of payments on a specific frequency. This is usually used to give customers the option to complete a purchase within a specific timeframe.
Billing frequency options for both types of plans include: daily, weekly, monthly, quarterly (every 3 months), semi-annually (every 6 months), and yearly.
IMPORTANT!
The billing frequency selected when the plan is created cannot be changed later. Create a new plan to offer a different billing frequency, period length, or unit.
- Create a Recurring Billing plan
- Log in to your Merchant Services account in Business Advantage 360 online banking.
- Select Recurring Billing > Manage Plans.
- Click Add new plan.
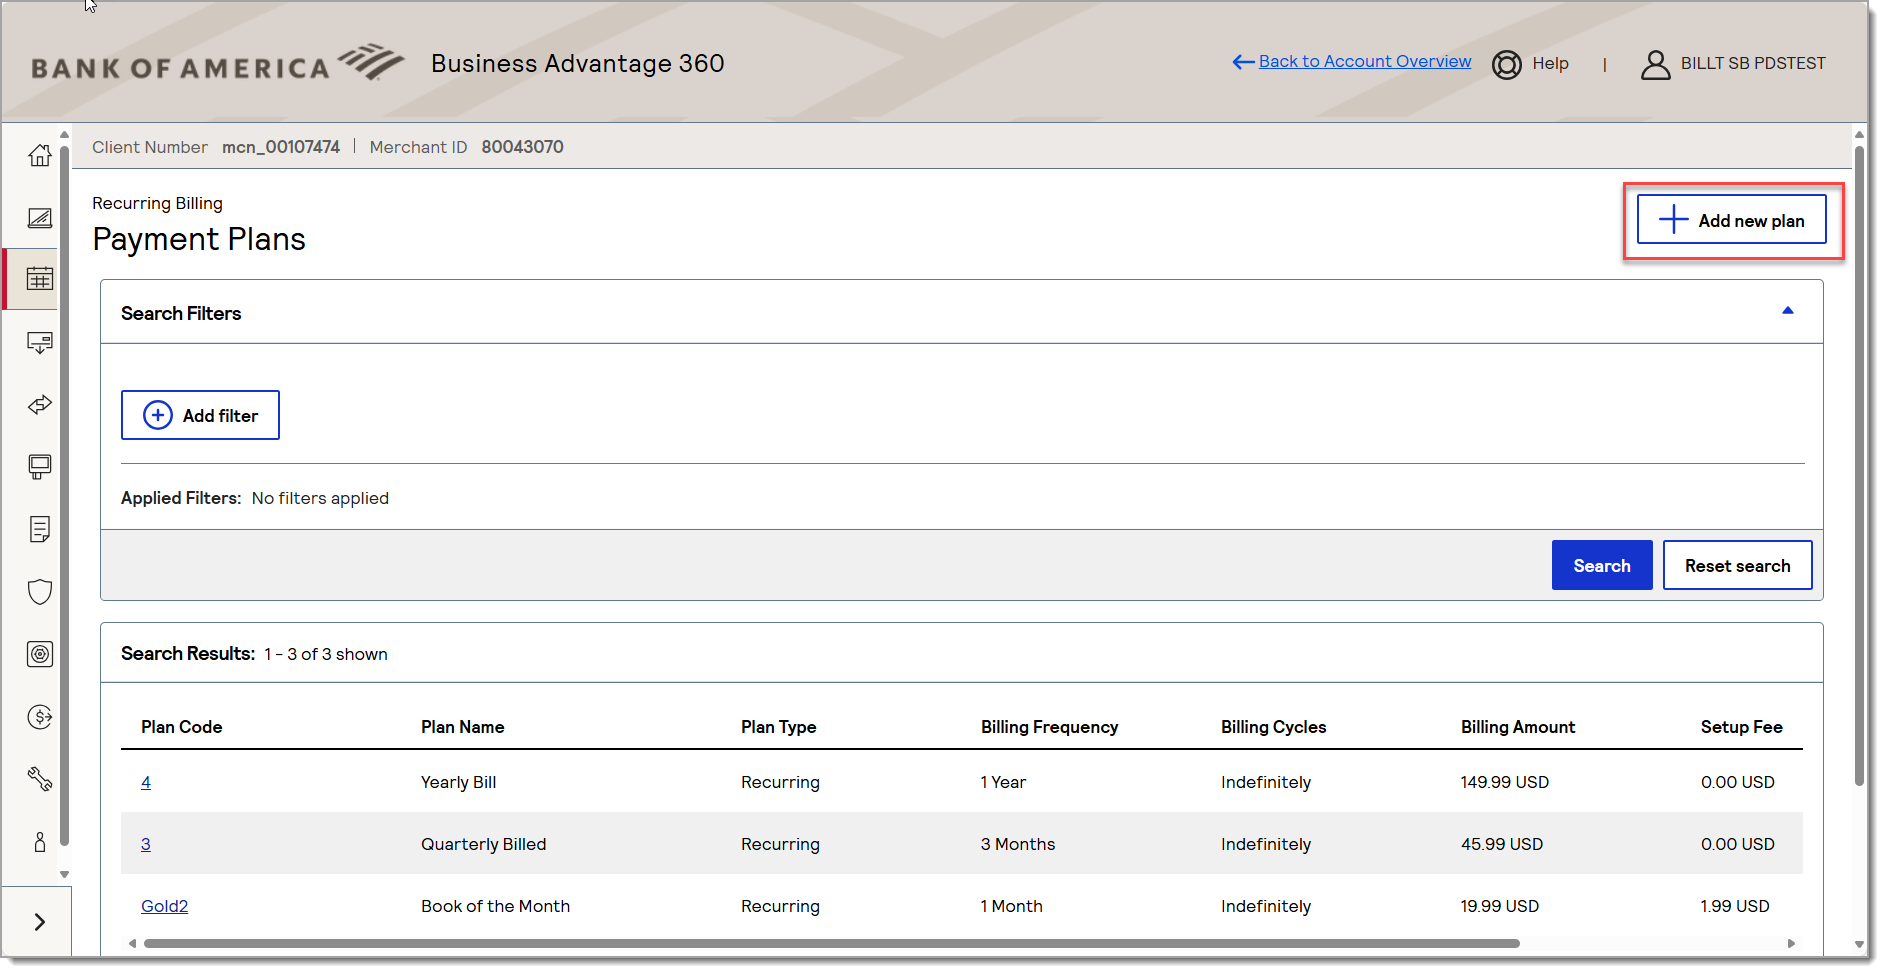
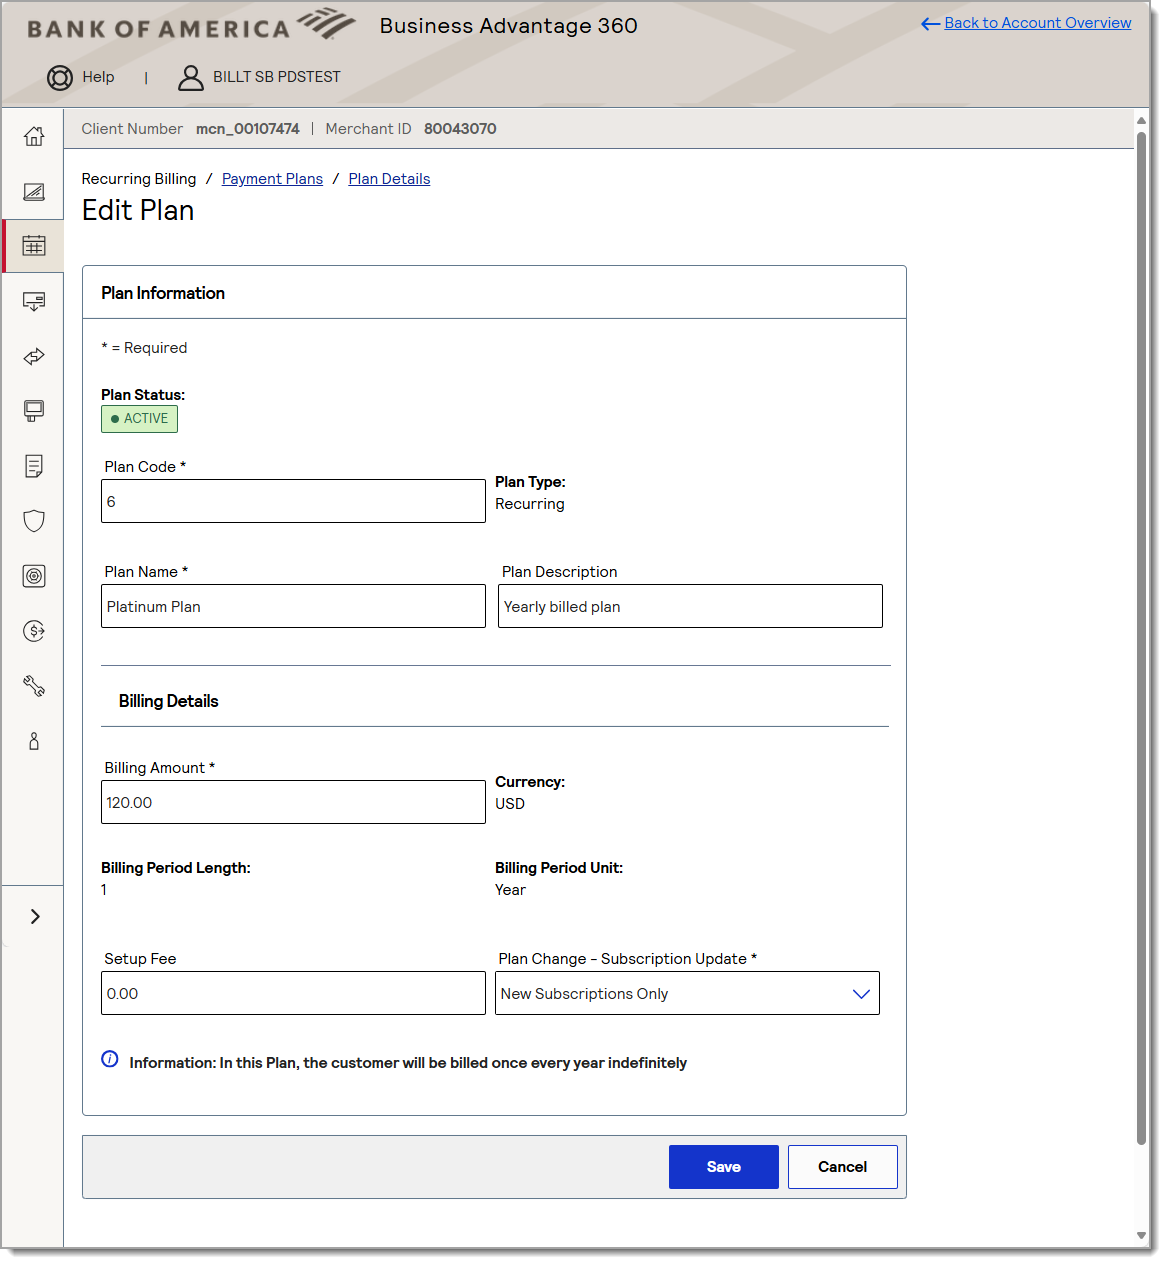
- Enter plan information
Table of plan information fields and descriptions Field Description Plan Code The system will automatically assign a plan number. You can enter your own code if there is a unique plan code that should be assigned. The number you enter will automatically increment each time you create a plan. Plan Name A name for your plan. This is a required field. Plan Description A description of your plan. Billing Amount The billing amount for this plan. Only USD currency is supported. Currency Leave as default. Only USD supported. Billing Frequency How frequently this plan should be billed. Billing Cycle Options If the plan is recurring, select Bill Indefinitely.
If the plan ends after a set number of payments, select Define Number of Billing Cycles, then enter the number of billing cycles.Setup fee Optional. Enter a setup fee that is applied the first time a plan is billed. - Click Submit. Your new plan will appear in Payment Plans. Once plan(s) have been created, you can create recurring billing subscriptions for your customers.
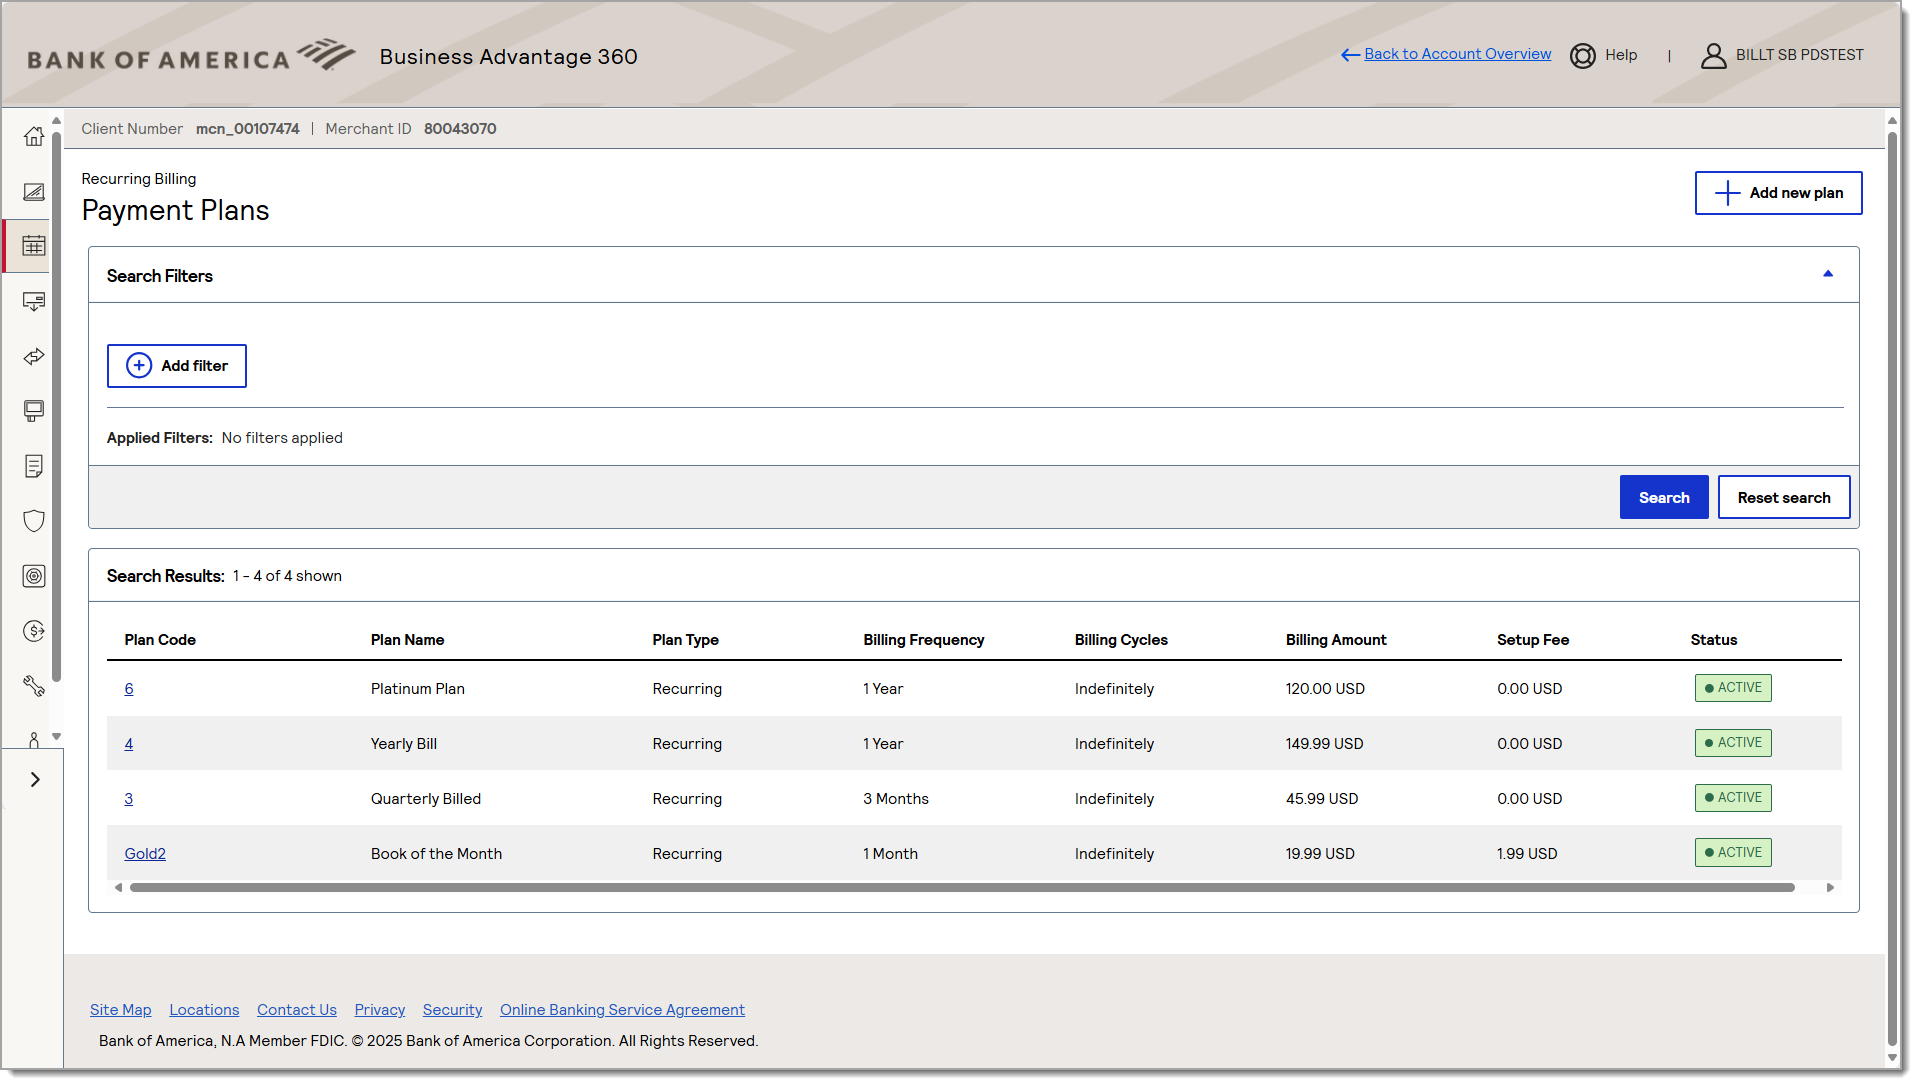
- Search for an existing plan
- Log in to your Merchant Services account in Business Advantage 360 online banking.
- Select Recurring Billing > Manage Plans.
- Click Add Filter. Your existing plans will not display without adding a filter.
- Select an option from the New Filter dropdown list.
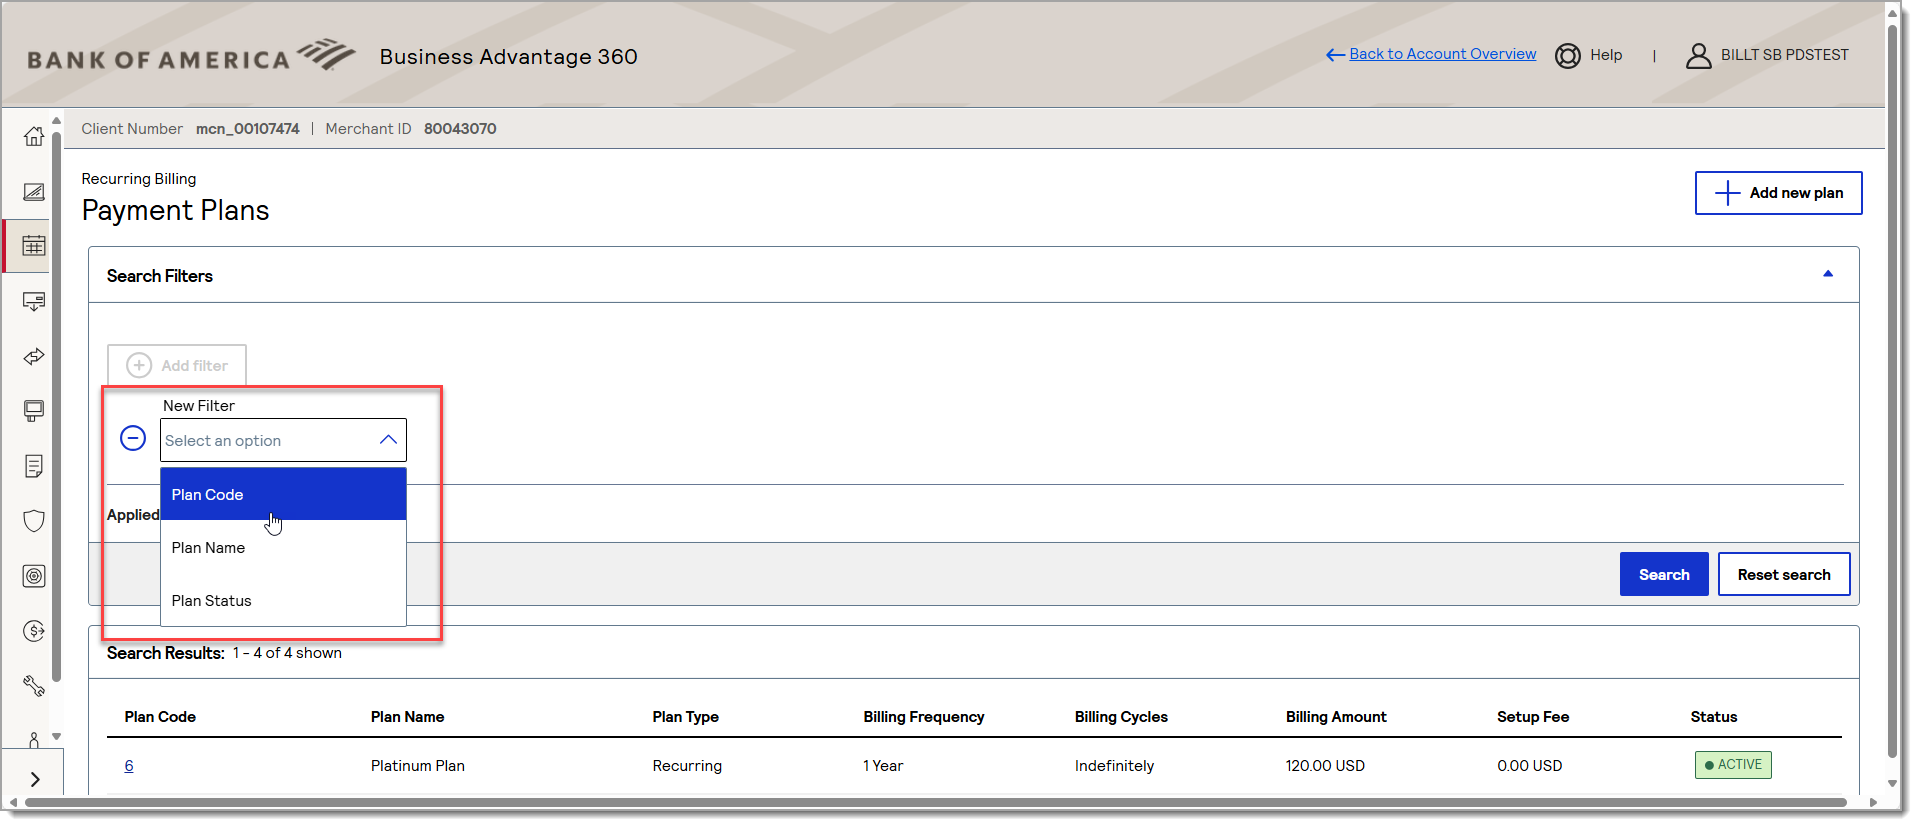
- Enter the complete Plan Code or Plan Name. Plan name must be complete and exact. If filtering by Plan Status, select a status from the dropdown list.
- Click Search. Filter results appear.
- Click the hyperlink in the Plan Code column and the Plan Details page appears.

- Edit an existing plan
You can edit, activate, deactivate, or delete a plan. The following information can be edited:
- Plan code
- Plan name
- Plan description
- Billing amount
- Setup fee
Once edited, you can select to apply the changes to any new subscriptions to the plan or apply them to all existing subscriptions and any new subscriptions going forward.
IMPORTANT!
Plan Billing Period Length and Billing Period Unit are not editable options.To edit existing plans
- Log in to your Merchant Services account in Business Advantage 360 online banking.
- Select Recurring Billing > Payment Plans.
- Click the hyperlink in the Plan Code column to view the Plan Details page. If you have multiple plans, you can filter to find the plan you need to edit.
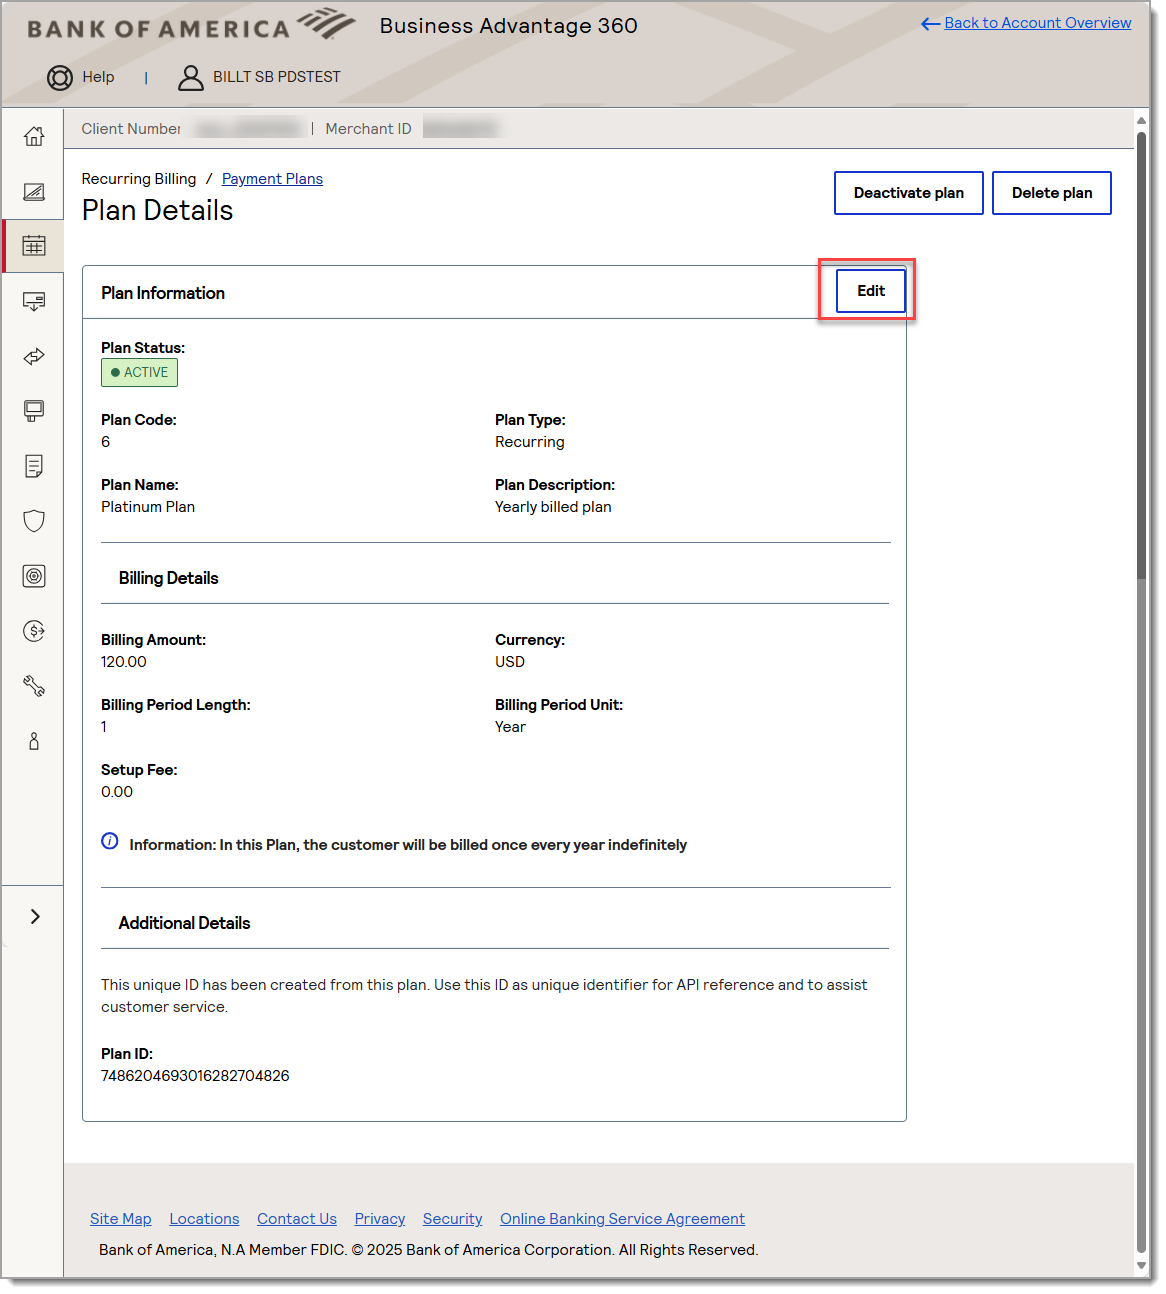
- Click Edit.
- Make desired changes to the plan.
- Plan code
- Plan name
- Plan description
- Billing amount
- Setup fee
- From the Plan Change - Subscription Update dropdown, select either New Subscriptions Only or All (New and Existing Subscriptions).
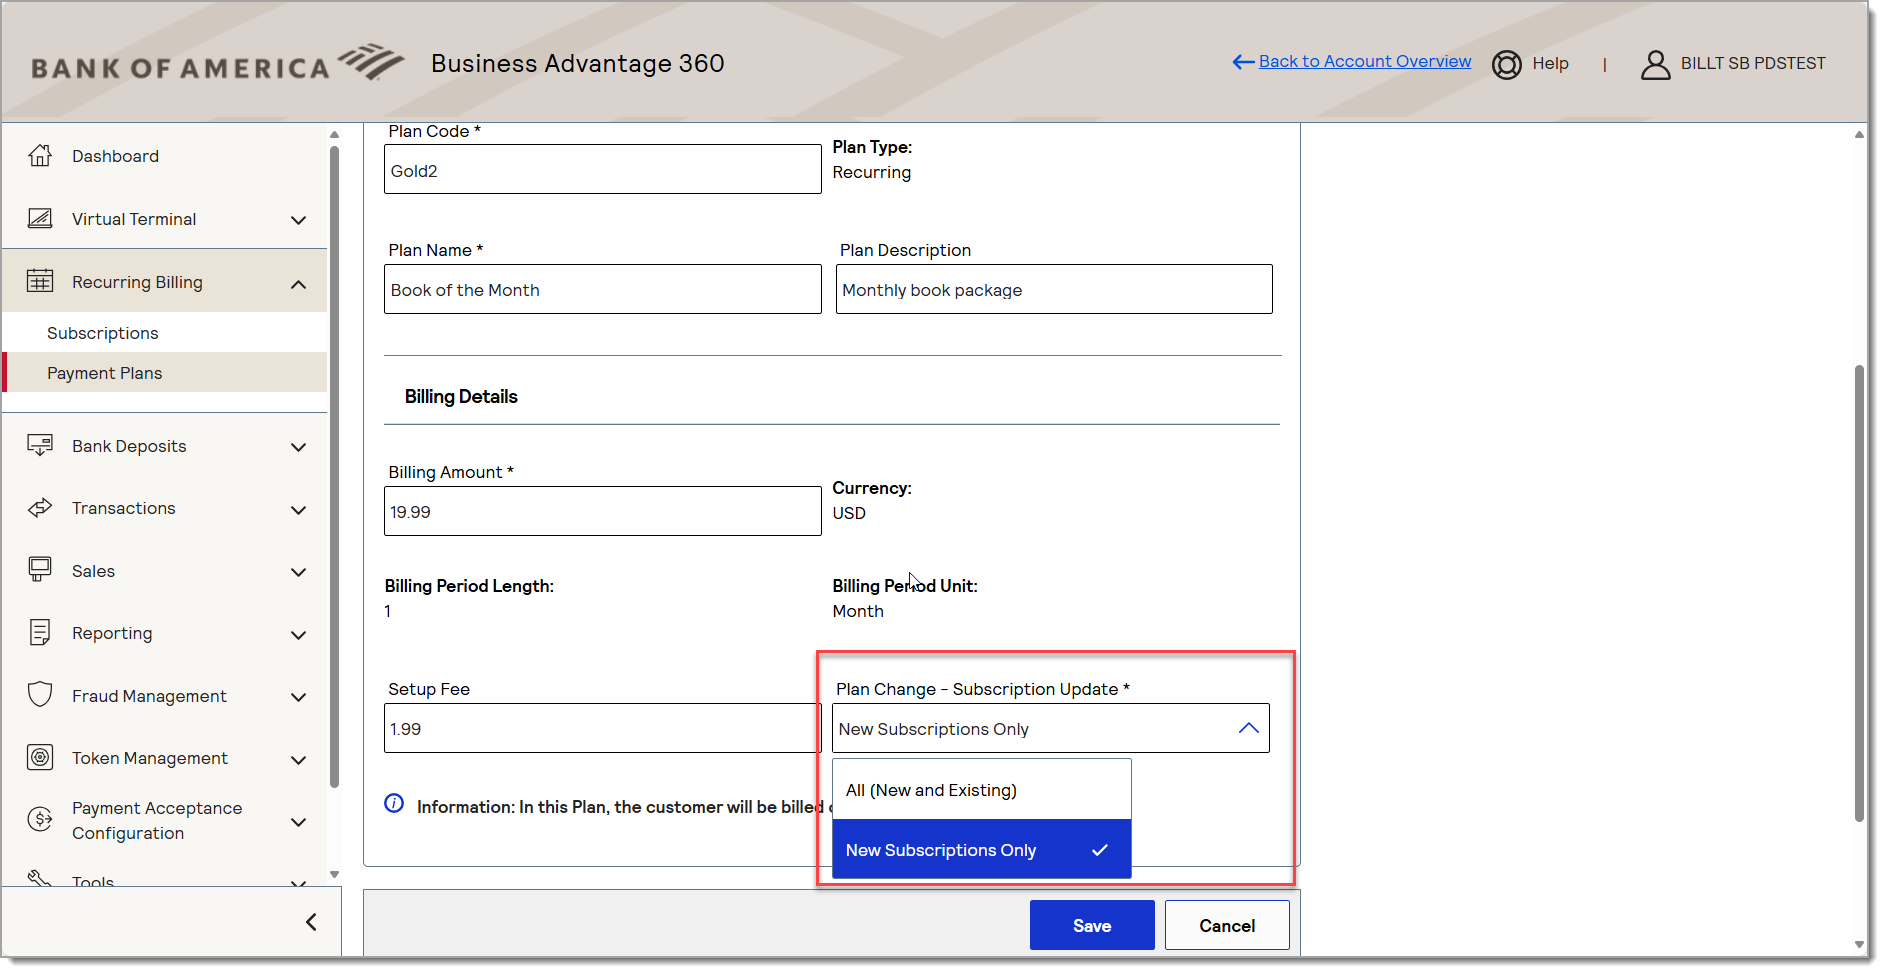
- Click Save.
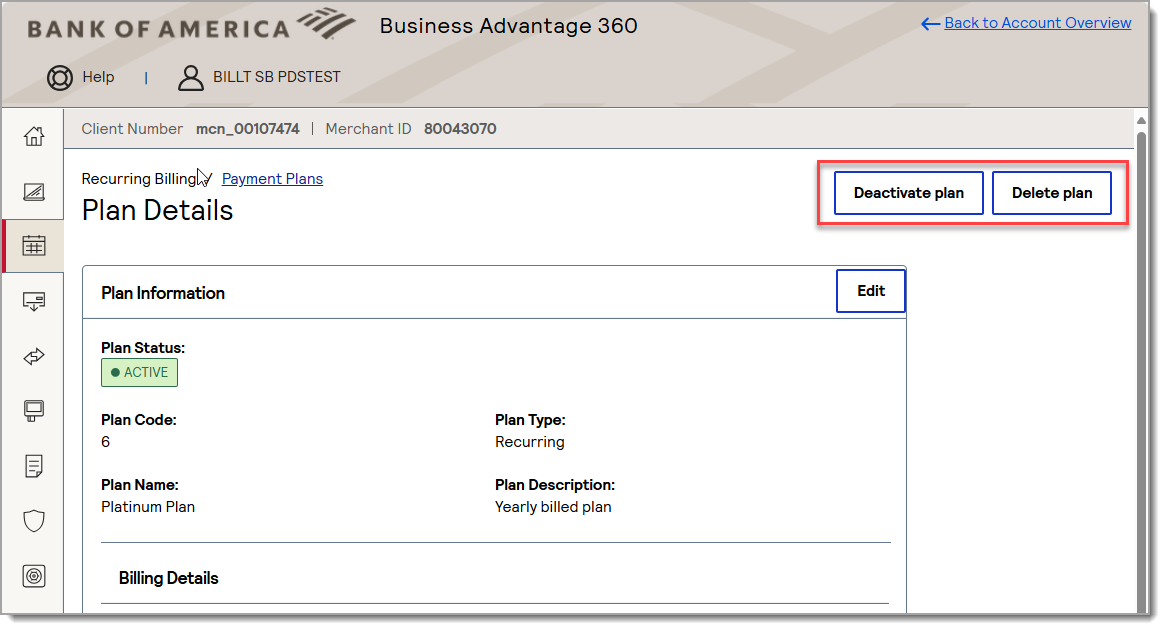
To deactivate or delete a plan
- Search for the desired plan and open the Plan Details page, then click the Deactivate plan or Delete plan button in the top right corner.
Subscriptions
A Recurring Billing subscription combines the customer's payment information (their token) with the Recurring Billing plan. The subscription defines when the payments will start and how long they will last. You can create a subscription with a new customer, which will create the customer token at the same time your create the subscription, or you can create the subscription using a customer token that you created previously. If needed, you can update or cancel a subscription at any time.
A Recurring Billing subscription combines the customer's payment information (their token) with the Recurring Billing plan. The subscription defines when the payments will start and how long they will last. You can create a subscription with a new customer, which will create the customer token at the same time your create the subscription, or you can create the subscription using a customer token that you created previously. If needed, you can update or cancel a subscription at any time.
- Create a subscription
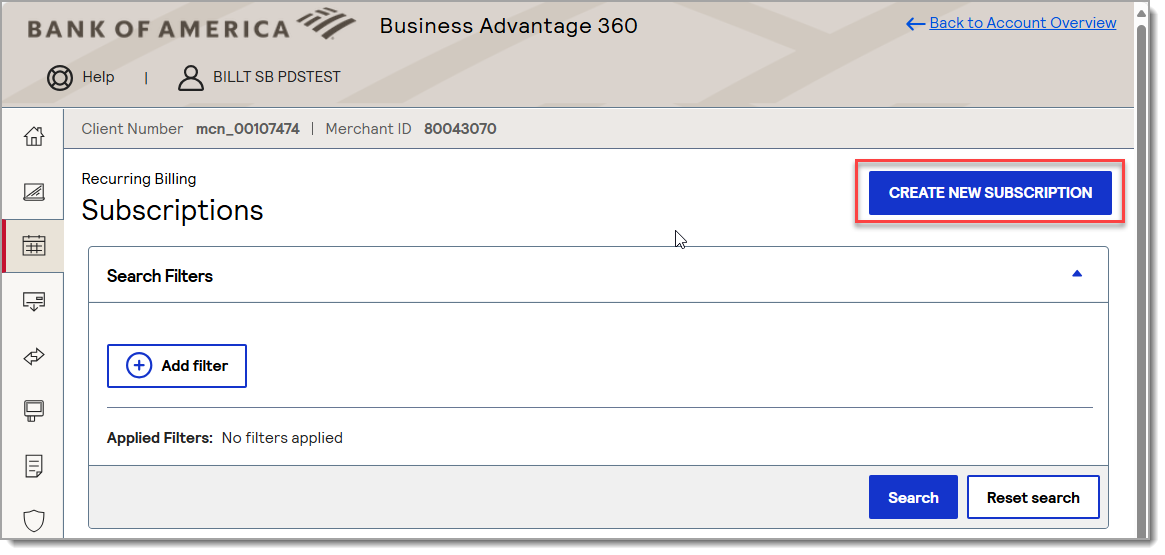
- Log in to your Merchant Services account in Business Advantage 360 online banking.
- Select Recurring Billing > Subscriptions.
- Click Create New Subscription.
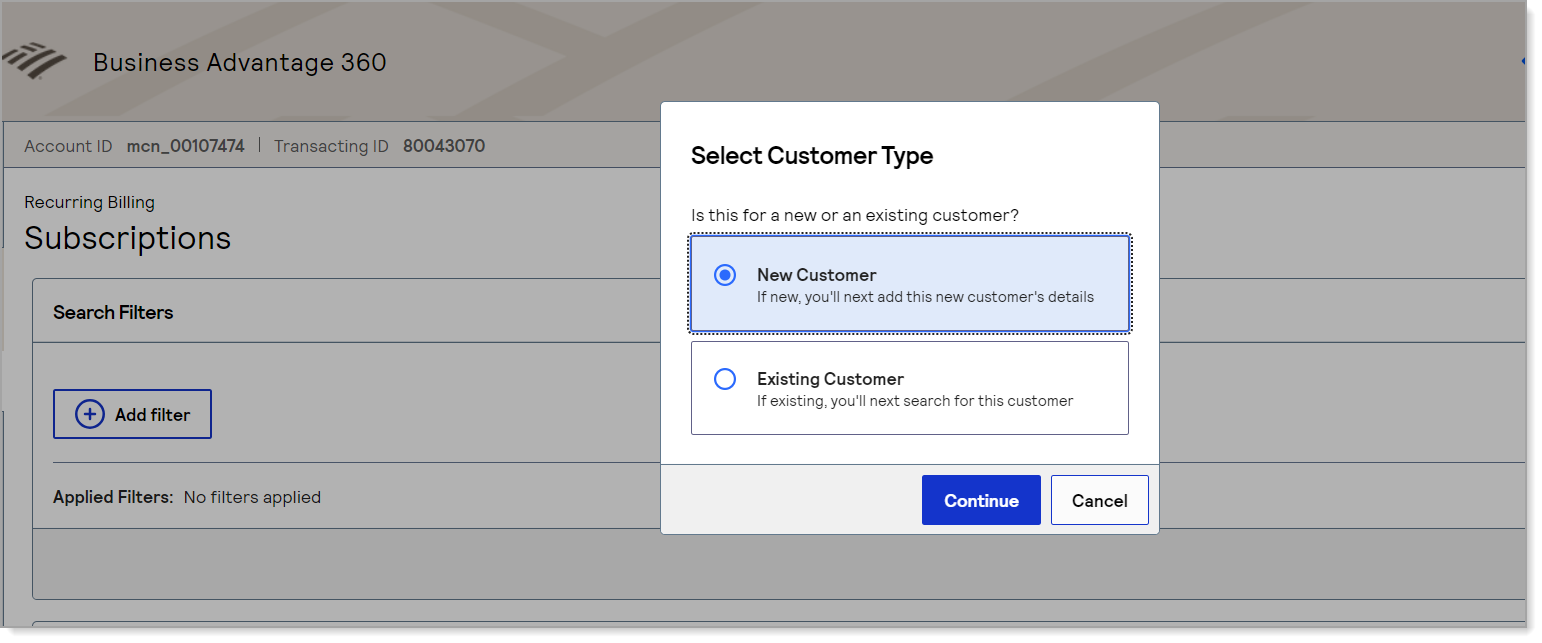
- Select whether you are creating a subscription for a New Customer and will be entering all of the customer and payment information or whether you will use an Existing Customer token, then click Continue.
Create a new customer token
- Enter a Reference number for the customer. This is a required field and will help you identify the customer later.
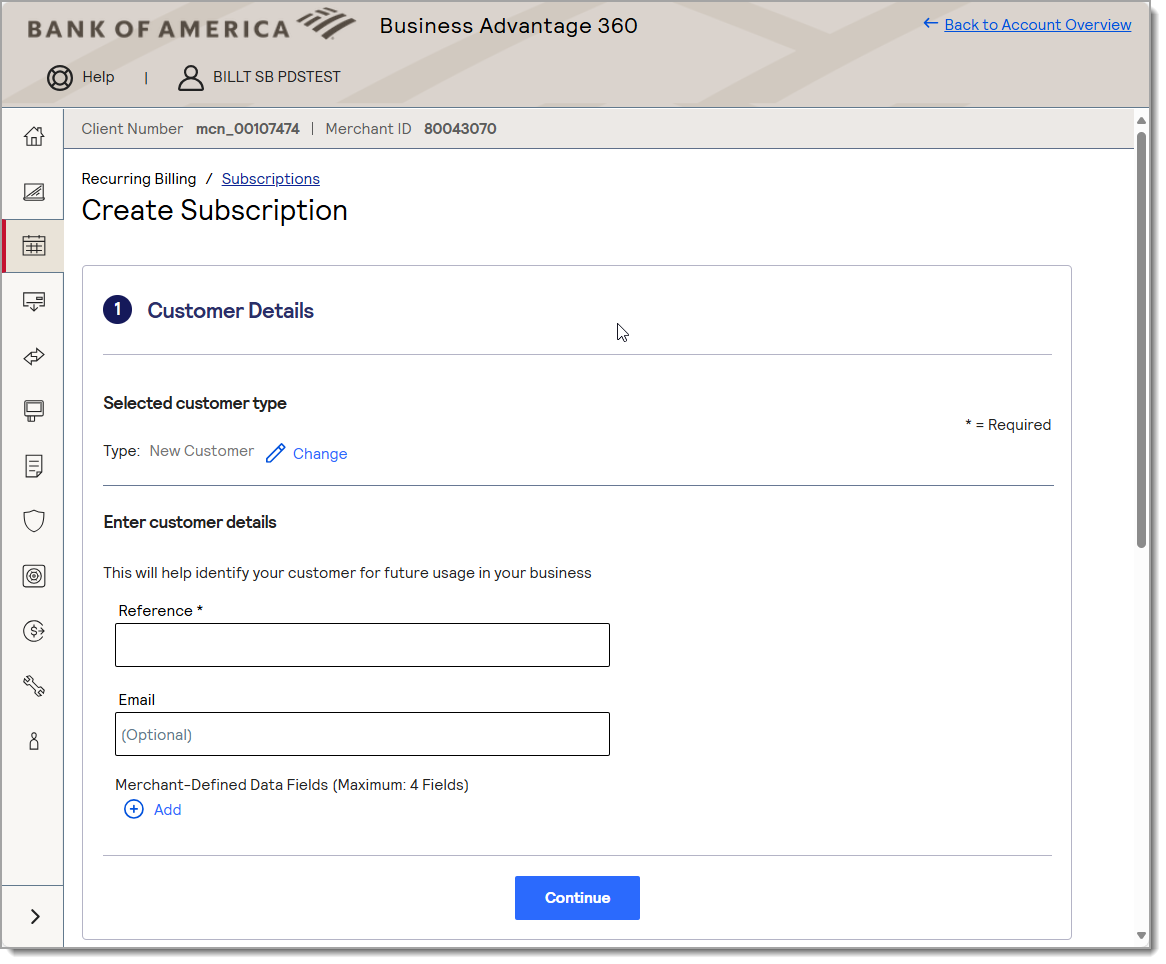
- (Optional) Enter an email for the customer.
- (Optional) You may add additional fields. Click Add and then enter the information of your choice.
- Click Continue.
- In Payment Methods, select Credit/Debit card from the dropdown list, then click Apply.
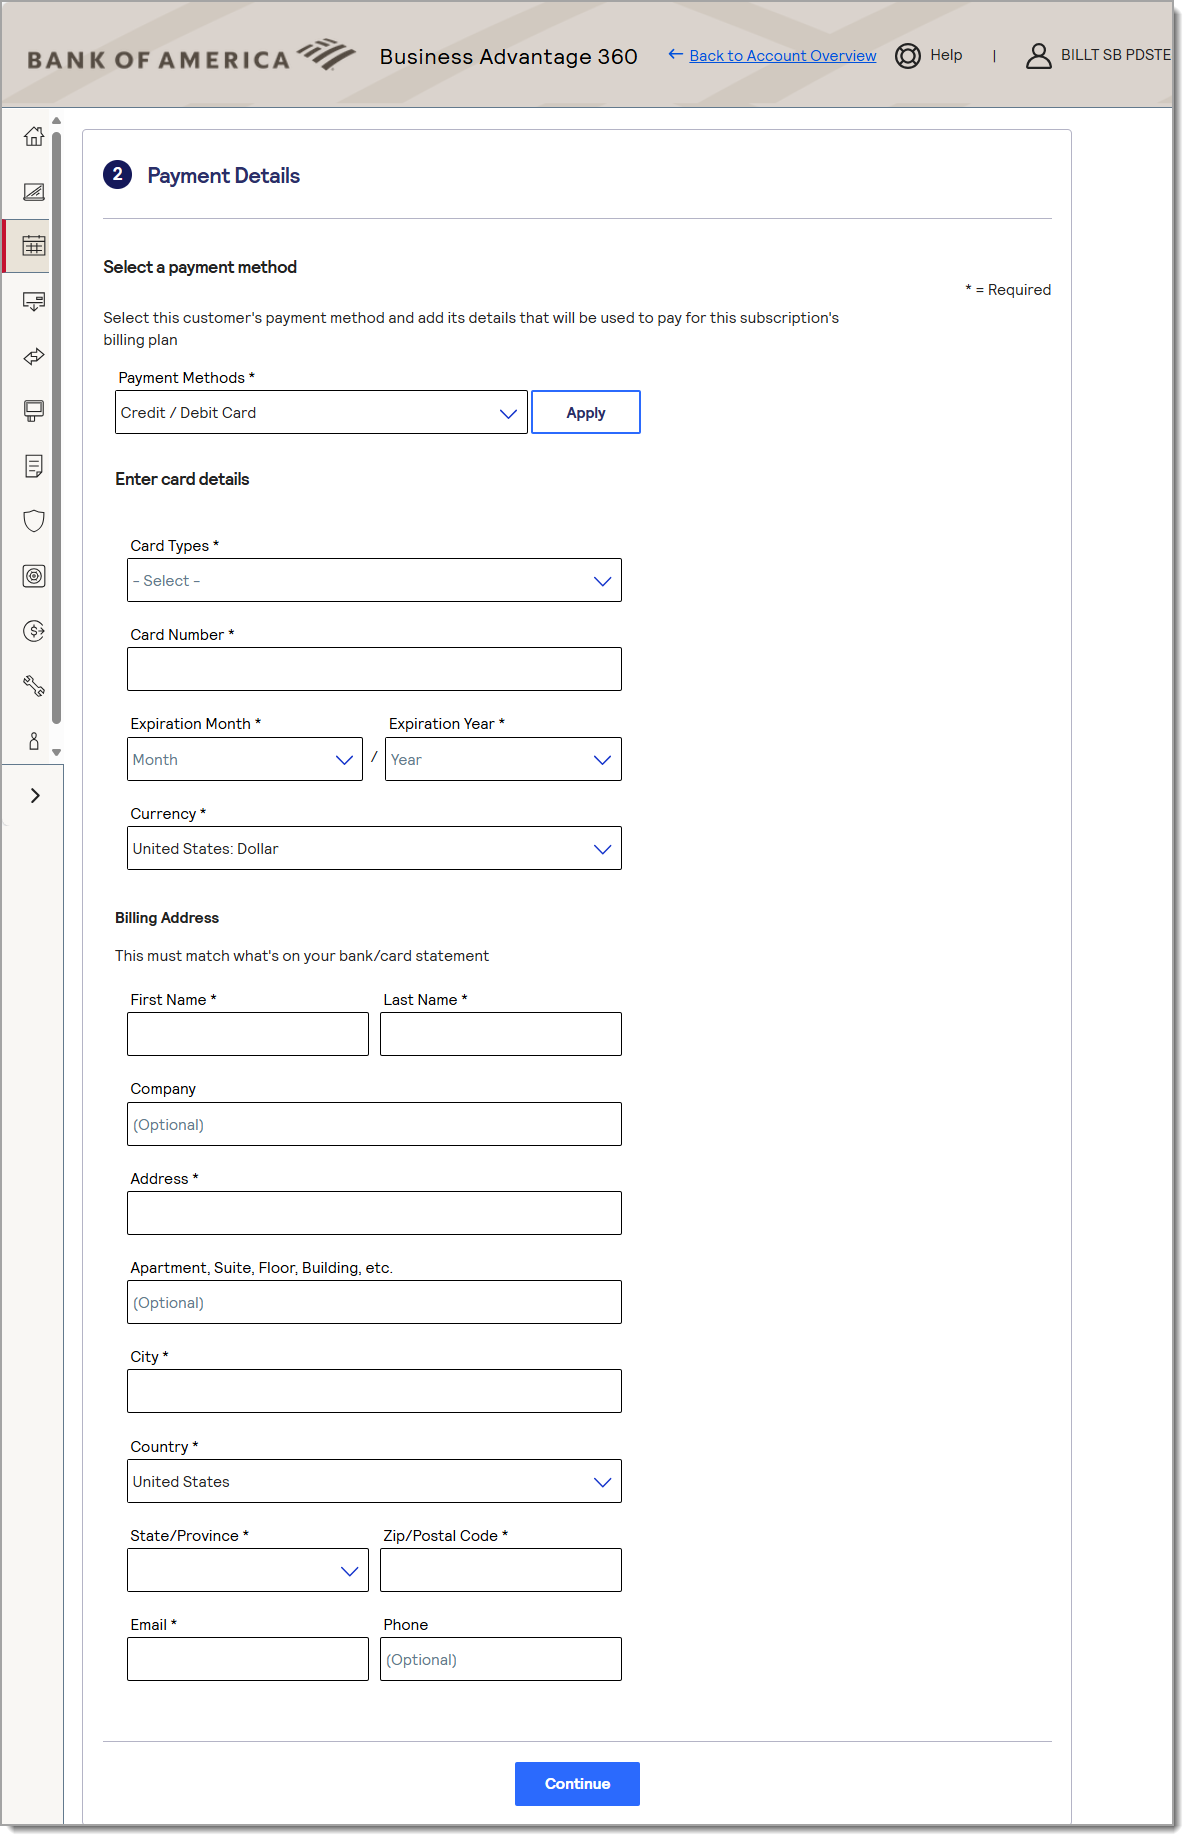
- Enter the card details: Card Types, Card Number, and Expiration Month and Year.
- Enter the billing address details for the cardholder.
- Click Continue.
- Select whether the Shipping Address is required for this subscription. If yes, enter the shipping address details.
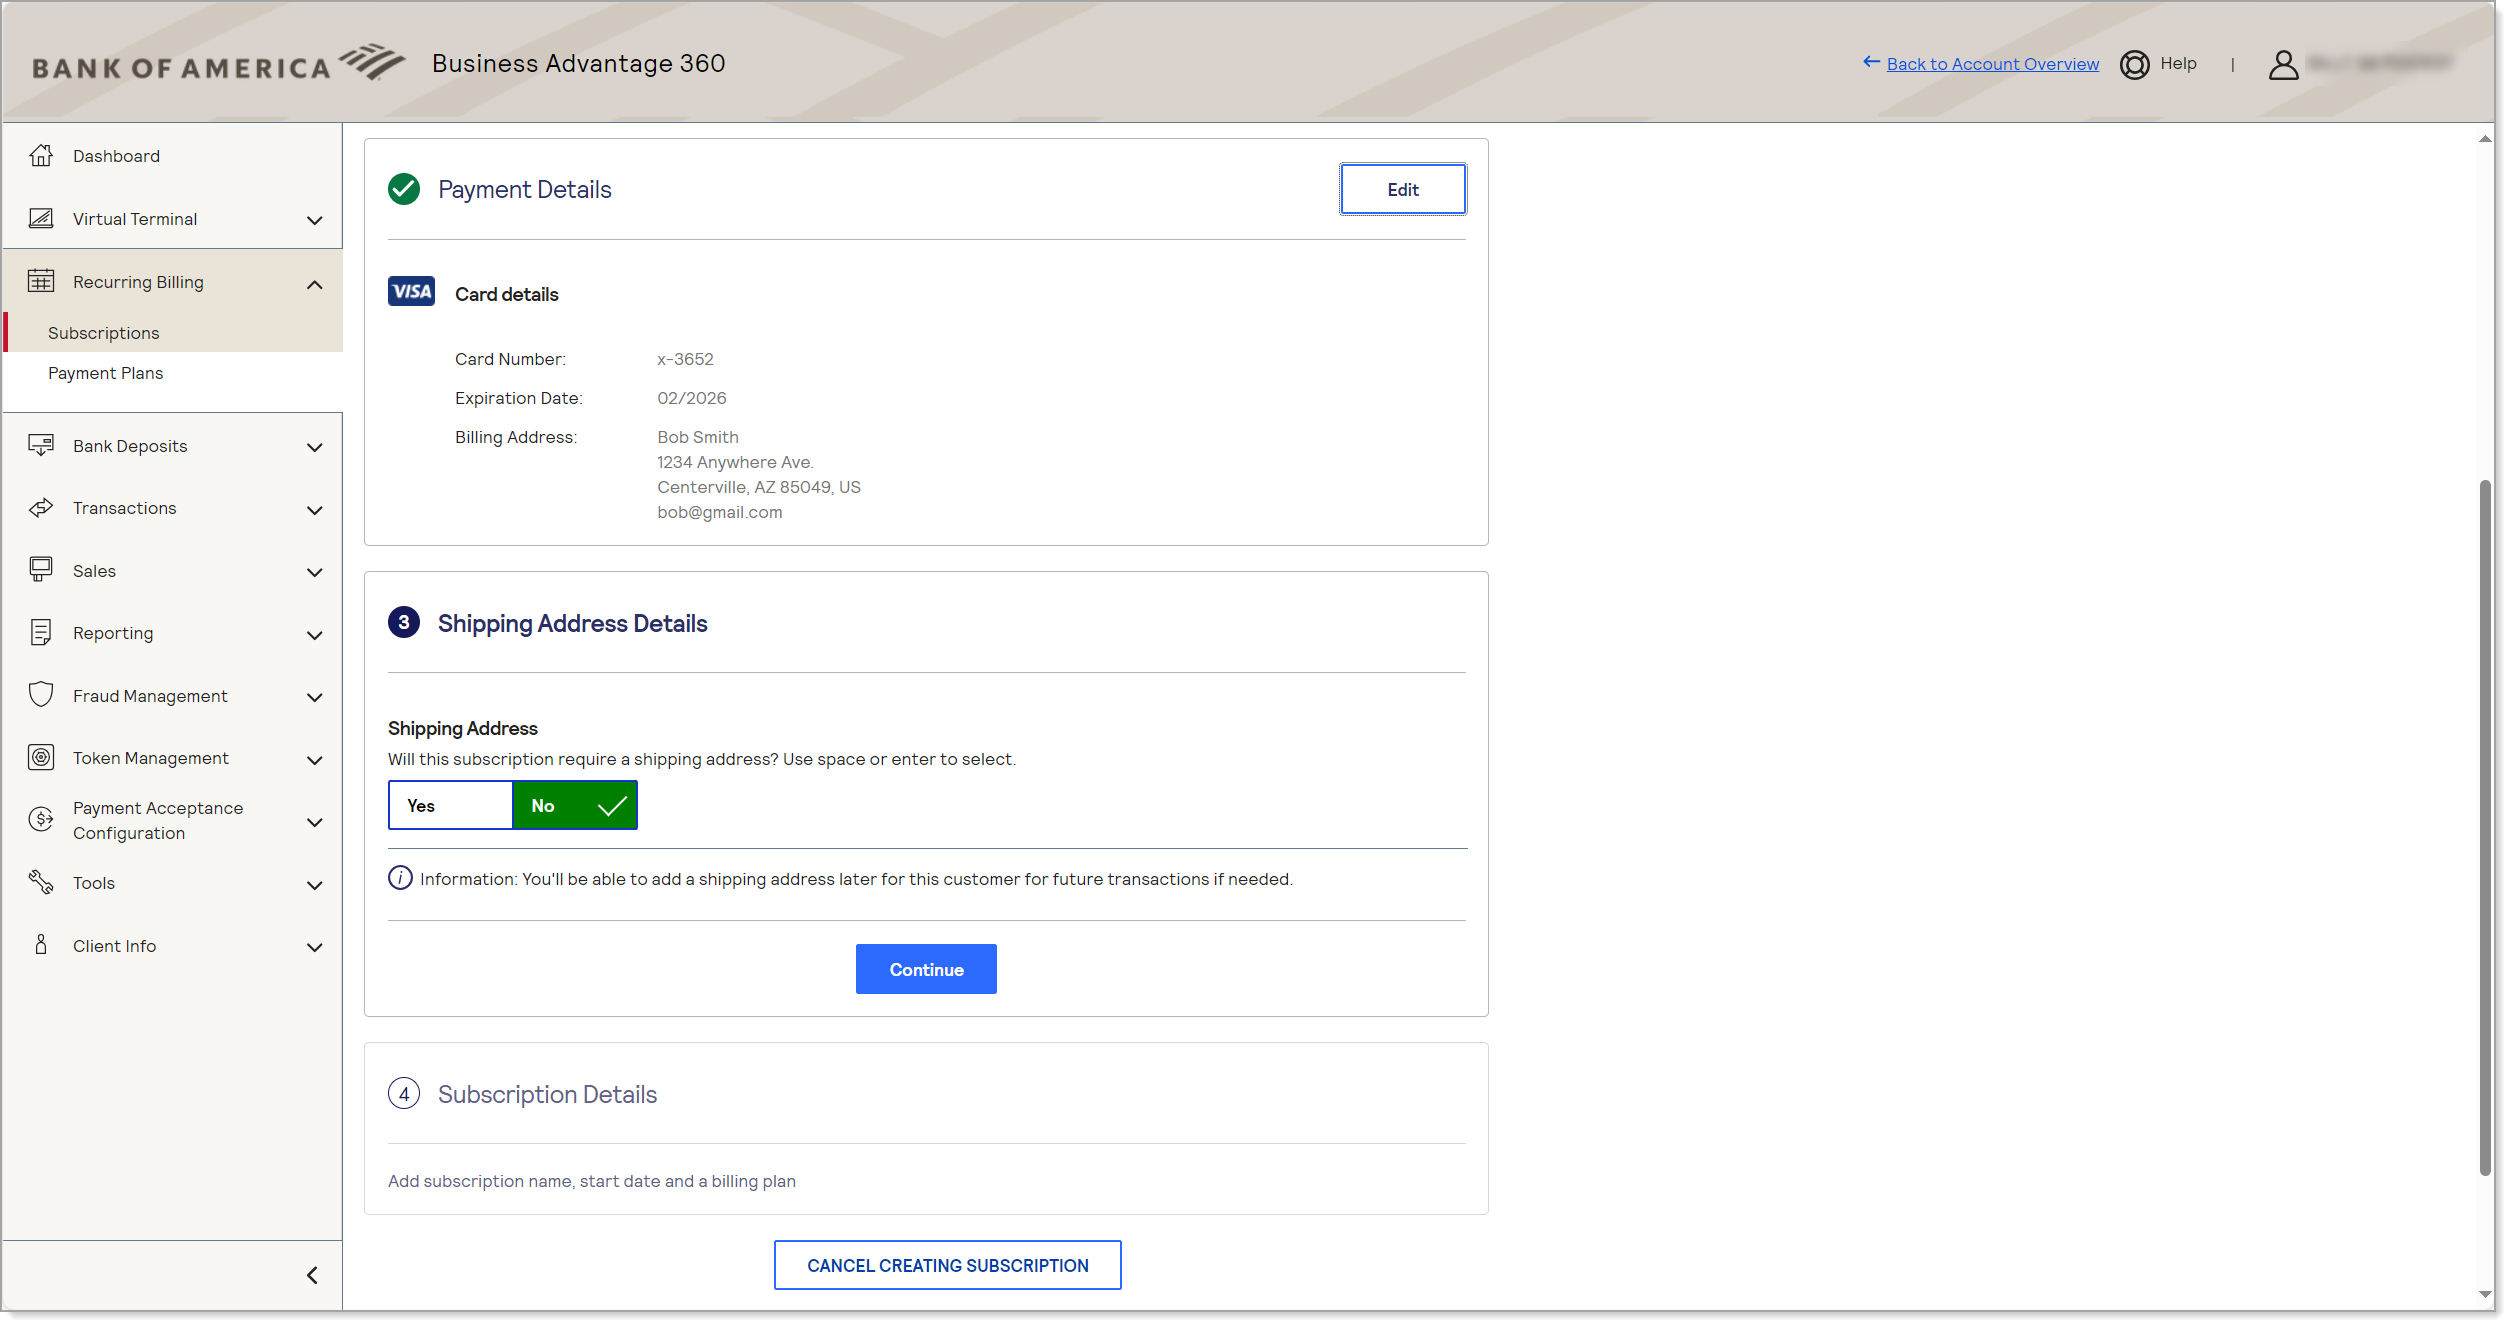
- Click Continue to enter subscription details.
- Enter a Reference number for the customer. This is a required field and will help you identify the customer later.
- Enter a Subscription Name, which can be the name can be the customer’s last name, a customer number, or whatever is most helpful to the you. This is a required field.
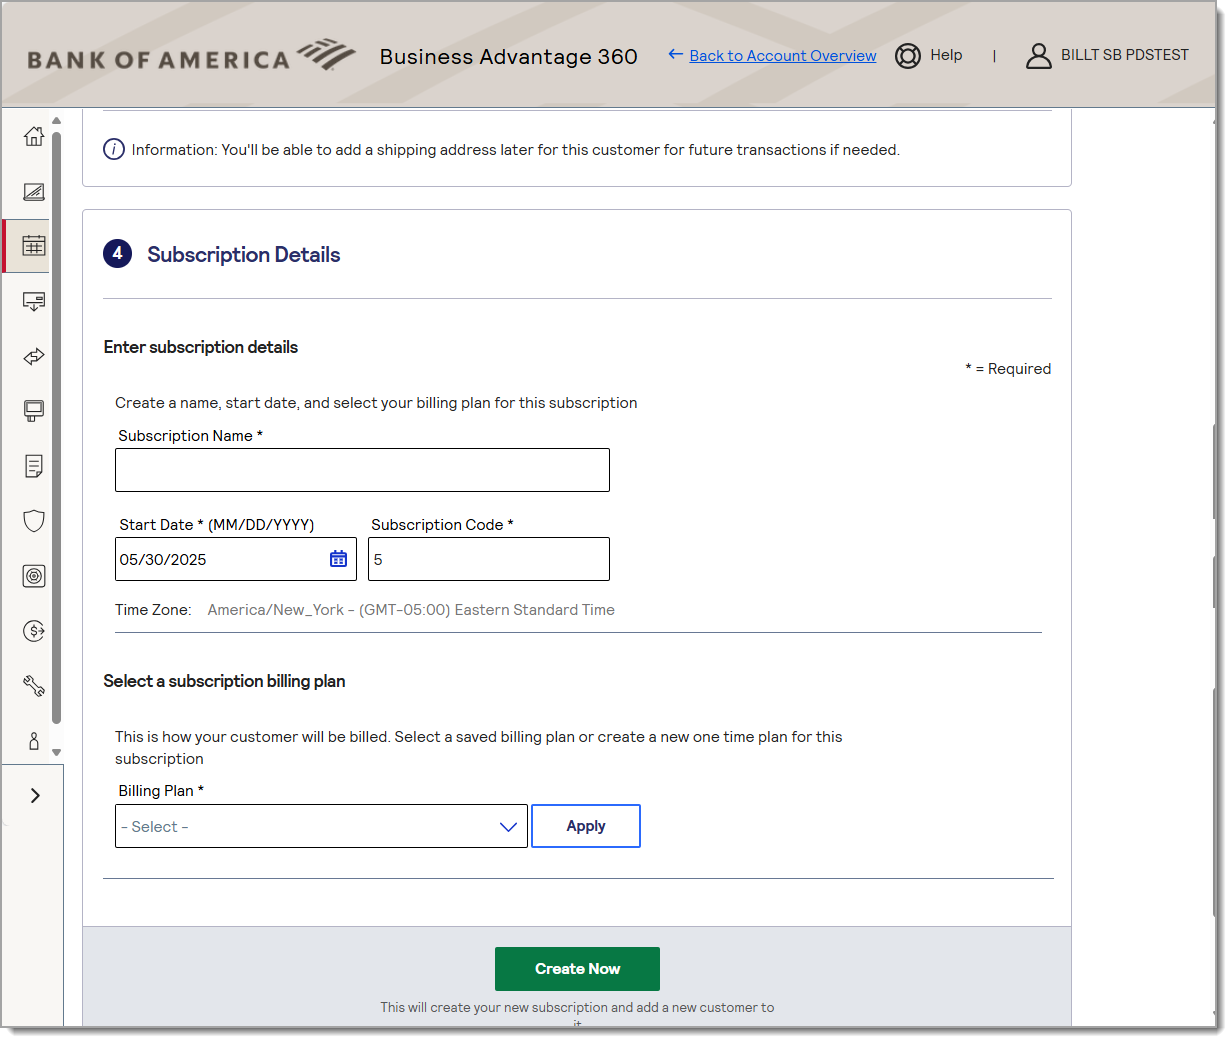
- Select a Start Date to begin billing. You can use the calendar icon to select a date. This date is used with the Plan billing period unit to determine when the client is billed.
IMPORTANT! You will not be able to change the Start date later. Billing will occur at the plan billing frequency based on this date. To change the date, a new subscription must be created.
- Enter a Subscription Code if there is a unique code that should be assigned; otherwise, the system will auto-assign a consecutive subscription code number. The Subscription Code can be letters or numbers.
- From the Billing Plan dropdown list, select a plan to associate to the subscription.
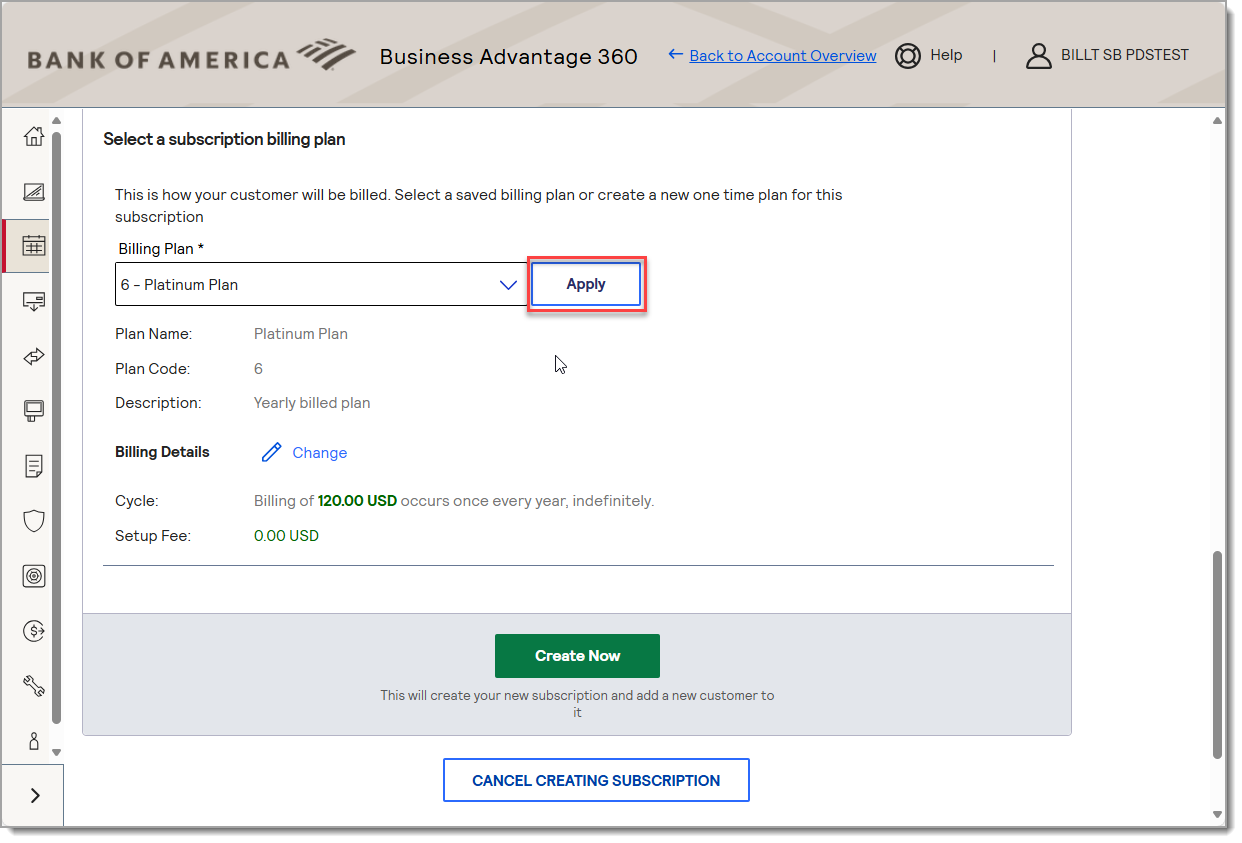
- Click Apply.
IMPORTANT! You may edit the Billing Amount and Setup Fee associated with the plan for this specific customer by clicking Change. While the Billing Amount and Setup Fee can be updated at the subscription level, this is not recommended. To keep consistency for all subscriptions assigned to a specific plan, we recommend that this information not be changed. If necessary, create a new plan and then associate the plan to the subscription.
- Click Create Now.
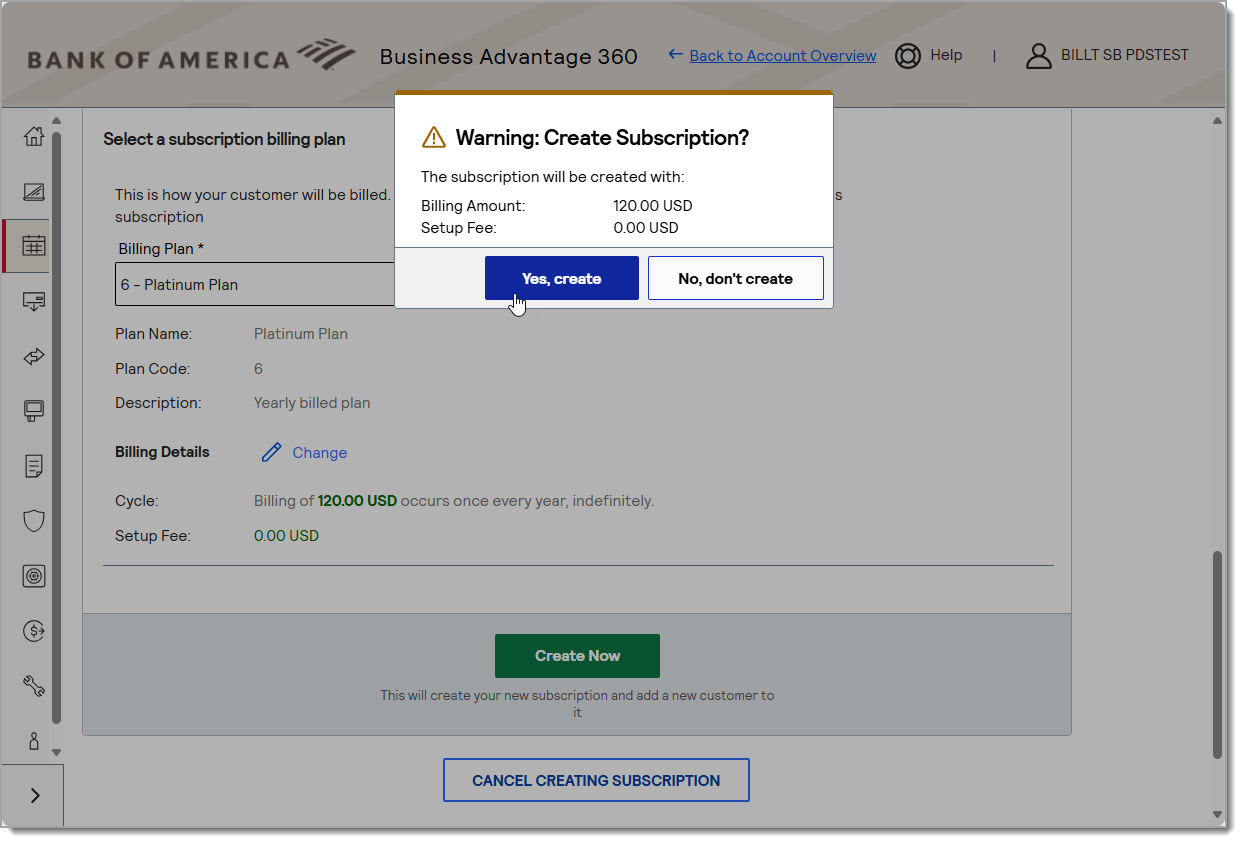
- Click Yes, create to confirm the new subscription. The Subscription Details screen will appear.
- Edit a subscription
You can change the subscription code and subscription name, plan option, and billing amount for an active subscription. There are two ways to edit the details of a specific subscription: through Recurring Billing or Token Management.
- Log in to your Merchant Services account in Business Advantage 360 online banking.
- Select Recurring Billing > Subscriptions.
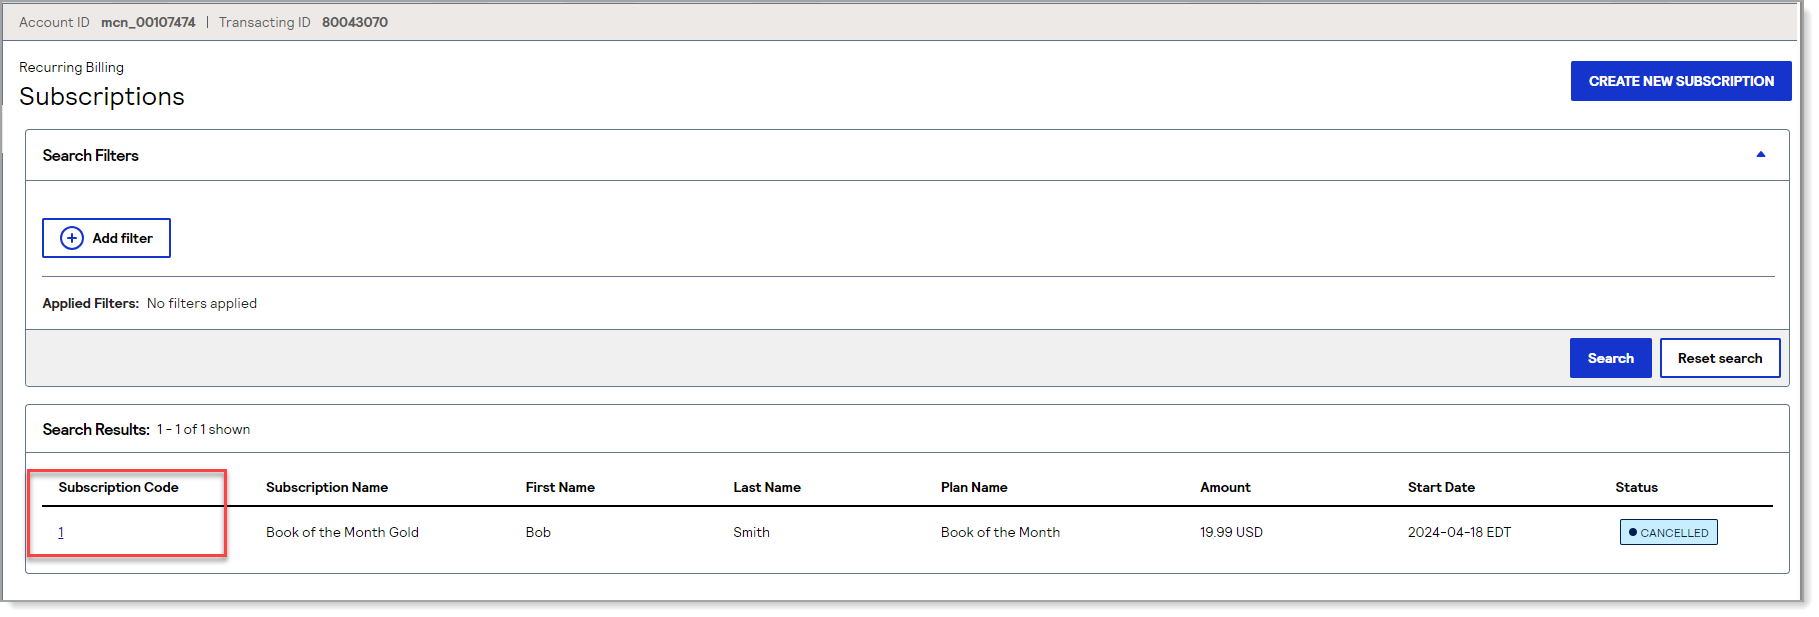
- Locate the subscription you want to edit , then click the Subscription Code hyperlink.
- Click Edit.
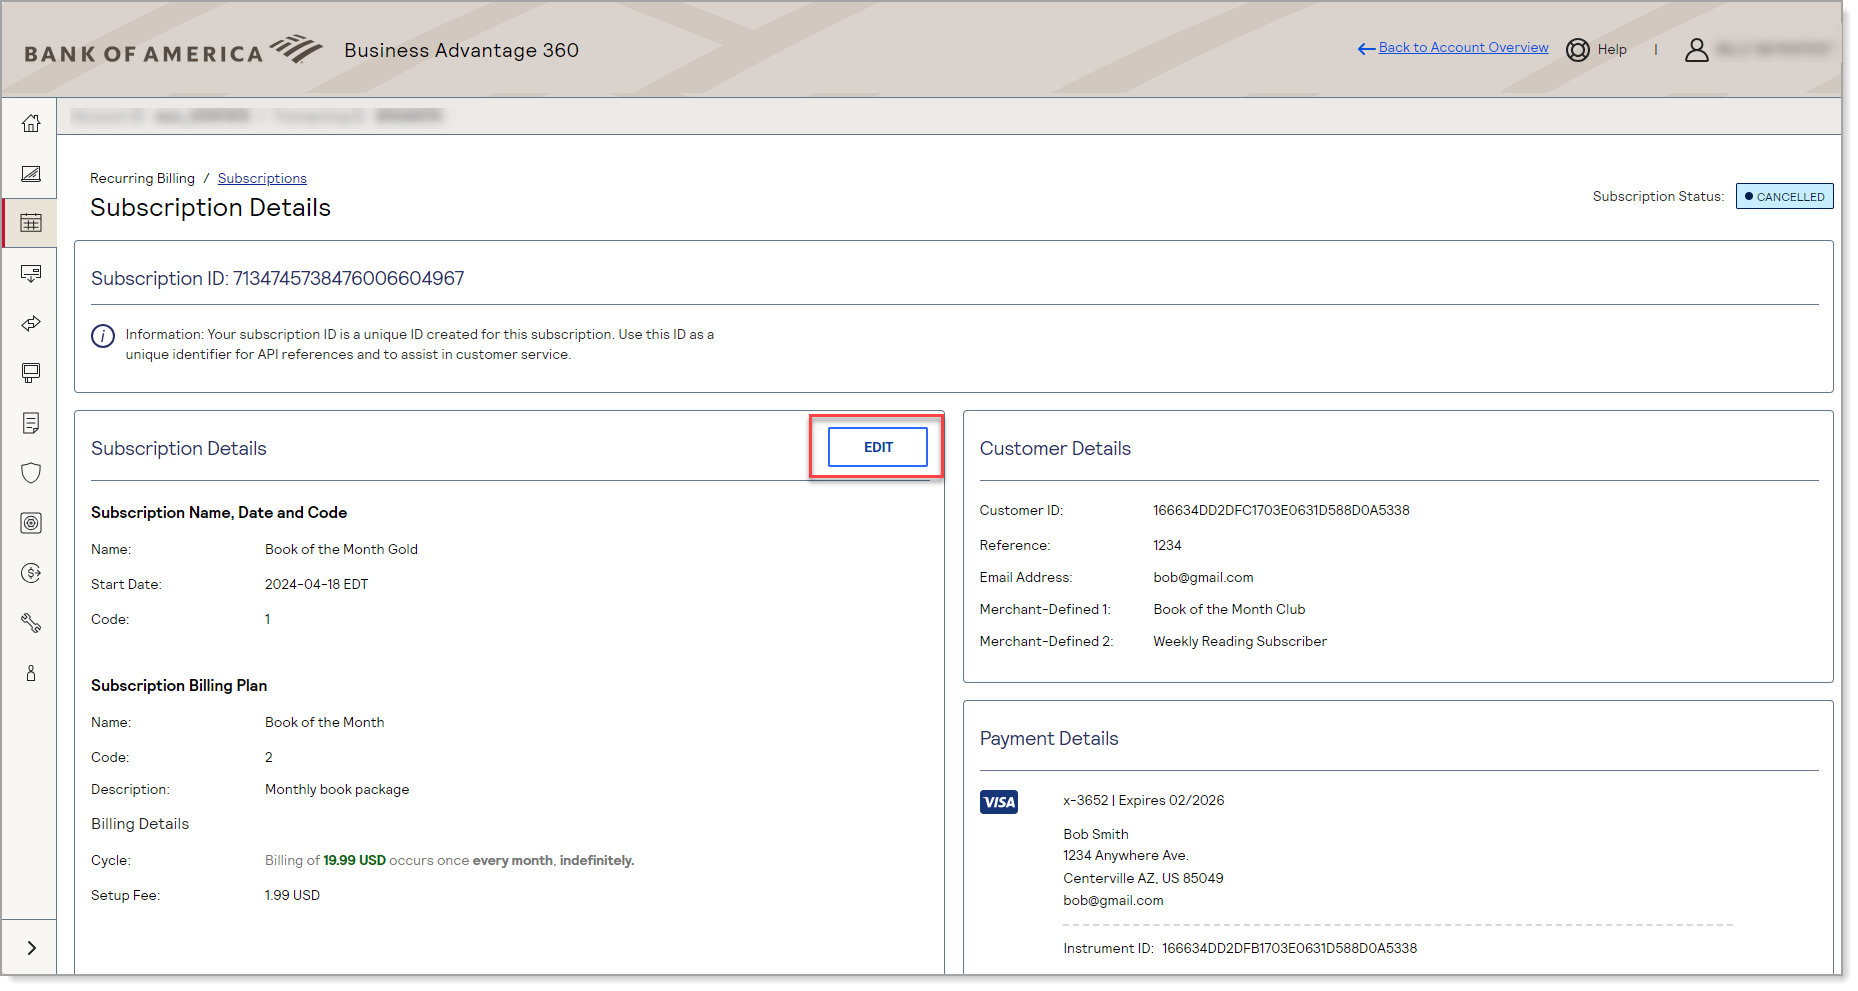
- Make desired changes. You can change the subscription code and subscription name, plan option, and billing amount for an active subscription. You will not be able to edit the Start Date. If you are unable to edit these fields, check that the subscription is in Active status. Payment information is stored in the token and can be changed by updating the token in Token Management.
- Click Update.
NOTE:
You can also access the subscription through Token Management by selecting the customer's token ID, then selecting the Subscriptions tab and clicking the Subscription Code. You can also create a new subscription directly from the Token Management Token Details page by clicking Create a New Subscription.
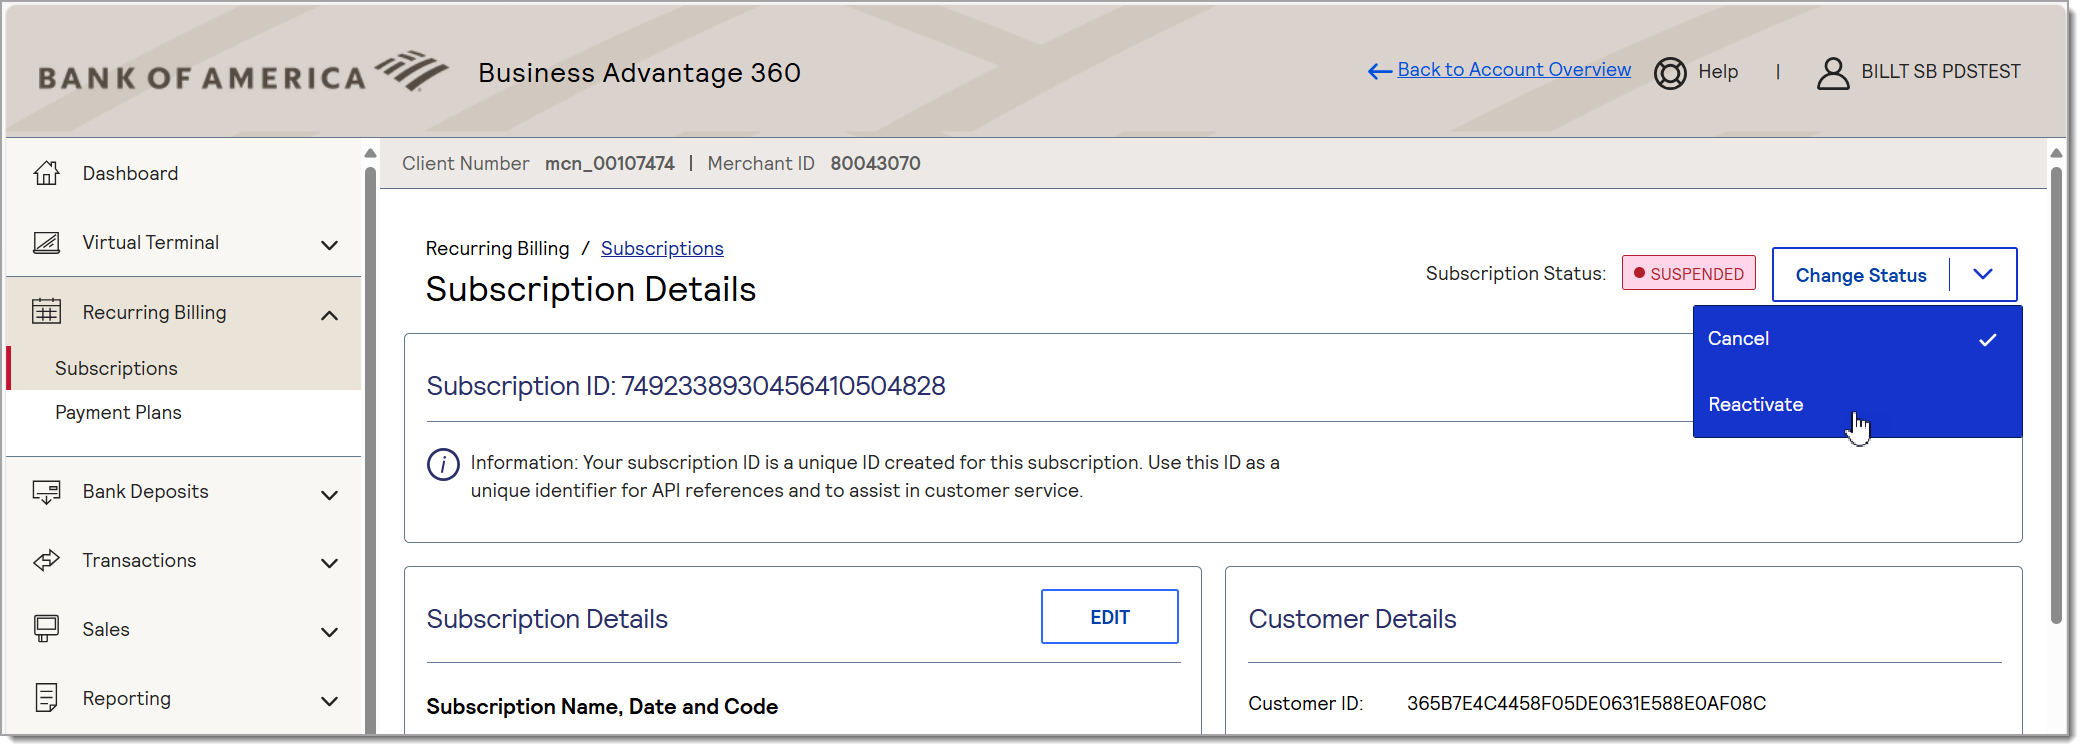
- Cancel or reactivate a subscription
- Log in to your Merchant Services account in Business Advantage 360 online banking.
- Select Recurring Billing > Subscriptions.
- Locate the subscription and click the Subscription Code hyperlink.
- From the Change Status dropdown list, select Cancel or Reactivate.
Reports
You can create a report subscription that will contain detailed information about recurring billing transactions.
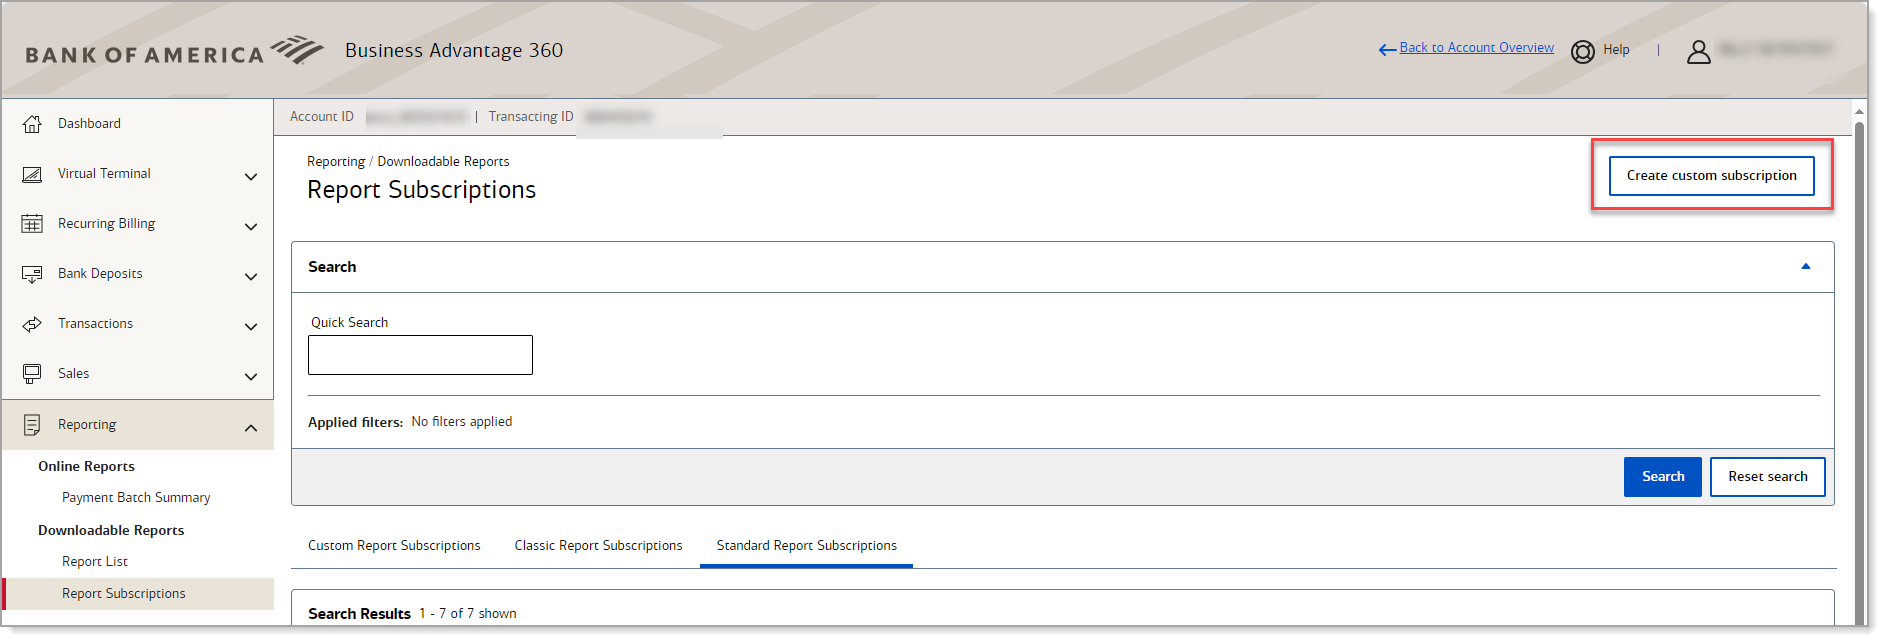
- Create a report
- Log in to your Merchant Services account in Business Advantage 360 online banking.
- Select Reporting > Report Subscriptions.
- Click Create Custom Subscription in the top right corner of the screen.
- Choose the File Format: CSV or XML.
- Enter a Report Name. This is a required field.
- Choose your report Subscription Frequency from the dropdown list: Daily, Weekly or Monthly.
- Choose your Subscription Time Zone and then choose a Start Time.
- Leave the Frequency as the default: Recurring Report Subscription.
- From the Report Type dropdown list, select Recurring Billing Detail Report.
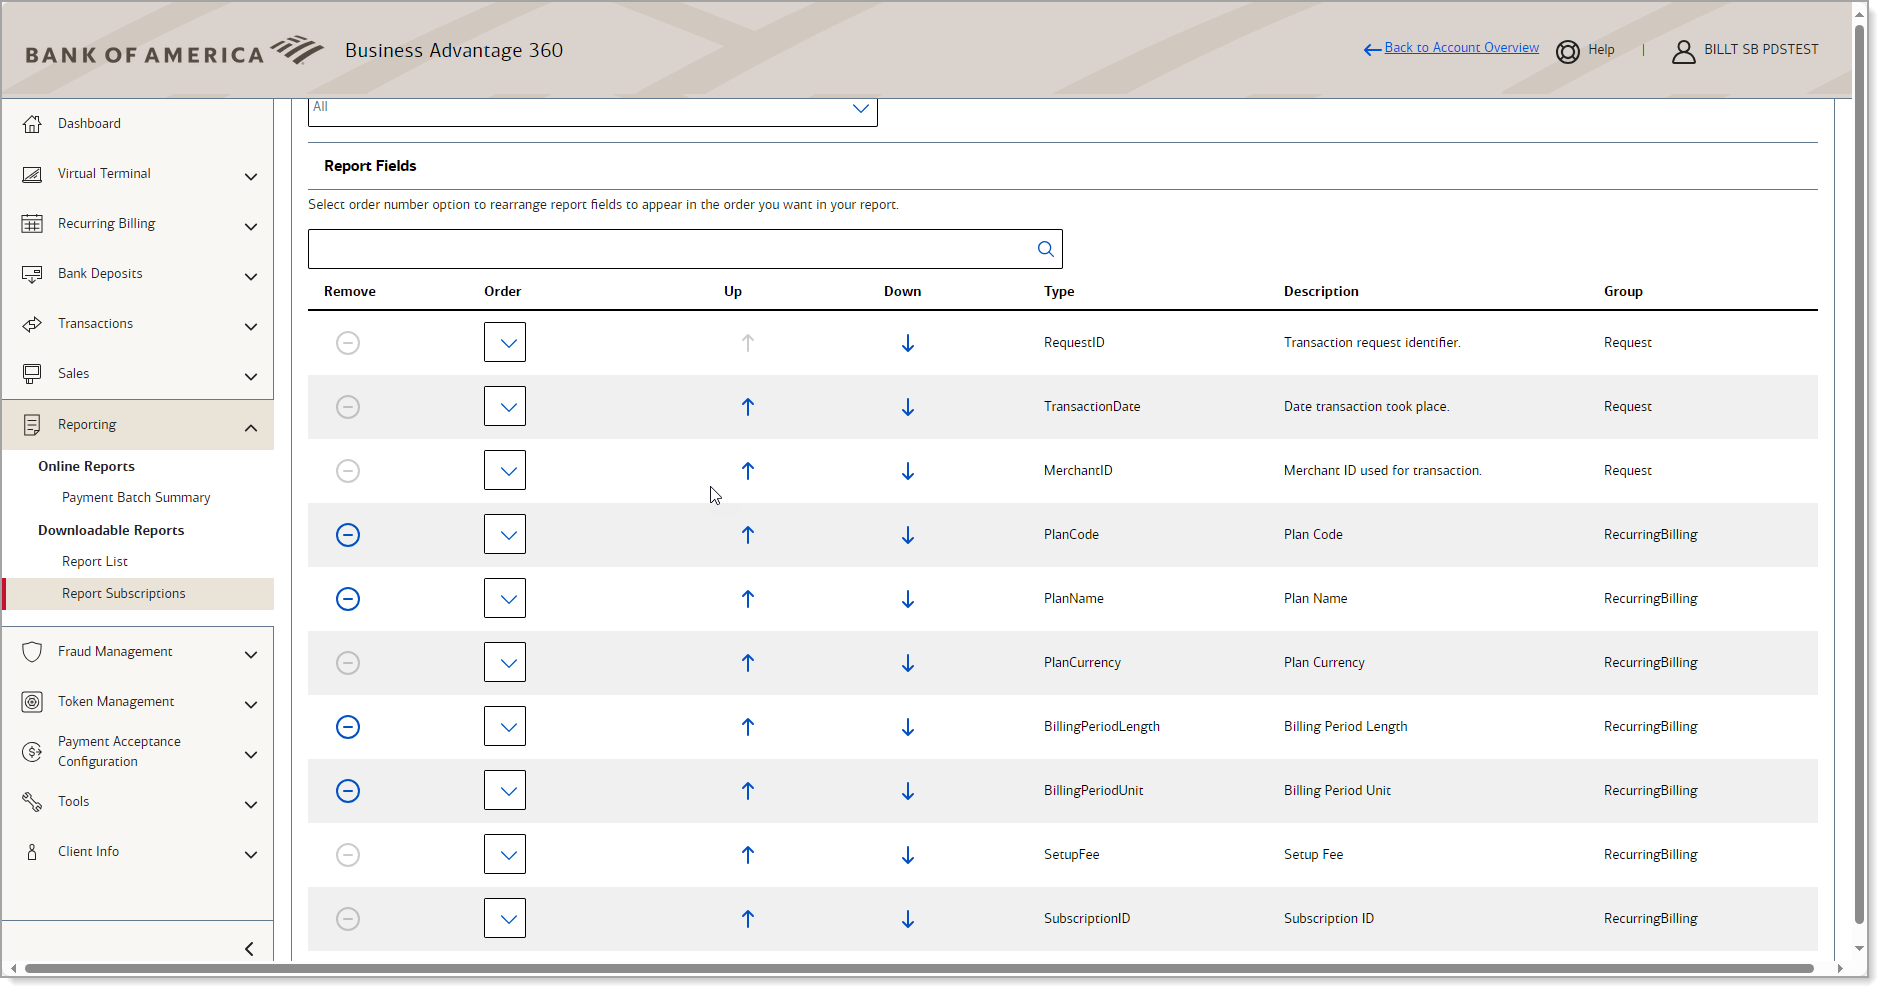
- If desired, customize your report fields:
- Click the Remove icon to remove a field
- Select Add Fields at the bottom of the list to add additional fields to the report.
- Choose an order from the Order dropdown list or use the up and down arrows to reorder the fields.
- Click Create.
NOTE:
This article is written for merchants who manage Recurring Billing within their Business Advantage 360 online banking Merchant Services account. (Business Advantage 360 is our Small Business Online Banking platform.) This article is not written for advanced e-commerce merchants who integrate to the Bank of America Gateway via our Card Not Present Integration Toolkit and manage this service via API.