Countertop A80 and PIN Pad SP30 Setup
Description
What's in this article?
The Countertop A80 is a payment-only device that's easy to set up and is compatible with the optional, client-facing PIN Pad SP30. The A80 works with our Basic Payment Solution.
Watch the video
- [Music in background throughout]
- [Countertop terminal, PIN Pad terminal and Bank of America® logo are displayed throughout.]
- Thank you for choosing the Countertop Payment Solution from Bank of America. This video will show you how to set up your terminal and prepare to take payments, so feel free to stop, rewind, and rewatch any sequence.
- On screen copy: Countertop A80 and PIN Pad SP30
- [User opens box to find welcome kit]
- To start, remove the sleeve and open the box, or boxes. Inside, you’ll find a welcome kit including a welcome letter, a quick set-up guide and a card acceptance decal for your location, along with other useful and important information.
- On screen copy:
- Welcome Kit
- Welcome letter
- Quick set-up guide
- Card acceptance decal
- PCI compliance guide
- Now, remove your terminal, which is powered down, and make sure you have both parts of the power cord, and a few rolls of receipt paper which may be in the side compartment, or under the terminal unit. On the underside of the terminal, you’ll find several labeled ports for connecting to power, ethernet access, and tethering to a PIN pad.
If you did not opt for an SP30 PIN pad for your customers to use at your point of sale, feel free to skip this next part. - On screen copy:
- SP30 PIN Pad
- If you do have a PIN Pad, do NOT plug the power in yet
- But if you do have a PIN pad, do not plug your power in yet.
- Instead, open the box for your PIN pad and plug the hard-wired tether cord into the pin pad port, here on the bottom right of the A80 terminal.
- It’s important to power up the terminal and the PIN Pad together, so now you can attach the power cord to the bottom of the terminal, fasten the two cords through the guides to secure them and then plug the unit into an outlet.
- Whether you have a PIN Pad or not, the terminal will power up when it’s plugged in for the first time. You can also turn it off or on by holding the red button for three seconds.
- Now, to get your unit online, you will either need to plug in an ethernet cable connected to a network into the LAN port, here, or you can connect your terminal to a Wi-Fi® network.
- On screen copy:
- Getting online
- Swipe down from the top of your terminal screen and you’ll see the controls to turn on your Wi-Fi connection.
- [Screen is swiped down to reveal Wi-Fi sign-in screen]
- On screen copy:
- XYZ Network
- Bank of America® logo
- Swipe down from top for Wi-Fi®
- You will need to have the name and password for your secure Wi-Fi network, but once you have connected, you only have one more step before you’re ready to go.
- On screen copy:
- Please input password
- Bank of America® logo
- [Password populates as “*********”]
- On screen copy:
- Loading the paper
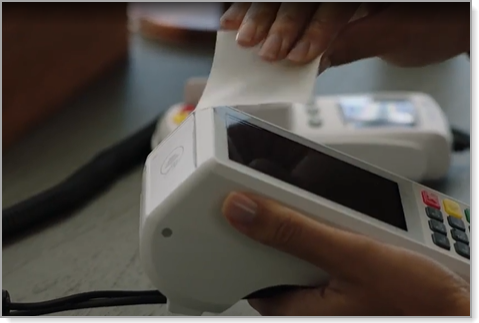
- Gently lift the tab of the printer paper door. Place a fresh roll of paper with the end extending from the top about two inches above the roll.
- Then close the door, leaving the top of the paper extended outside the door, and tear off the excess. Now you are able to accept payments and give receipts.
- On screen copy:
- Make sure door closes fully
- Touch the Bank of America app icon on the screen to begin a card transaction with a customer.
- [Bank of America app tile is tapped and point of sale machine opens card transaction screen]
- To pay, they can tap their card or mobile device on the front of the terminal.
- [Customer demonstrating tap to pay, inserting card and swipe for payment using a Bank of America® VISA card]
- On screen copy:
- Tap the card
- Or insert a chip card, face up and chip side first, into the bottom of the terminal.
- On screen copy:
- Insert chip card
- Or, if the terminal can’t read the chip, swipe the card on the side with the magnetic stripe facing into the terminal.
- On screen copy:
- Swipe the card
- If you also have a PIN pad, the customer can use it for contactless payment, or insert their chip card. Or if necessary, swipe their card, and enter their PIN number if needed as well.
- Now, you should be ready to take payments with your new Countertop A80 terminal.
- If you have any difficulties or questions, call technical support at 833.344.2324, or visit bankofamerica.com/MerchantHelp. Thank you for choosing Bank of America for your business.
- On screen copy:
- We’re here to help
- Technical Support
- 833.344.2324
- For more information visit
- bankofamerica.com/MerchantHelp
- On screen copy:
- Bank of America® logo
- On screen disclosures:
- A Bank of America business checking account is required to apply for a Merchant Services account. You must be enrolled in Business Advantage 360, our small business online banking, to have a Merchant Services account from Bank of America. Merchant Services processing funds must be settled into a Bank of America business checking account.
Banking products and services are provided by Bank of America, N.A. and affiliated banks, Members FDIC and wholly owned subsidiaries of Bank of America Corporation.
Wi-Fi®, the Wi-Fi logo, the Wi-Fi CERTIFIED logo, and other marks are trademarks of Wi-Fi Alliance.
© 2023 Bank of America Corp. All rights reserved. All trademarks, service marks and trade names referenced in this material are the property of and licensed by their respective owners.
What's in the box
Inside the box you will find the following items:
- Countertop A80
- AC power adapter
- AC power supply
- Thermal paper rolls
- Ethernet cable
A Merchant Information sticker, featuring your unique merchant identification number (MID#) and the Technical Support phone number, has been affixed to the terminal. Your MID will be needed to identify your account any time you contact Customer Service or Technical Support.
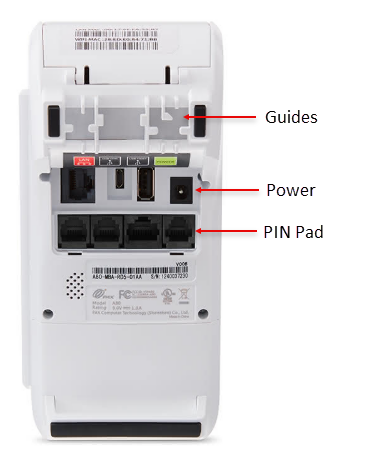
1 Connect the PIN Pad
The PIN Pad SP30 connects directly to the A80 terminal as a secure external PIN pad via hard-wired tether cord provided. It is ADA-compliant, featuring raised dot indicators on the number keys, a raised X for Cancel, raised O for Enter and a raised arrow for the Clear key. It can take chip, magnetic stripe and contactless payments. The connection cord between the PIN pad and terminal is 6 feet in length.
IMPORTANT!
If you are using the PIN pad, connect the PIN Pad to the terminal before connecting the terminal to power. The PIN Pad will automatically power up and power down with the A80.
- Ensure the A80 terminal is powered off and unplugged.
- Connect the PIN Pad cable to the PIN Pad port on the back of the A80 terminal and secure the cord through the guide.
- Also on the back of the terminal, plug the black L-shaped power supply cord into the terminal power port, and secure the cord through the guide.
- Plug the power cord into your surge protector (recommended) or wall outlet.
- When plugged in, the terminal should automatically power on and a chime will sound. The PIN pad will automatically power up with the A80 terminal.
NOTE: Your customer can use the SP30 to take a card payment (insert, tap or swipe) as well as enter a PIN for Debit. Other interactions, such as tipping, are performed on the A80.
To connect the A80 to power
Connect the A80 AC power adapter to the power port on the underside of the terminal, fastening the cord through the guide to secure it. The terminal will automatically power on when you plug it into a power source for the first time.

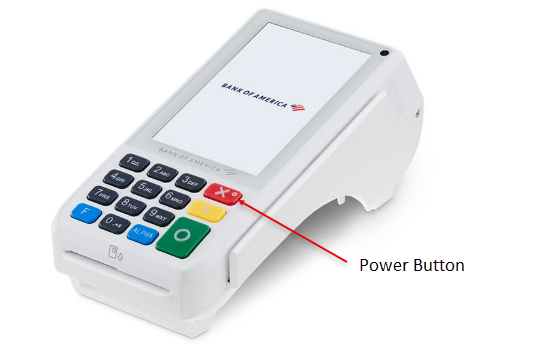
2 Power up
To power up the terminal, press and hold the red Power button until the display screen wakes. To power off, press and hold the Power button until the shutdown menu appears, then follow the steps to complete powering down.
If you are using the SP30 PIN Pad, it will automatically power up and power down with the A80.
3 Connect to the internet
You can use a Wi-Fi network and/or Ethernet cable connection to your router. You will need to know the name of your network and the password. Learn more about connecting to your network.
4 Load printer paper
The A80 terminal comes pre-loaded with a roll of printer paper, along with an additional three rolls in the box. Additional printer paper may be purchased from any office supply store.
- Gently lift the tab of the printer paper door.

- Place a fresh roll of paper with the end extending from the top about two inches above the roll.

- Fully close the door, leaving the top of the paper extended outside the door.
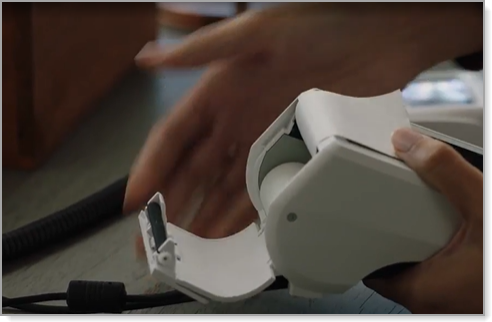
- Tear off the excess paper.
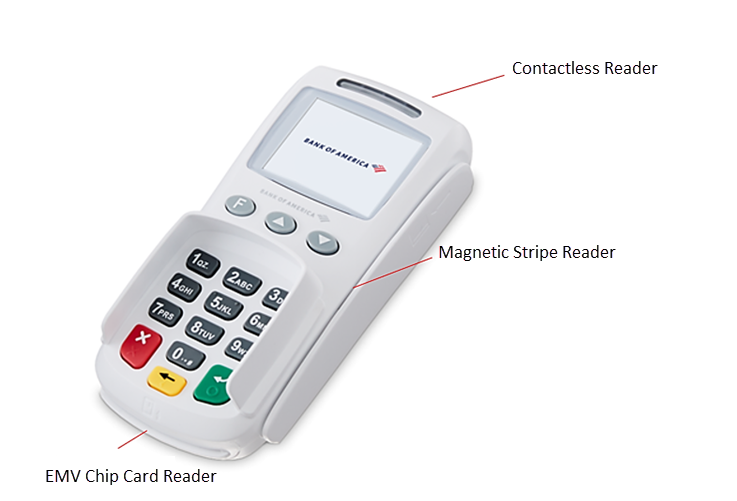
Take a payment on the Countertop A80
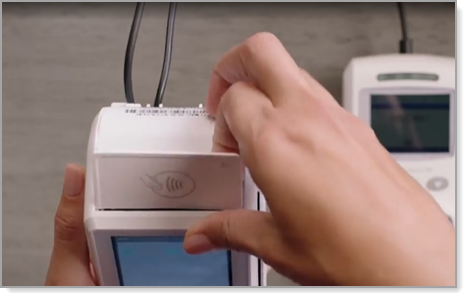
The Countertop A80 supports contactless card and mobile device "tap to pay" payments. Chip card insertion, and magnetic stripe swipe payments are also supported. If necessary, you can troubleshoot card swipe or insertion errors.
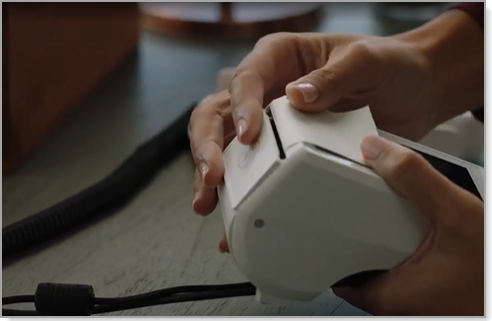
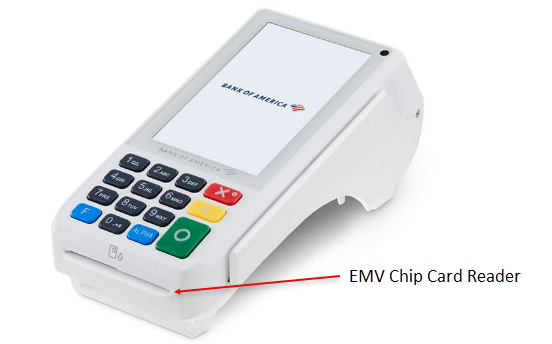
Insert the card into the chip card reader, chip end first, with the chip facing upwards. When prompted, remove the card.
Swipe the the card through the magnetic stripe reader with the stripe facing toward the bottom of the terminal.

Tap or hold the card to the contactless card reader on the top of the terminal.
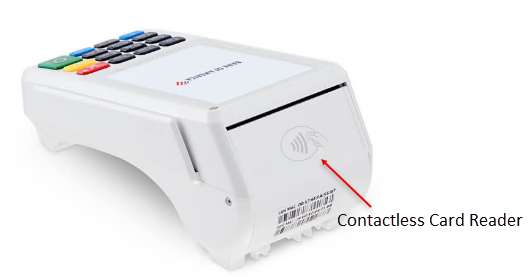
Hold the mobile phone/device to the contactless card reader on the top of the terminal. Your mobile device will then prompt you to approve the payment.
Take a payment on the PIN Pad SP30
The PIN Pad SP30 supports contactless card and mobile device "tap to pay" payments. Hold the card/payment device 1-2 inches away from the SP30 screen until a beep sounds. If the payment is successful, the blue, green, and yellow indicators will illuminate on the top of the PIN pad. Chip card insertion, and magnetic stripe payments are also supported.
Terminal settings
You can adjust your terminal settings to your preference, including; terminal volume and key sound, brightness and timeout (sleep).
Terminal care
For care guidelines, cleaning recommendations and other best practices, see Terminal Care.