Point of Sale Solution App Orders
Description
What's in this article?
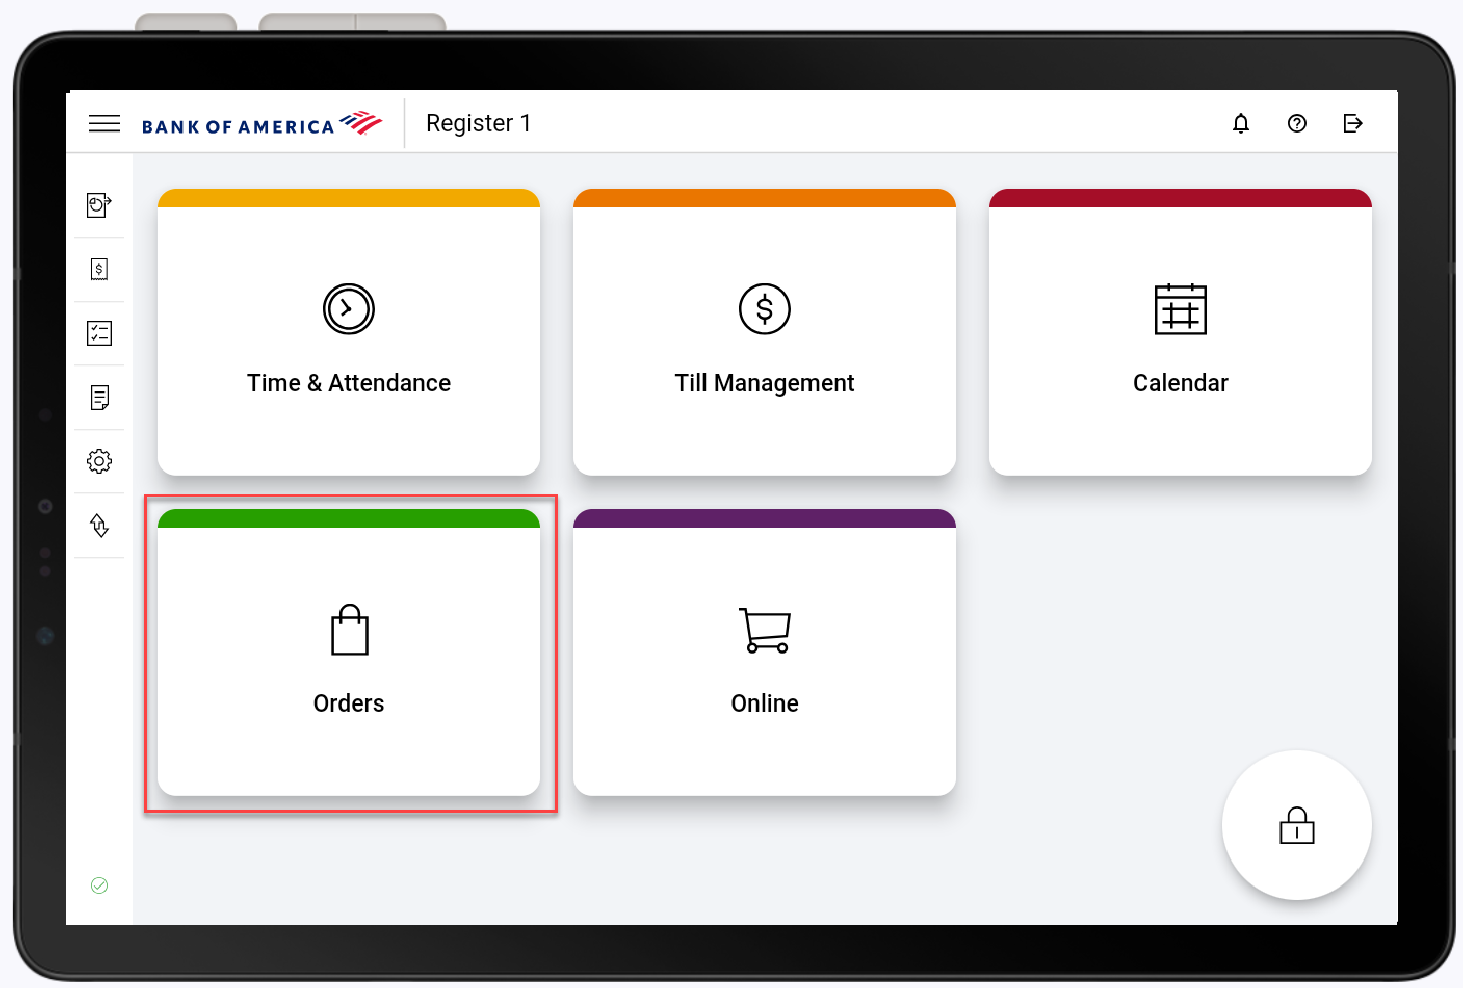
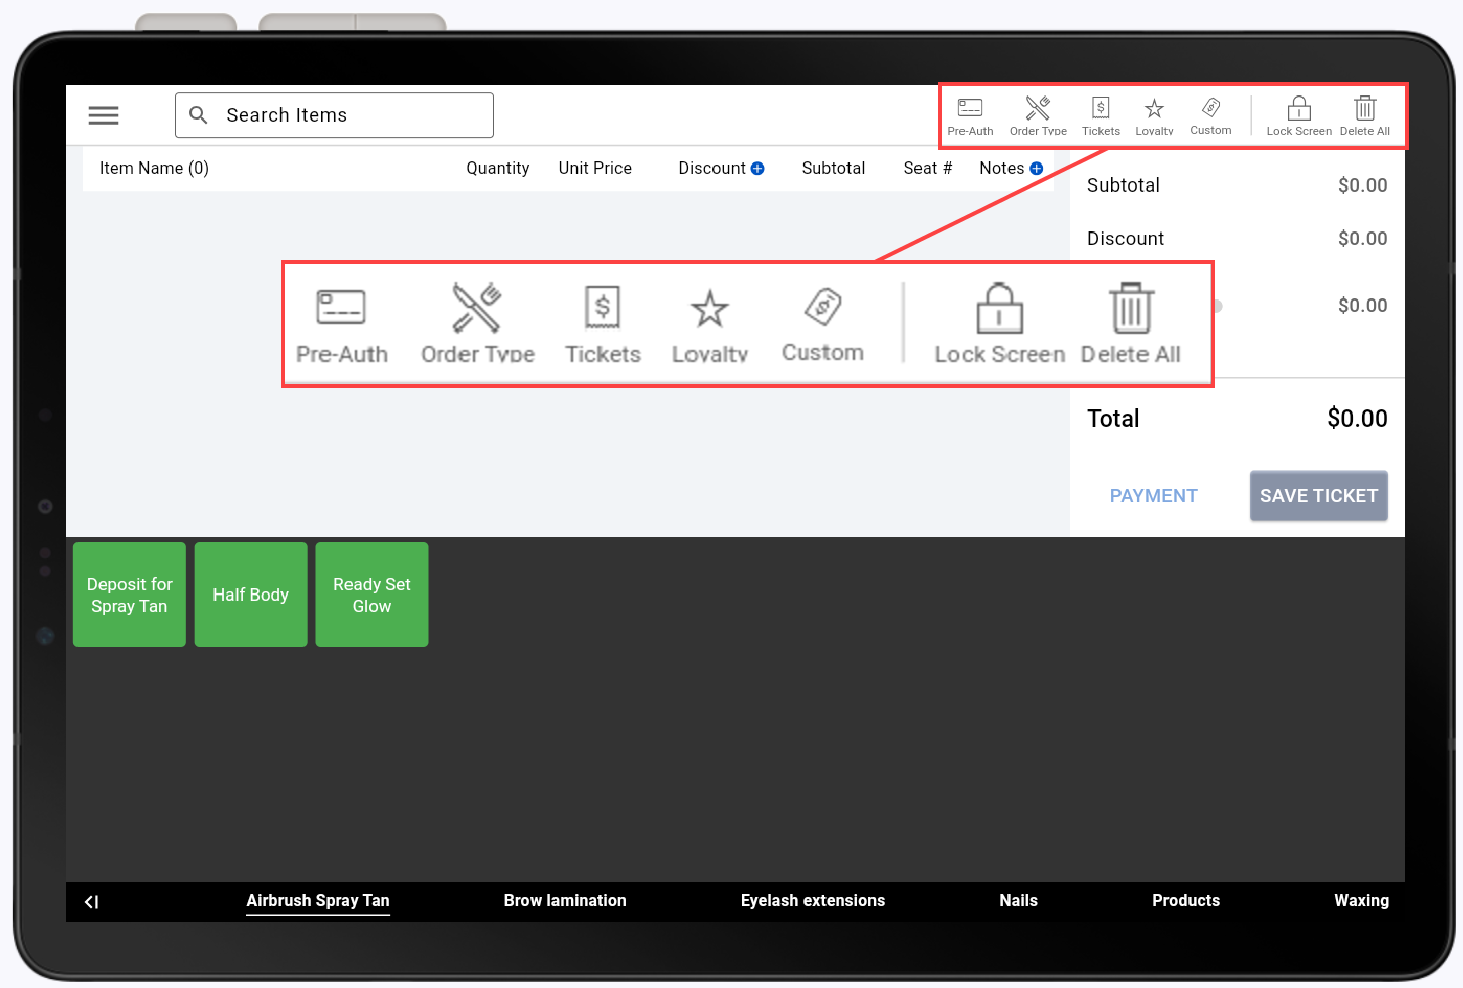
Start an order by selecting Orders from the main screen and then selecting an item. Additional order options are available in the top left corner of the screen to start a tab/pre-authorize a card, add an order type and the associated information, manage saved tickets, assign and redeem loyalty points for an order, and enter a custom product on the order.
Create an order
The items and categories you see in the Order screen are set in the Point of Sale Solution Back Office profile. If you are looking for a specific item, you can use the search option.
You can retrieve a saved order to add additional items or finalize the sale. When items that route to a kitchen printer are saved, they will print to their designated printer.
You can repeat a previous order by recalling the original order.
- *music*
- This video covers how to create, save, and retrieve an order in the Point of Sale Solution application.
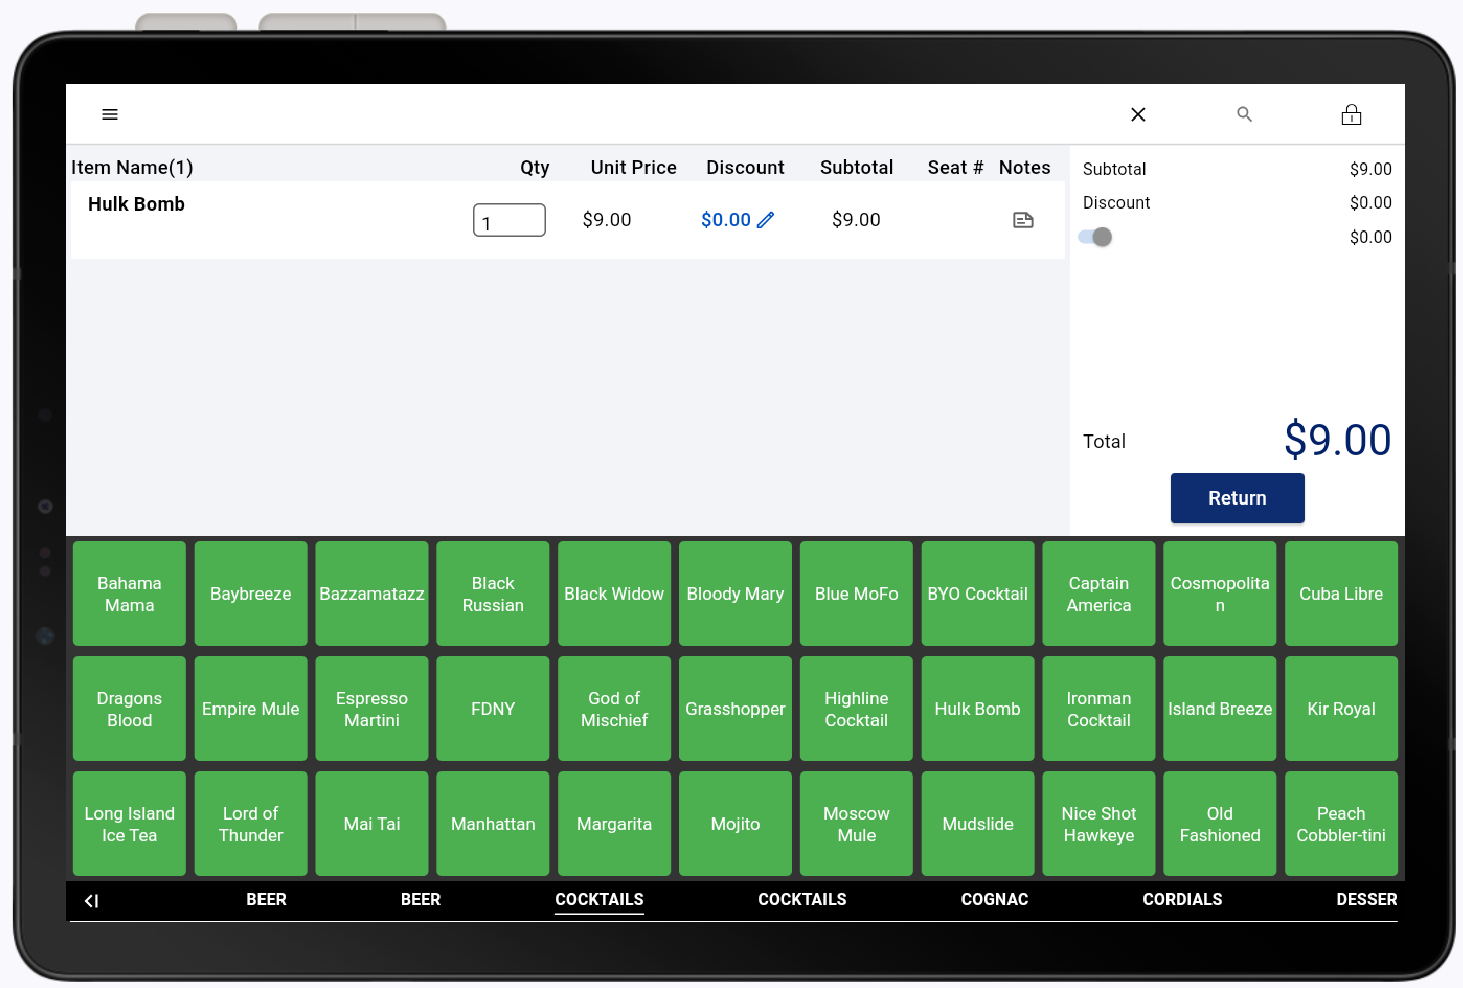
- To create an order, tap the Orders tile. Sort through the categories along the bottom of the order's screen to find the desired item.
- Tap on the item to add it to the order. If prompted, select an order type, complete the customer fields and tap Done.
- Add additional items if desired. To add multiple of one item, adjust the quantity by tapping the field and adjusting the number.
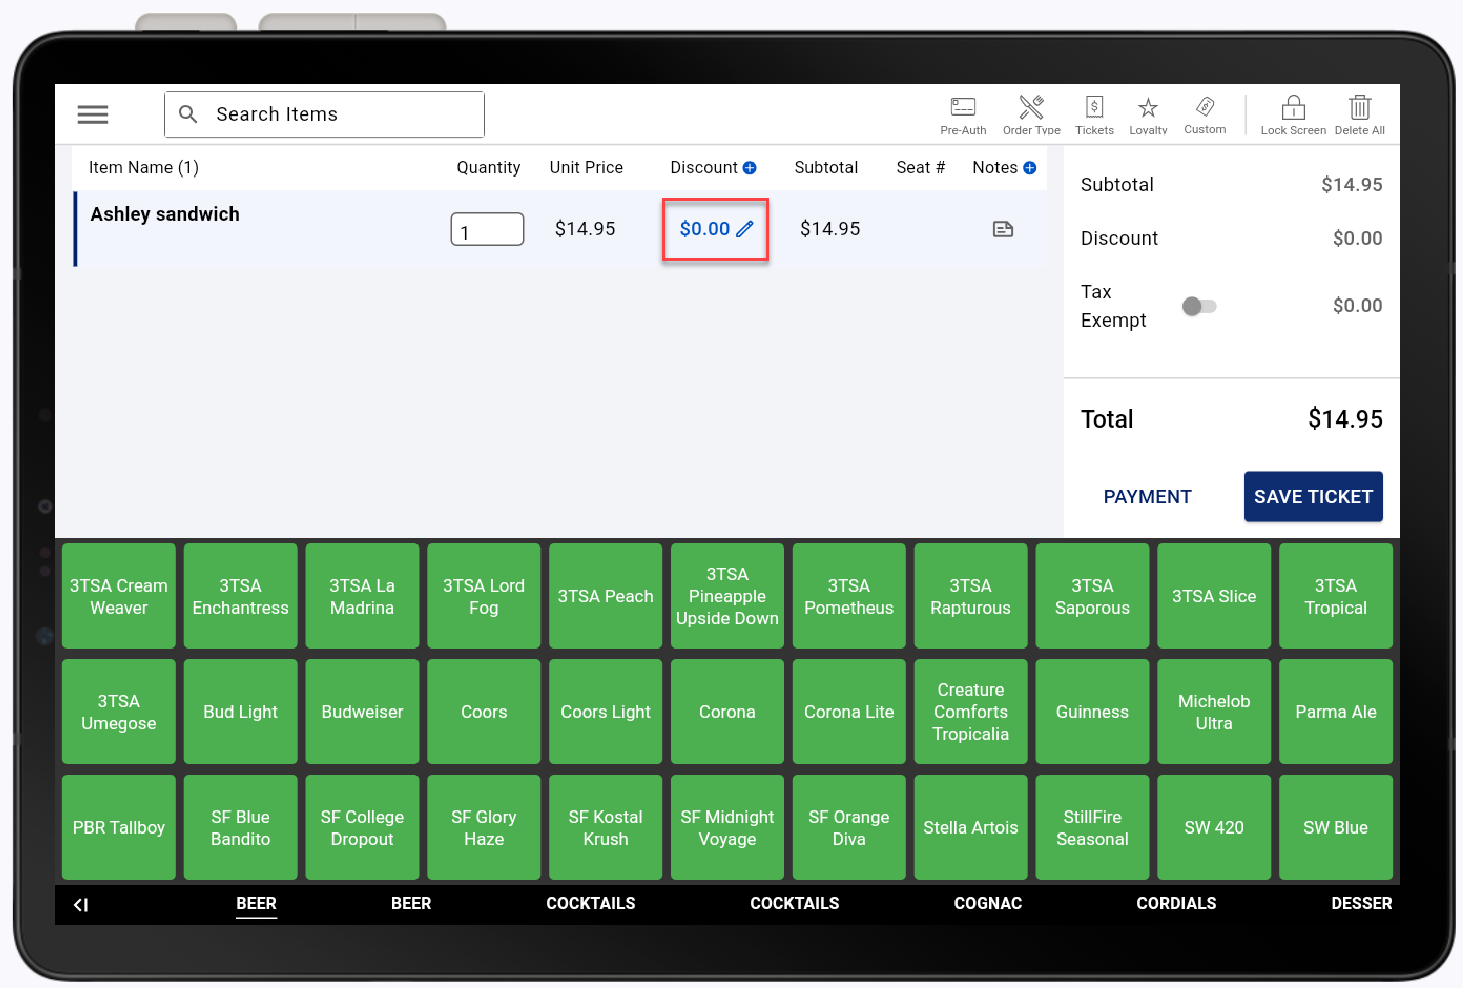
- If you'd like to add a discount to an item, tap the field under discount, and enter the percentage or dollar amount being discounted.
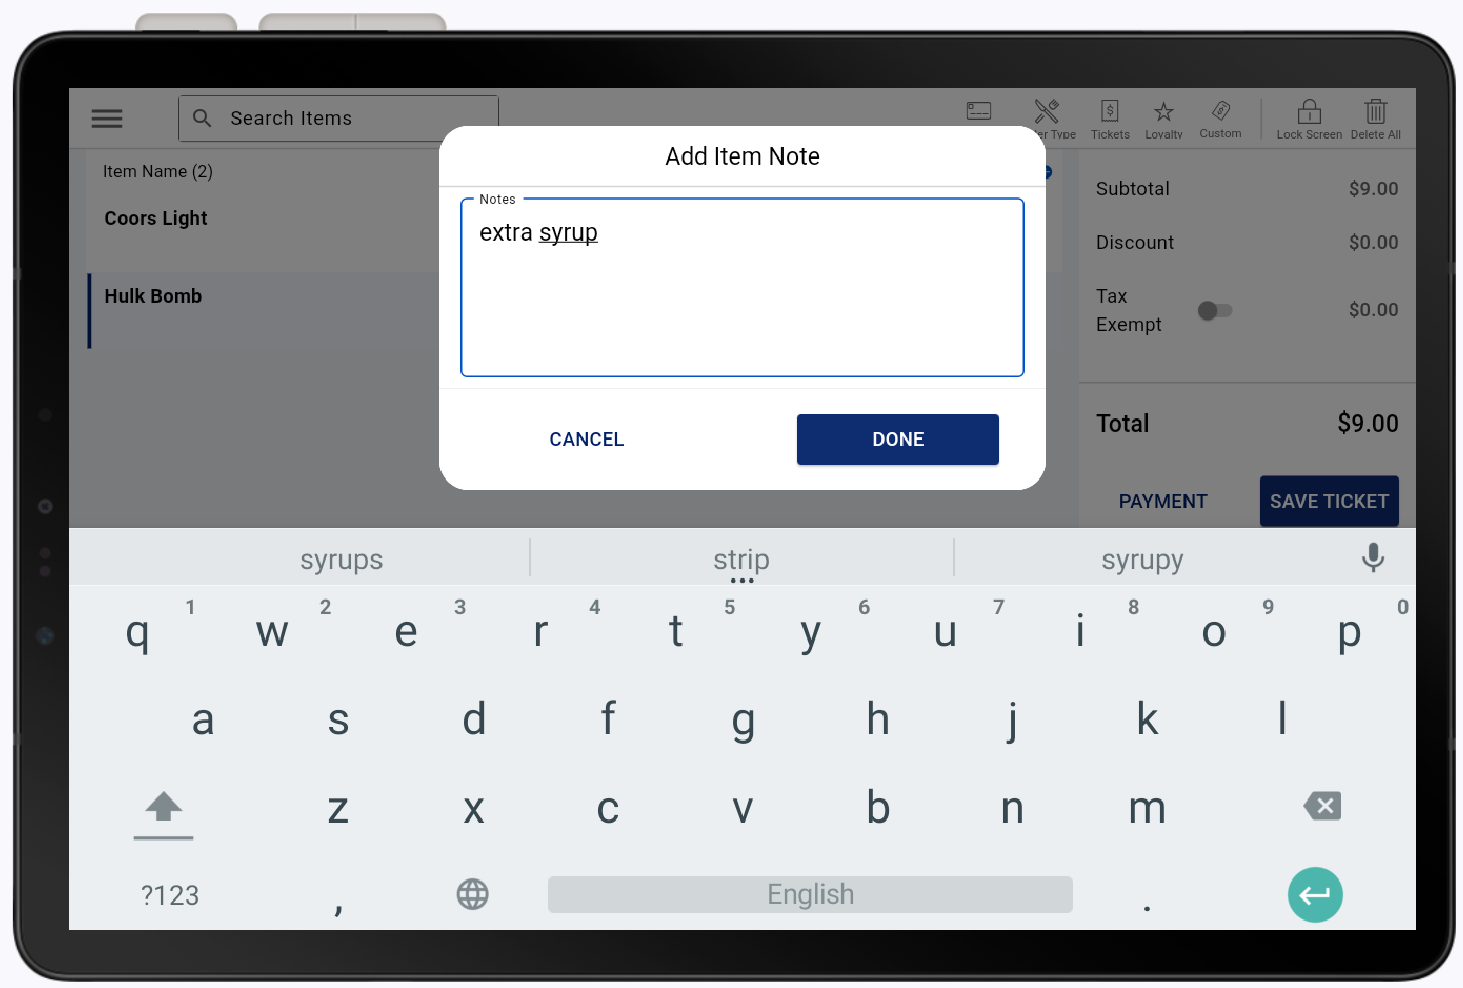
- Depending on your order type, you can assign a seat number to the order. To add notes, tap the note icon, align to the desired item, enter the information, and tap Save.
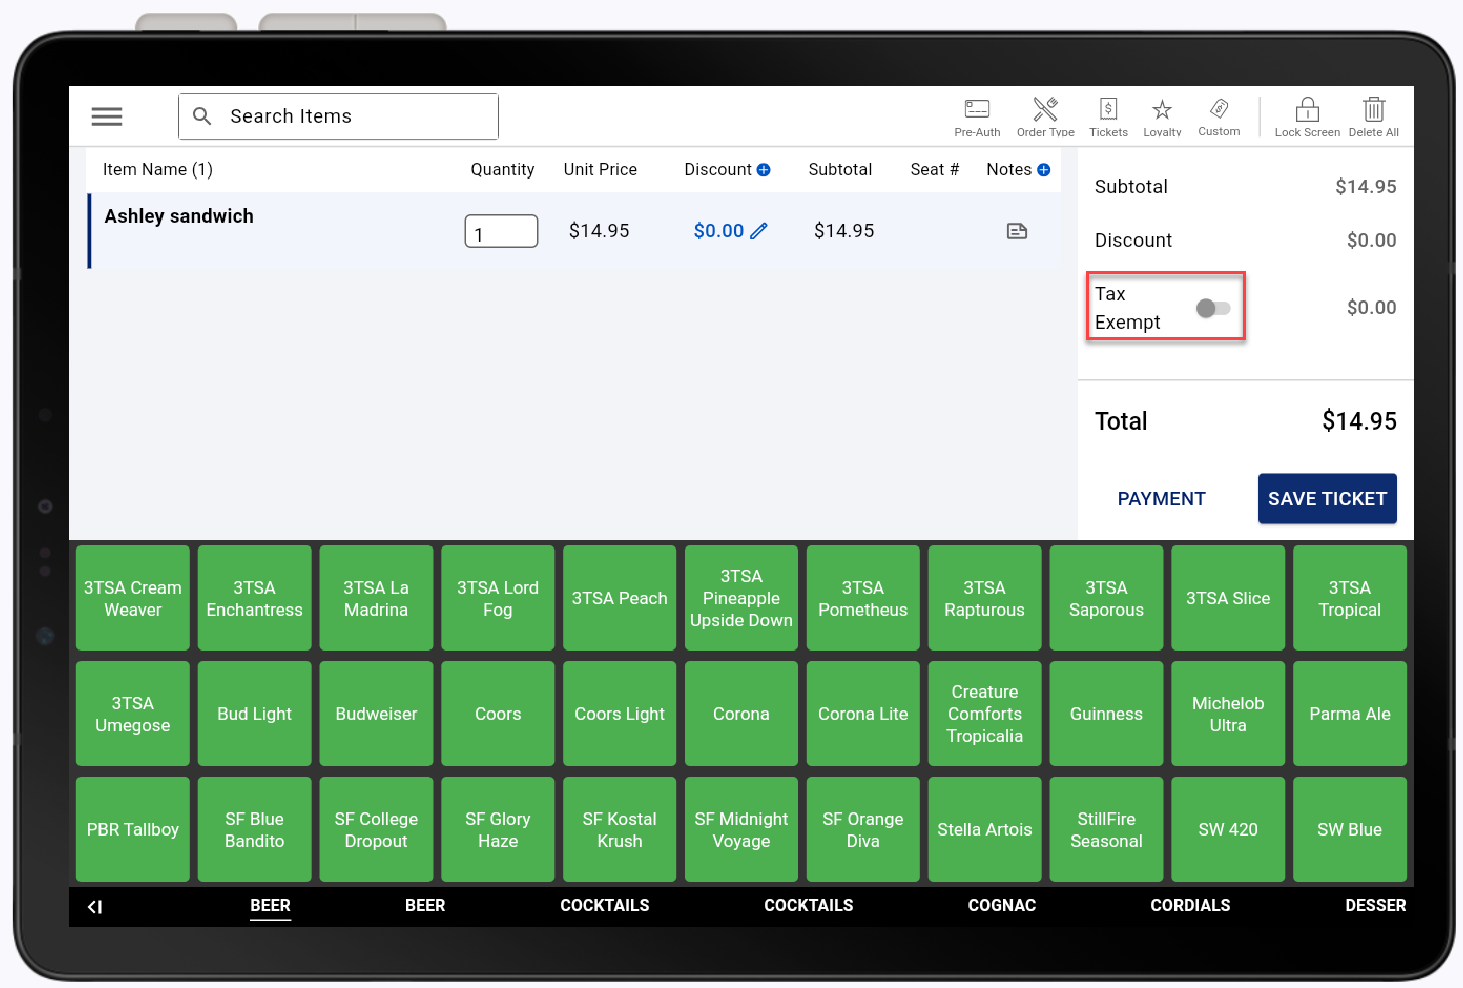
- If the order is tax-exempt, tap the toggle to enable the tax-exempt option. If you're not ready to take a payment, tap Save Ticket.
- You can retrieve a saved order by tapping table or ticket, depending on your business type.
- Tap the ticket number, aligned to your desired order. Tap Edit Order.
- *music*
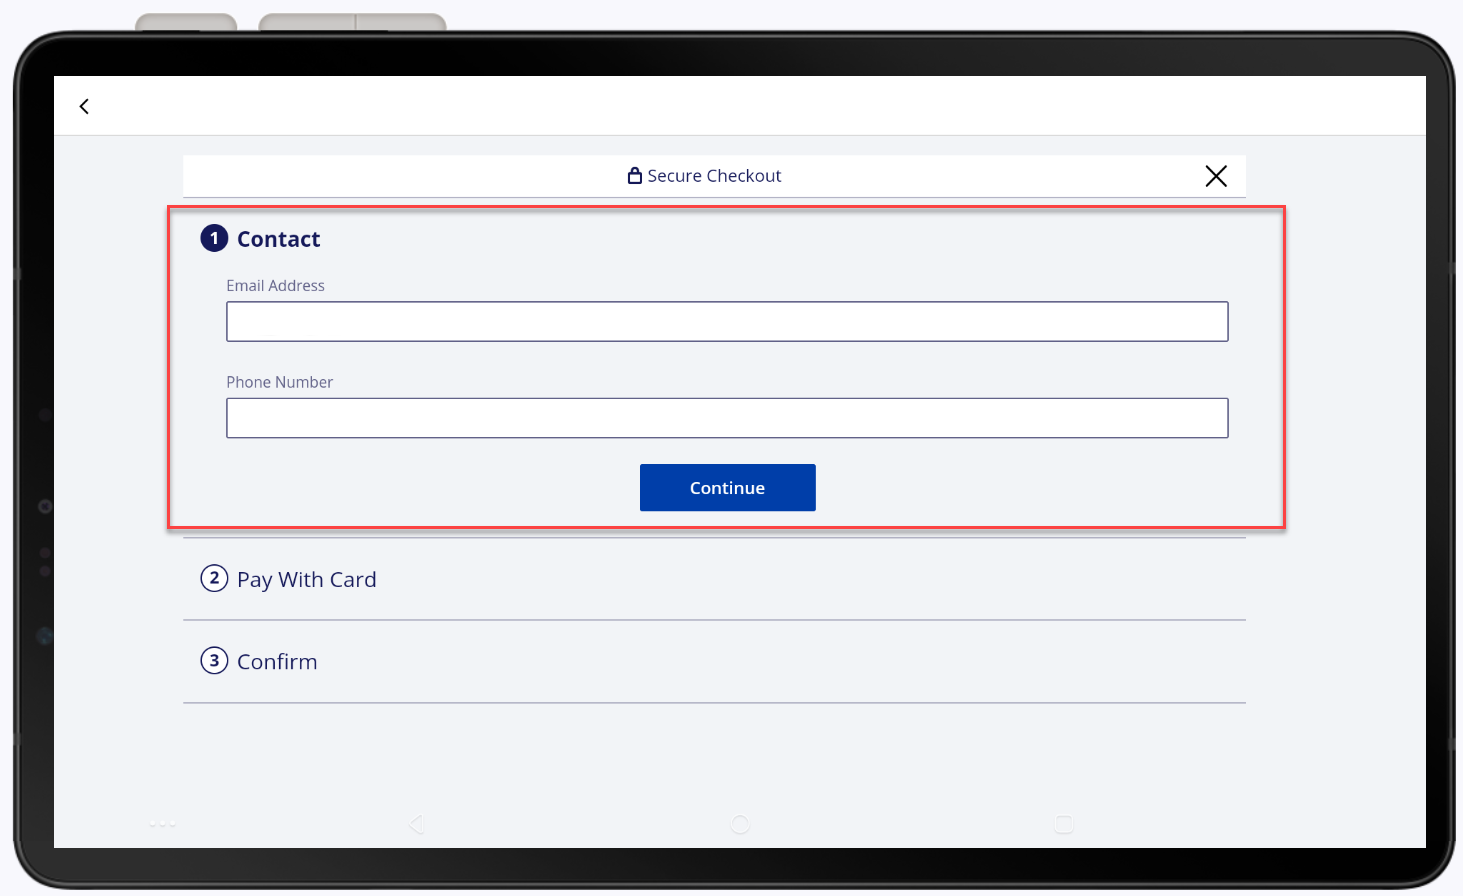
To create an order
- From the Point of Sale Solution app main screen, tap Orders.
- If prompted, select an order type from the tabs and then fill in the customer information required and tap Done.
For example, if you select a To Go order, you will need to enter the customer name and phone number of the person who will pick it up.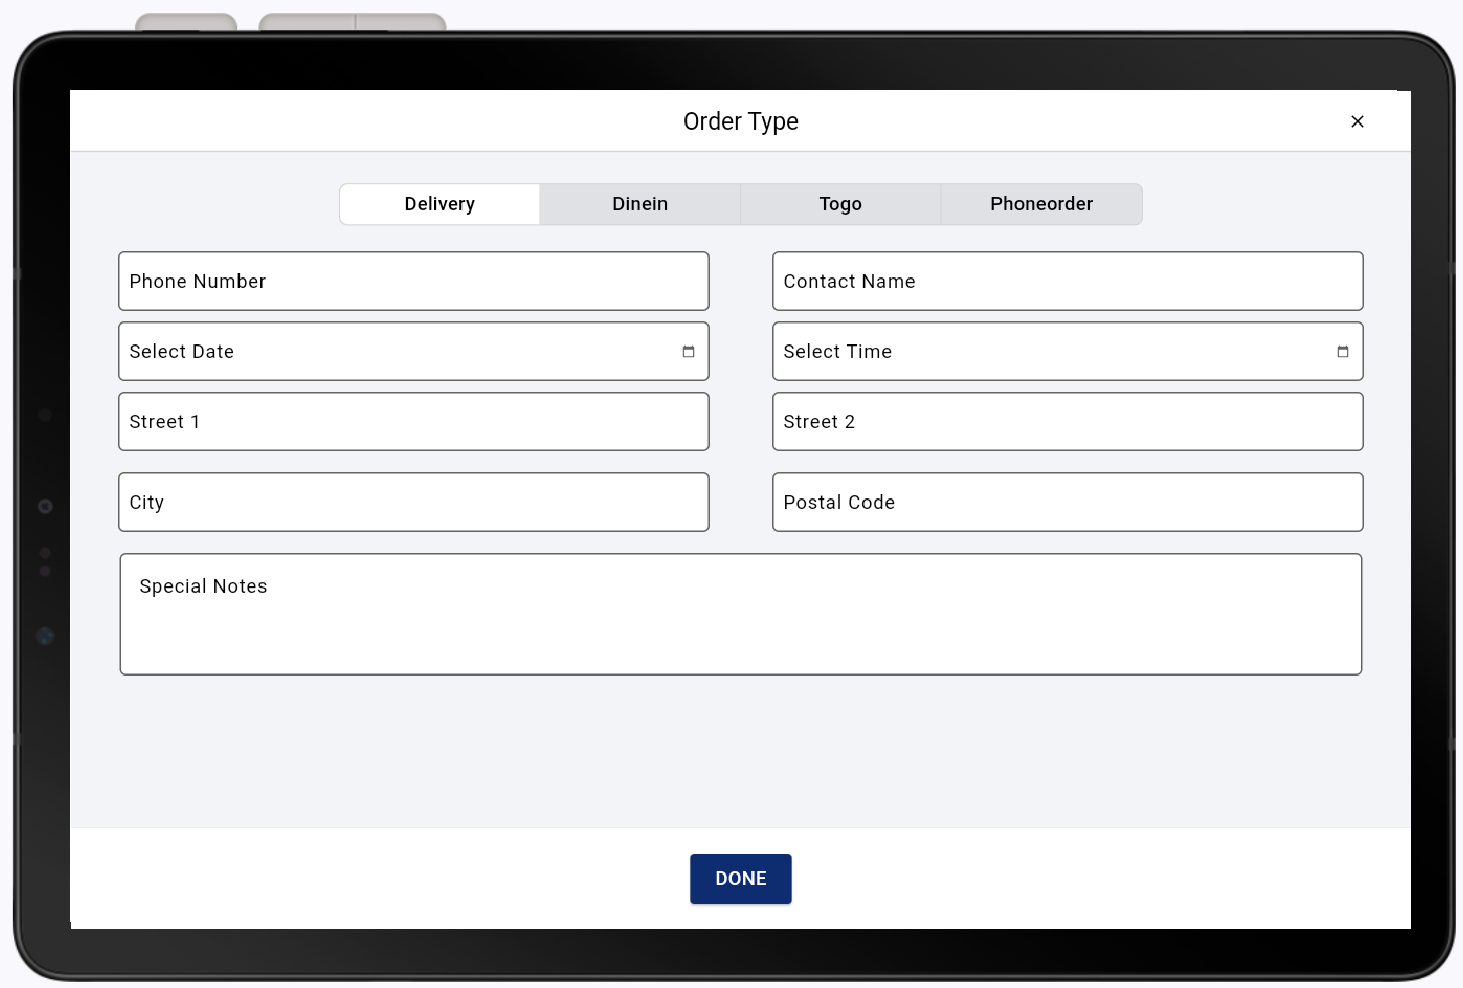
NOTE: If you are not prompted for an order type, but would like to add one, tap the Order Type button in the top right panel. To enable the prompt to automatically appear for every order, update the Hardware Settings.
Order type options Order Type Prompts Walk-in Phone number, contact name and special notes Delivery Phone number, contact name, date, time, address, special notes Pickup Phone number, contact name, date, time, special notes Dine in Phone number, contact name, table number, guests, special notes To go Phone number, contact name, special notes Phone order Phone number, contact name, special notes Drive Thru Phone number, contact name, special notes - Add items to the order by tapping a button on the profile. Switch categories by tapping at the bottom. If you have many categories, you can swipe right and left to move between them. A maximum of 33 items can display per category. Use the Search Items option to find a specific item in your inventory.

- If needed, tap Quantity to adjust the quantity.
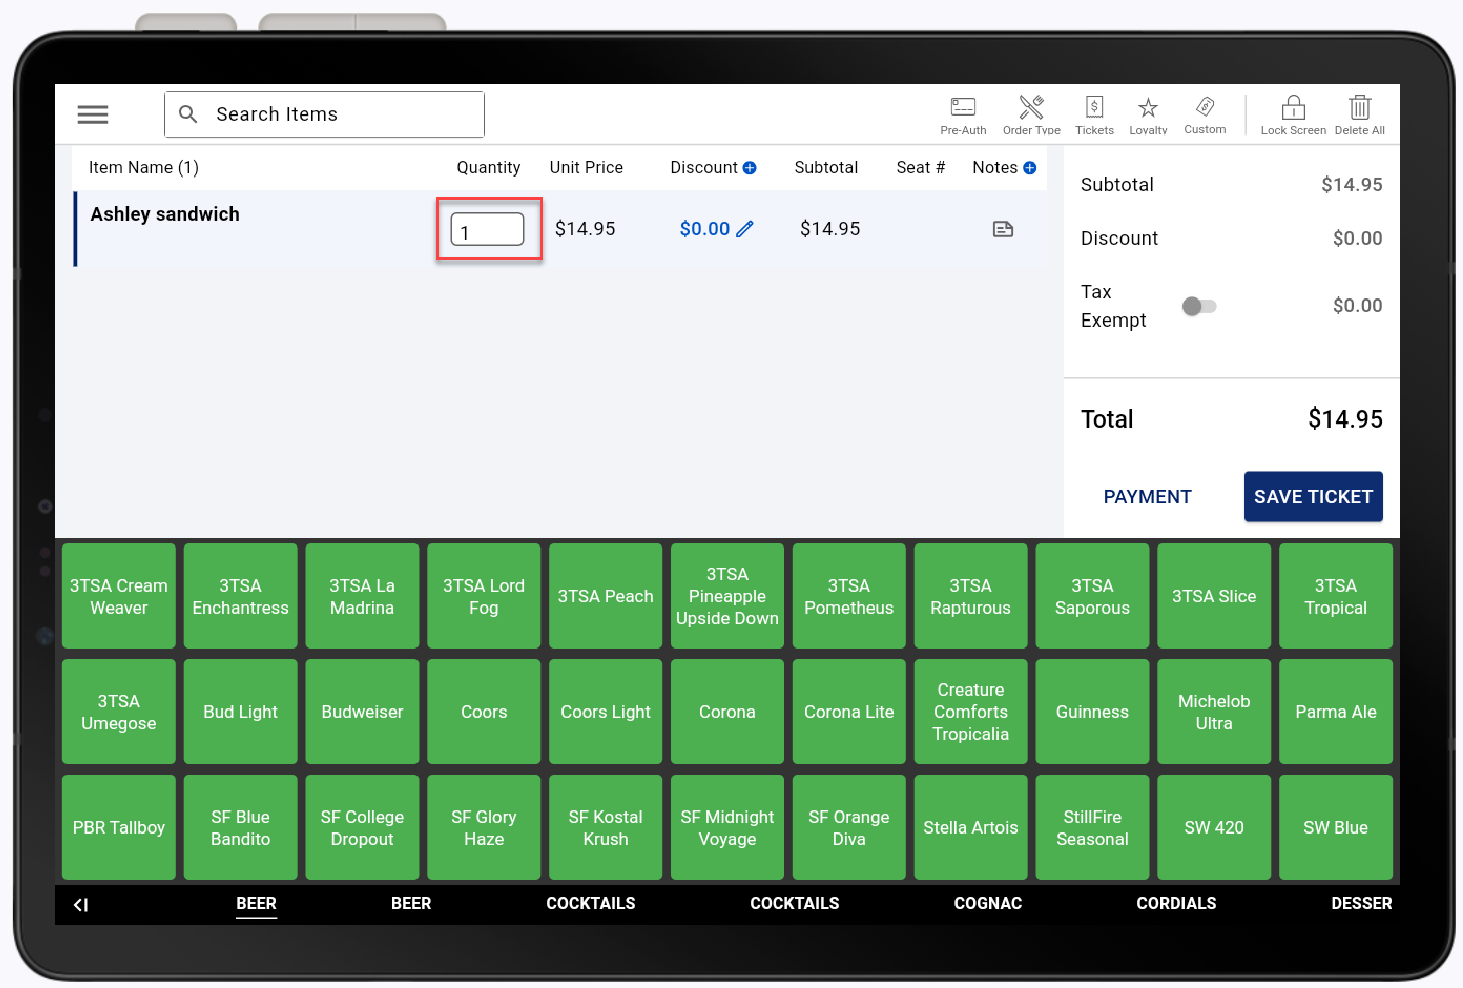
- If desired, tap Discount to add a discount as either a percentage of the item amount or a dollar amount. Automatic discounts created in the Back Office many be applied or tap Manual and enter a discount percentage or dollar amount. Manage your Discount settings in Back Office.
- If using table mapping, enter the seat number associated with the item.
- Tap the Notes icon to add a note to the sale, if desired.
- If tax exempt, tap to enable the Tax exempt option.
- Tap Payment or tap Save Ticket to save the transaction and return to it later.
NOTE: If your items route to a kitchen printer, the items will print to the kitchen printer when paid or the ticket is saved.
- Select a payment type and follow the prompts to accept the payment. See below.
To delete an order
You can delete an order by tapping Delete All from the Order options menu in the upper right corner.
To retrieve a saved order
- From the Orders screen, tap Tickets (or Tables if using Table Layouts) from the Order options menu in the top right.

- Tap the Ticket # to select the order from the list of recent orders. If using Table Layout, tap the table.
NOTE: If the order is not a recent one, search for the order by entering an order number from the receipt, the customer phone number or email in the top right corner search field.
- Continue with the order as needed.
To repeat a previous order
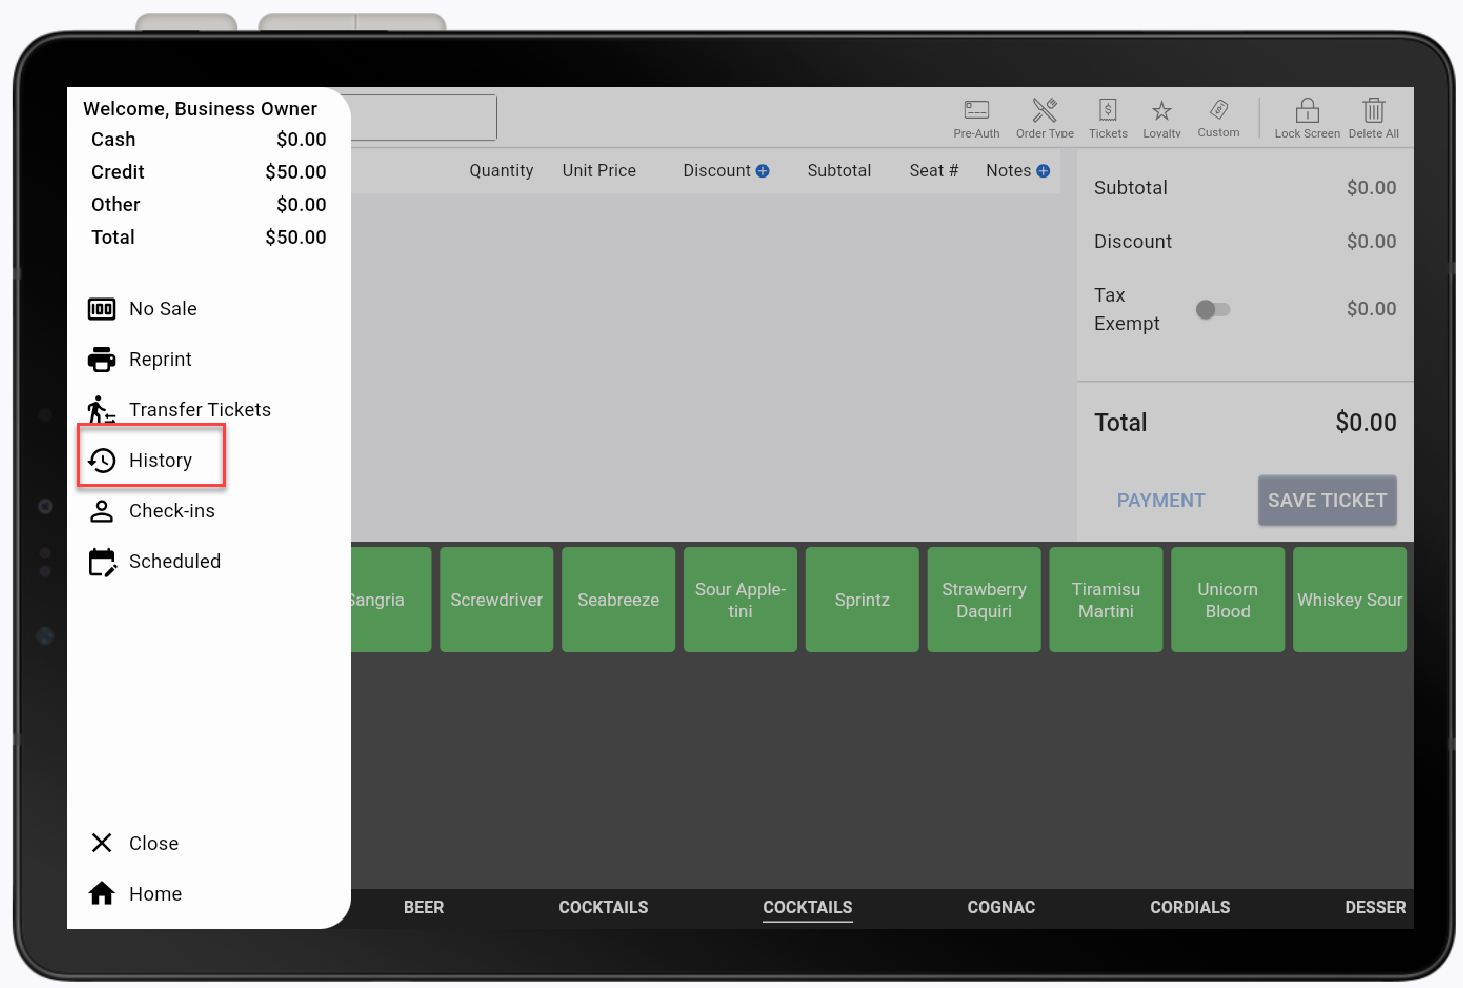
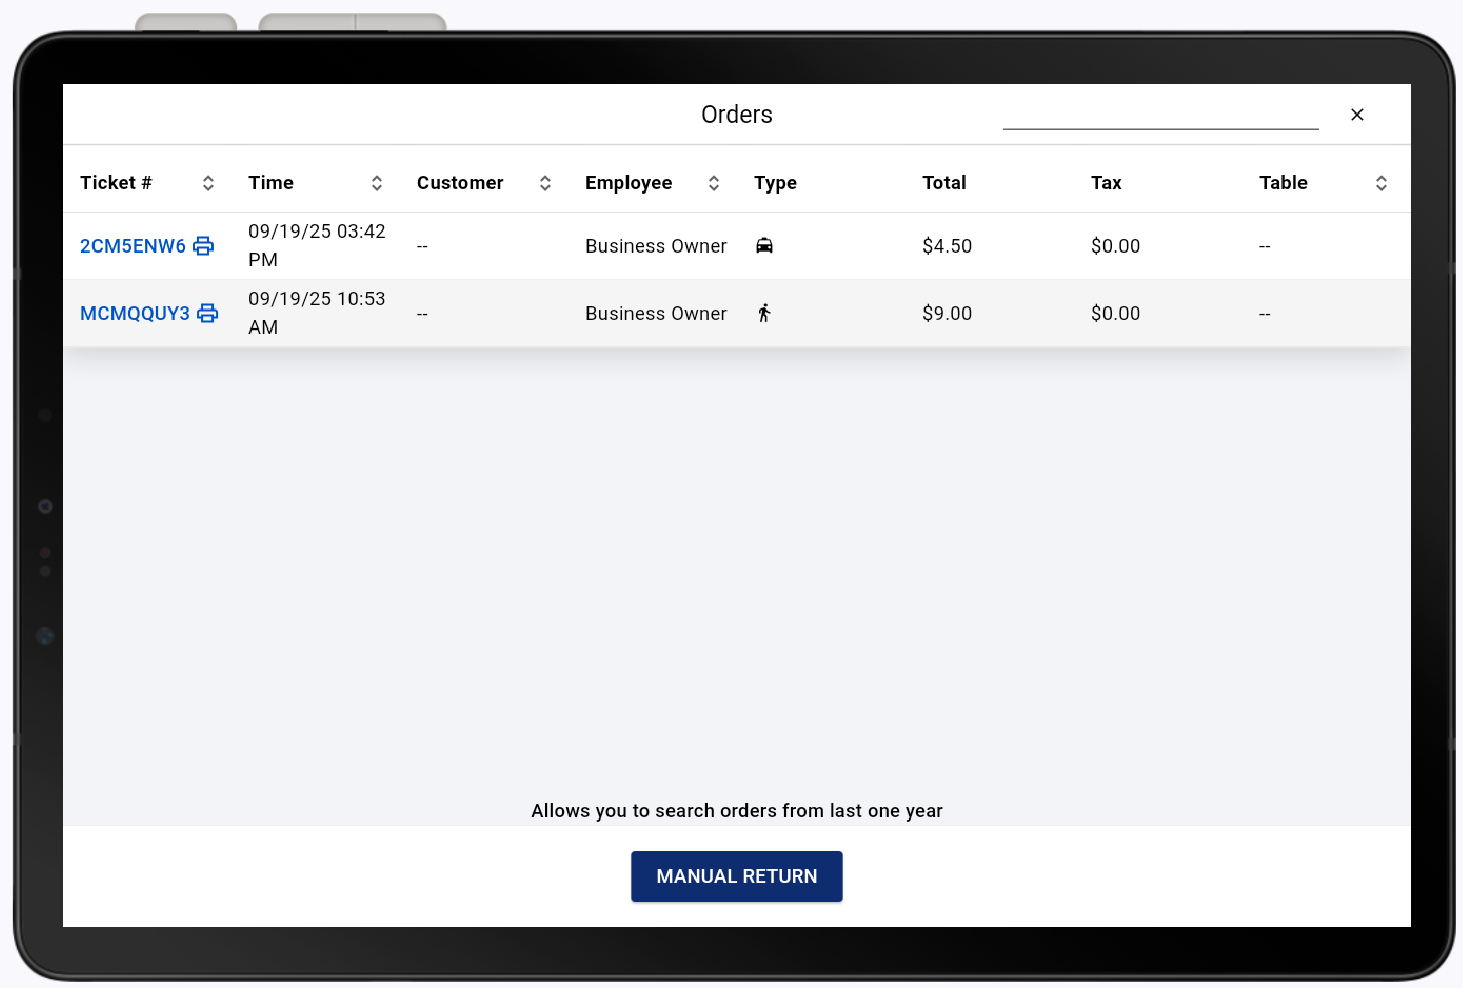
- From the Orders screen, tap Menu > History. Your recent orders will list.
- Tap on the order that you would like to repeat. A new order is created with the same items selected as the original order.
NOTE: If the order you would like to repeat is not a recent one, you can search for the order by entering an order number from the receipt, the customer phone number or email in the top right corner search field.
 Tap Repeat Order.
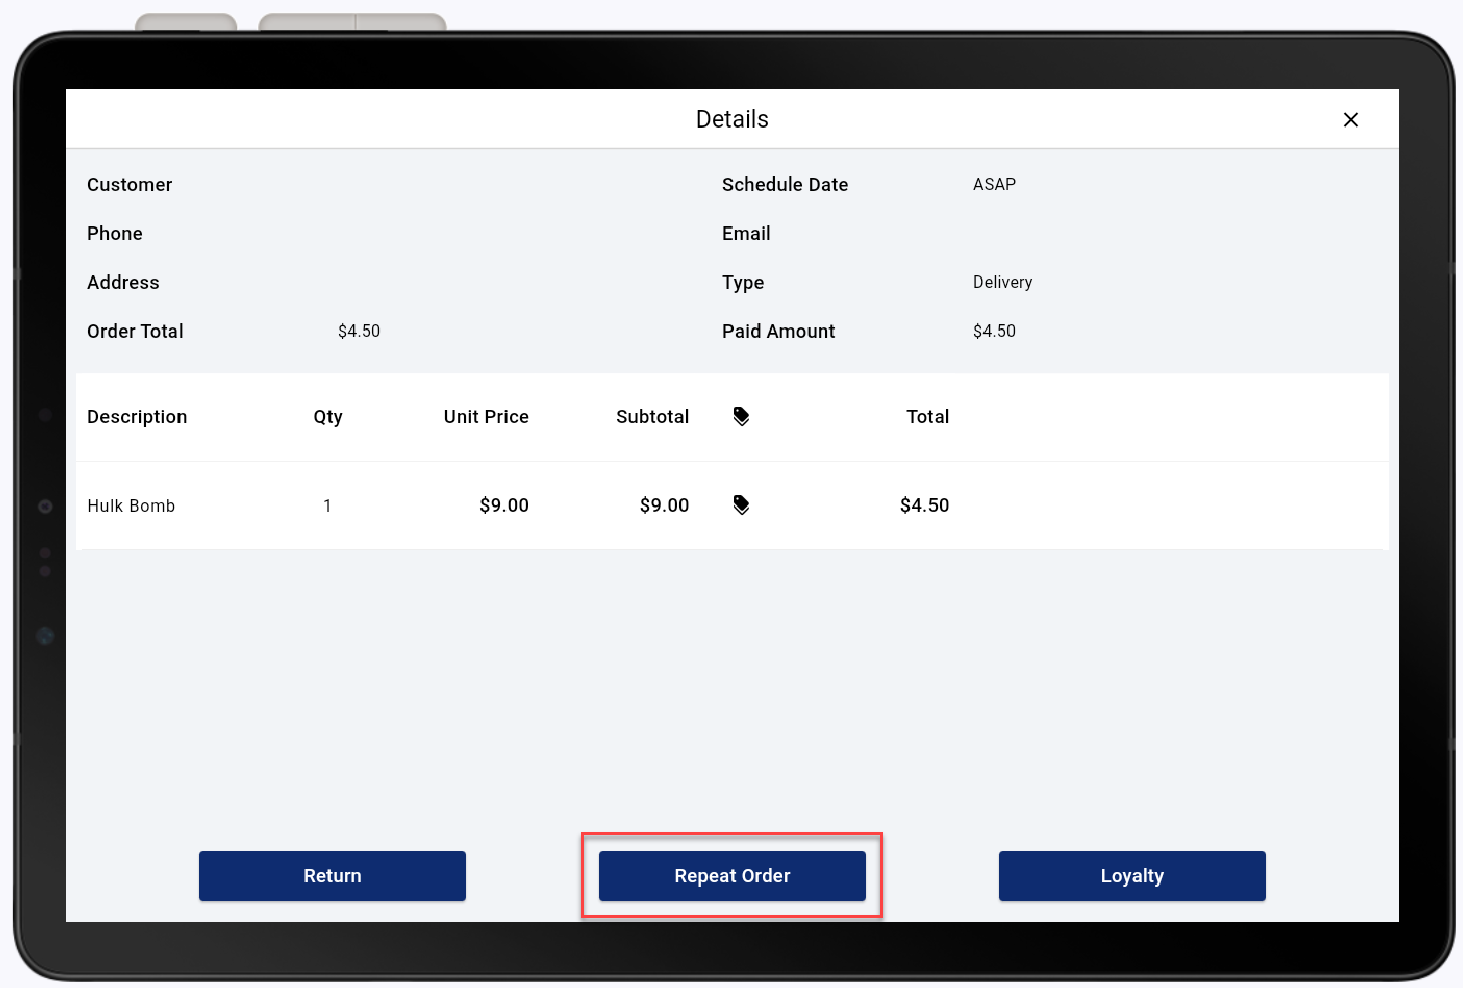
- Continue with the order to add additional items if desired and then take payment.
Take a payment
When you tap Payment, the payment process starts. Payment steps can vary depending on the type of payment tender such as a cash payment or credit card payment and the type of register device. Some steps of the payment process may be on the customer-facing screens for your device.
- *music*
- This video covers how to take a payment on an order in the Point of Sale Solution application.
- After you've created an order, tap Payment to start the payment process.
- Select a payment type from the tab options. Additional payment types can be added in the Back Office.
- Confirm the Amount Due. If the amount is incorrect, return to the Orders screen to correct the order.
- Depending on the payment type, enter or confirm the amount being paid in the Tender field. Then tap Continue.
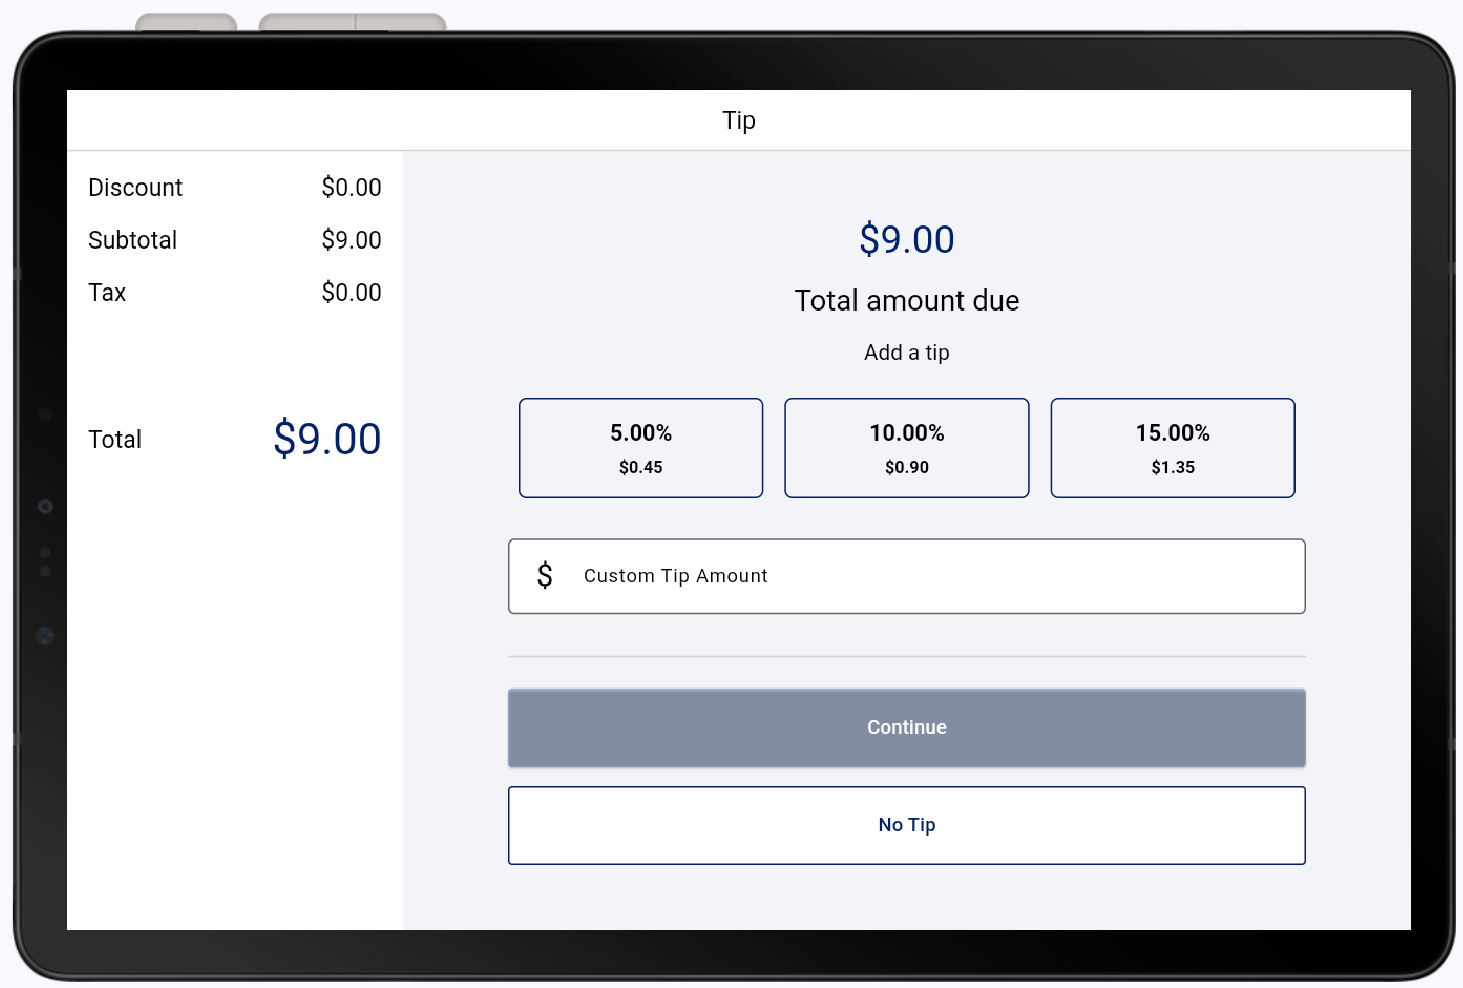
- If tipping is enabled in the Back Office, a tip option can be selected.
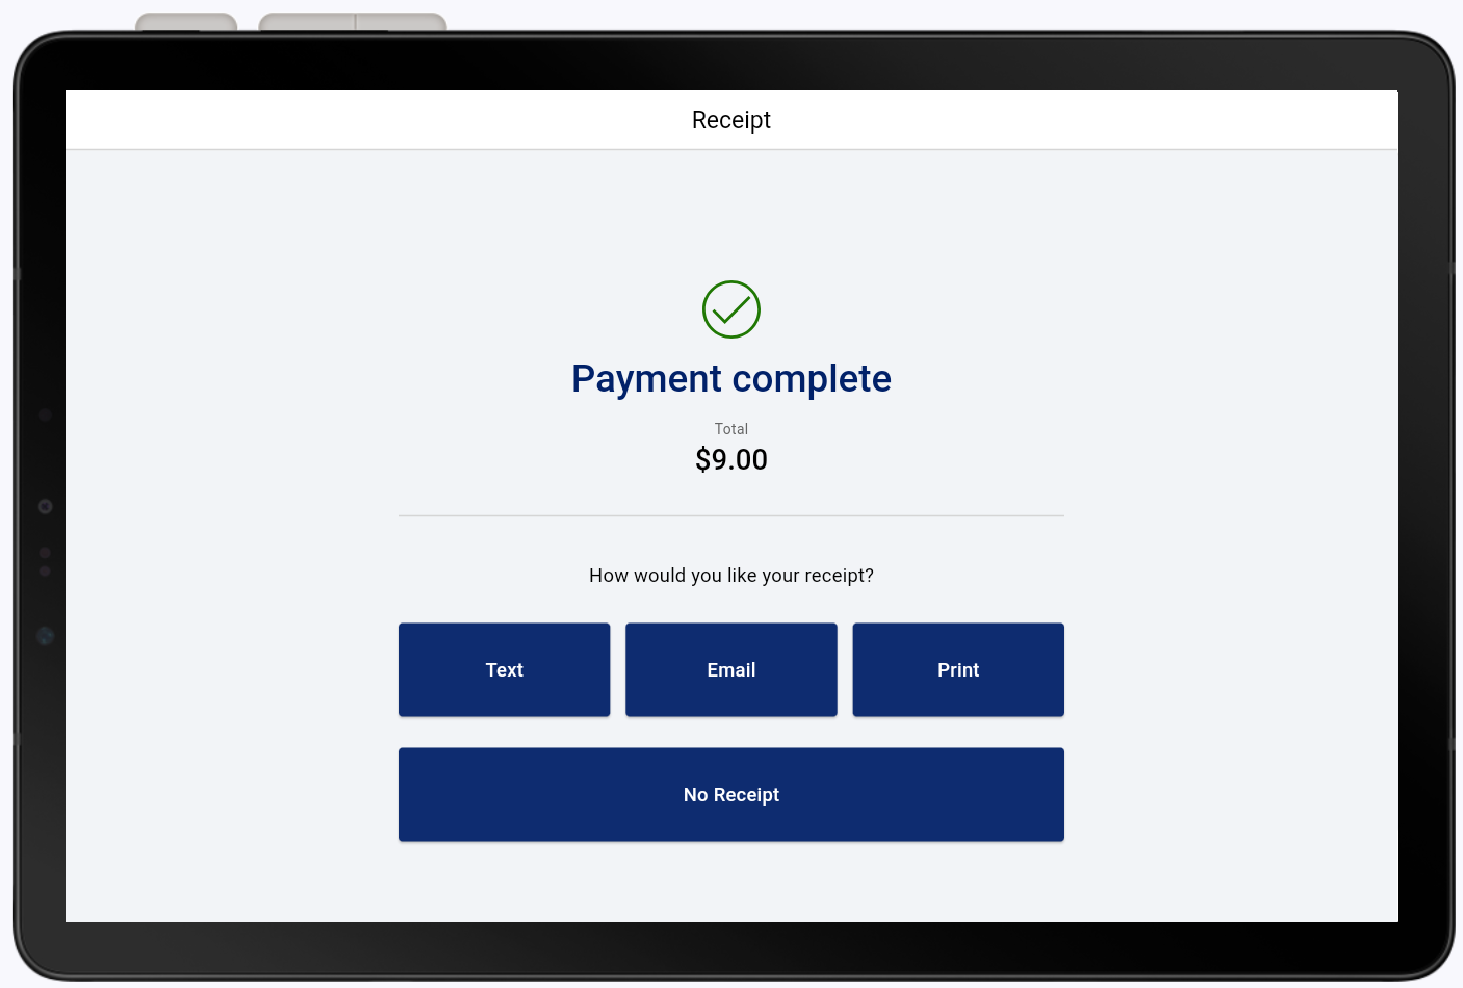
- Tap Continue and collect payment. Select a receipt option.
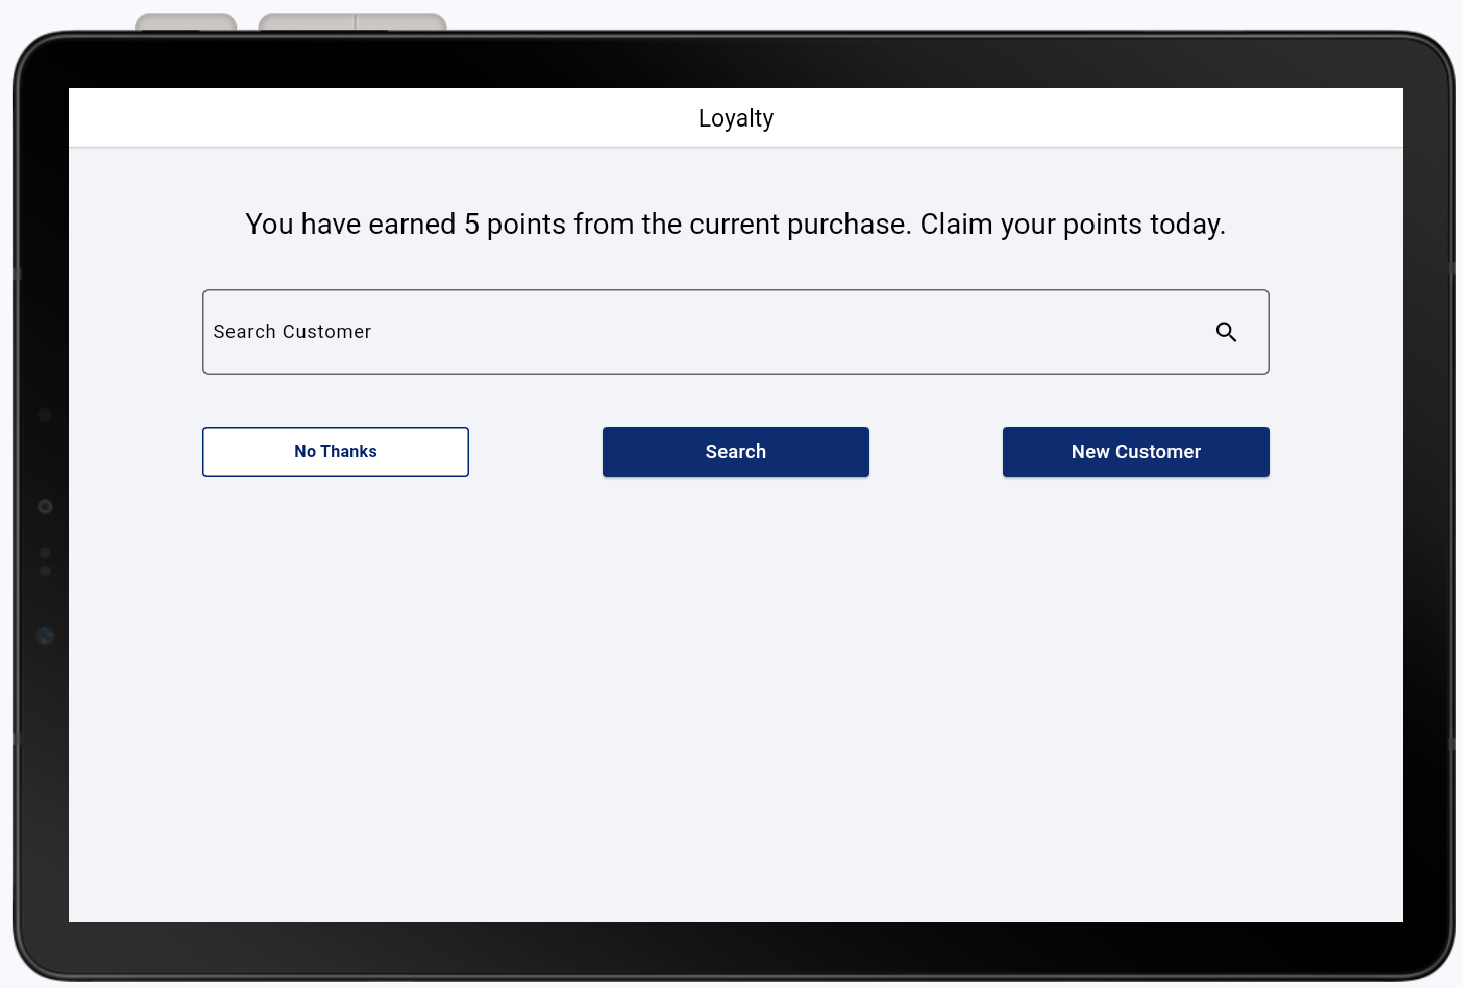
- If enabled in the Back Office, the customer can claim the loyalty points for their purchase after completing the order.
- *music*
To take a payment
- Select a payment tender from the available tabs. The accepted payment types for your business are configured in Back Office.
- Confirm the Amount Due. This field cannot be edited. If the amount is incorrect, use the back arrow button at the top left of the screen to return to the order to correct.
- Confirm the tendered amount or change it if taking a partial payment. Follow the prompts for the tender type, then tap Continue.
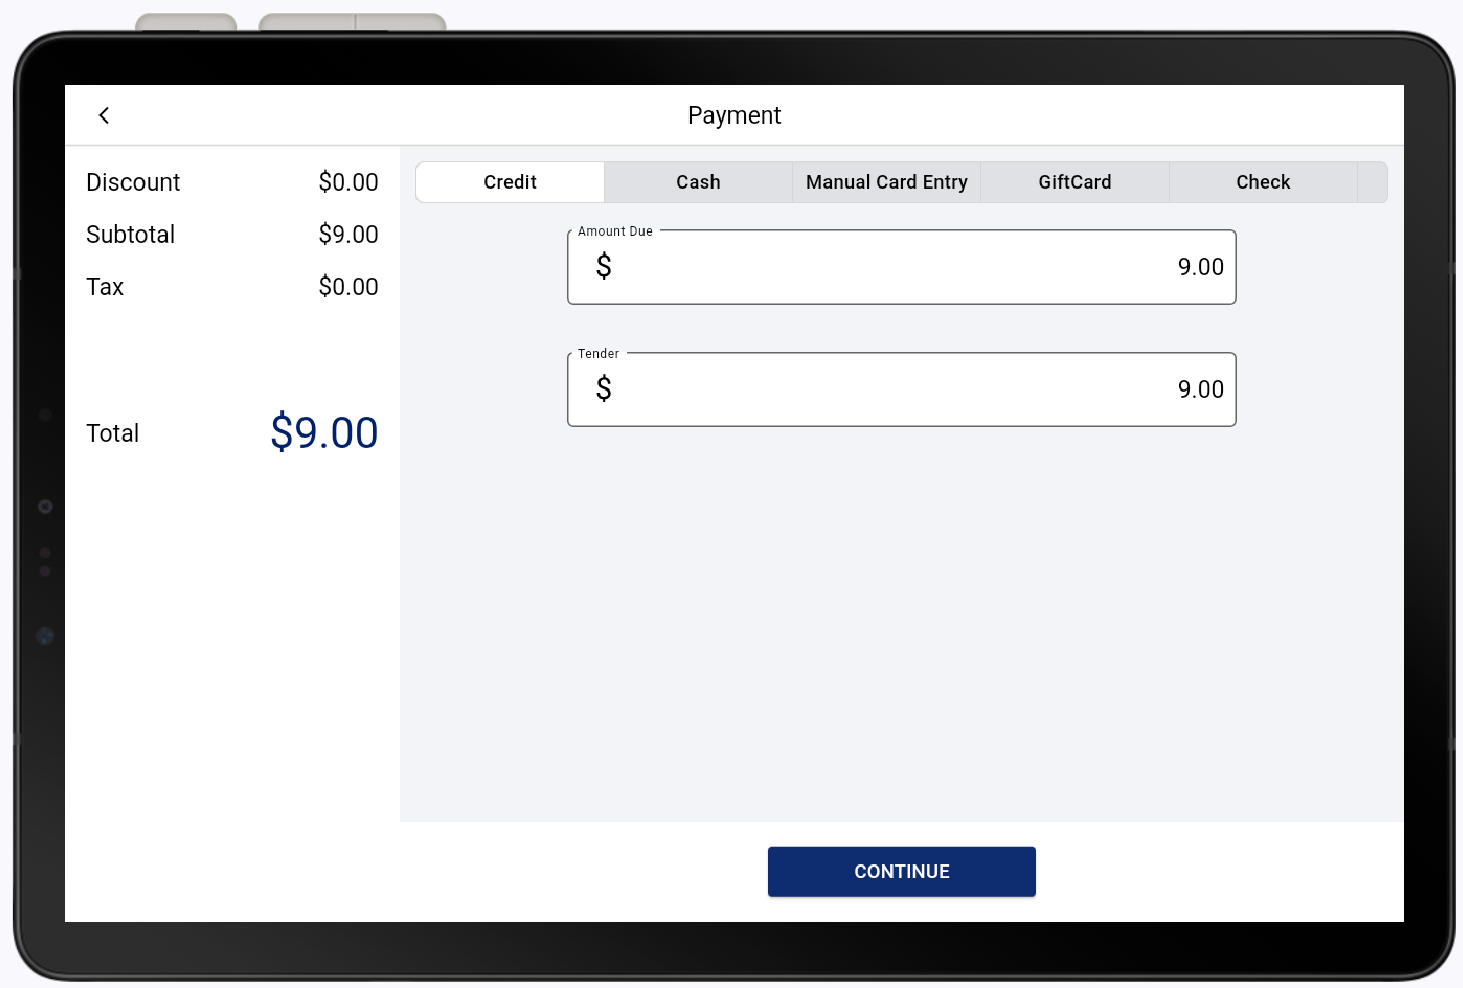
payment tenders table Payment Tender Prompts Credit Confirm tender amount. Cash Tender amount. You can use the quick buttons below to select a common cash amount. If change is required, the change due will display. Manual Card Entry Confirm tender amount and add notes if desired. Gift Card Confirm tender amount, enter the gift card number and CVV, and any additional notes. See Gift Cards for additional information. Check Confirm tender amount and add notes if desired. EBT Confirm tender amount and add notes if desired. EBT must be available for the items ordered, otherwise amount due will be 0. Other Confirm tender amount and add notes if desired. NOTE: If taking a partial payment, tap on the Tender field to change the amount, then tap Done. For example, your customer might pay for the first $10 of an order with cash and then will pay for the rest with a credit card.
- If inline tipping is enabled, the customer selects a tip option. Learn more about tipping settings in Back Office.
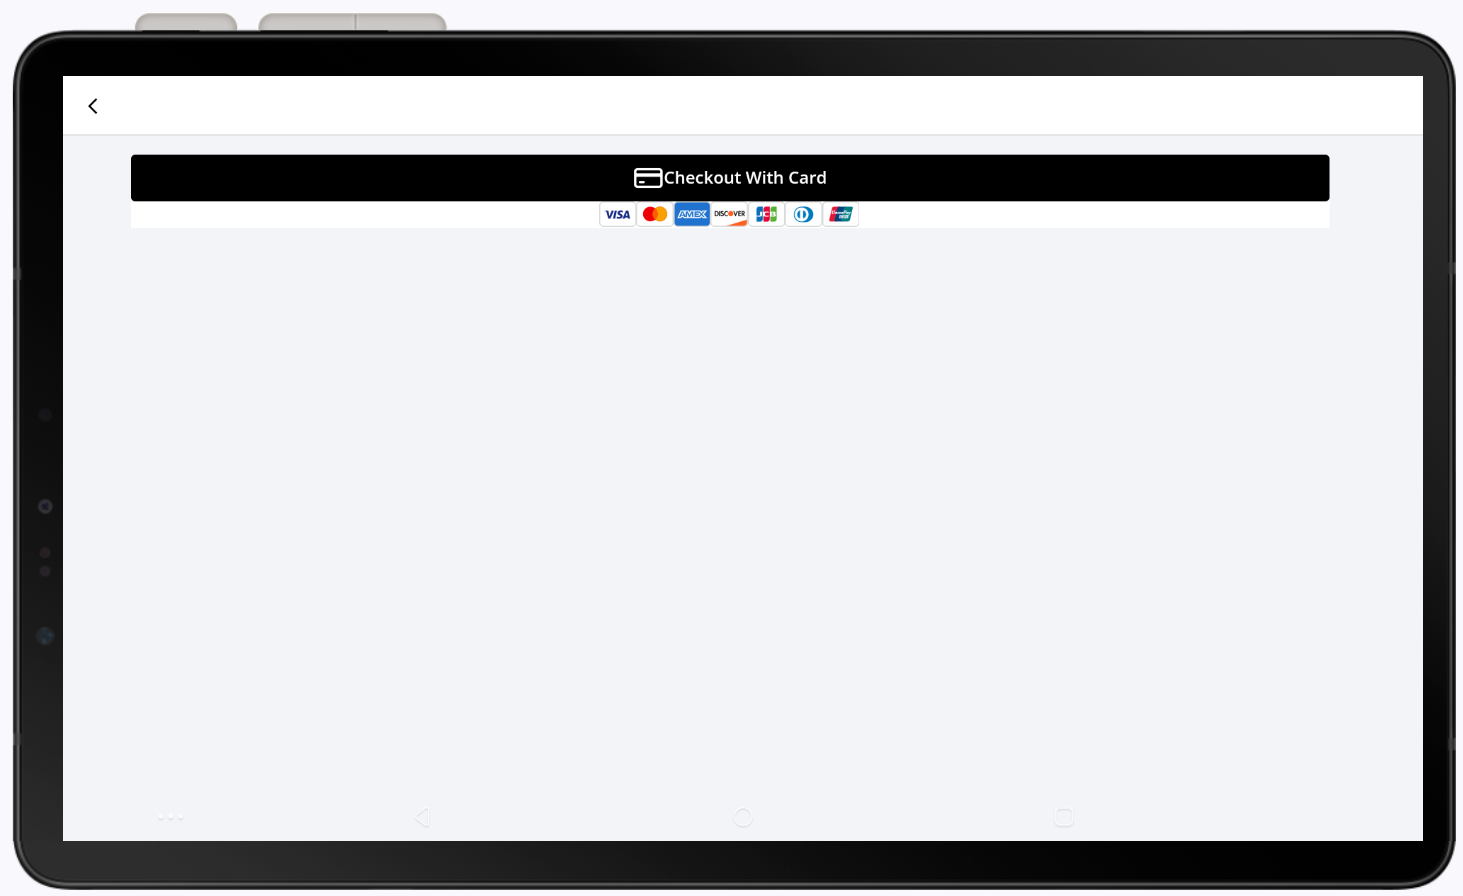
- (Manual Card Entry only) Enter the customer contact and card information.
To manually enter credit card contact and card information
- Tap Checkout with Card.
- Enter the customer contact email and/or phone number, then tap Continue.
- Enter the card information, including the card number, expiration date, security code and the billing address for the card. Tap Continue.
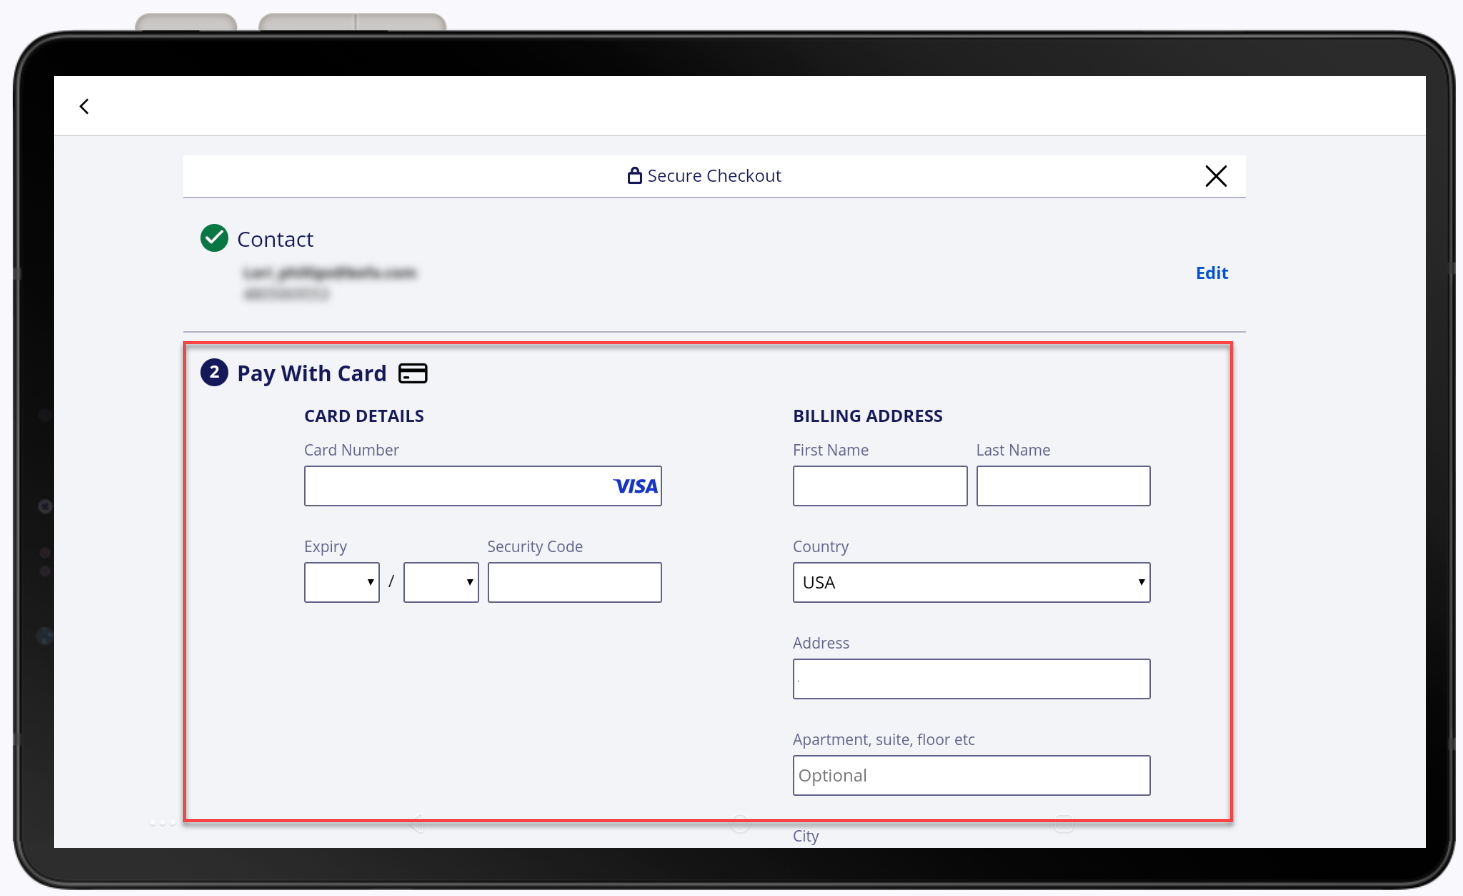
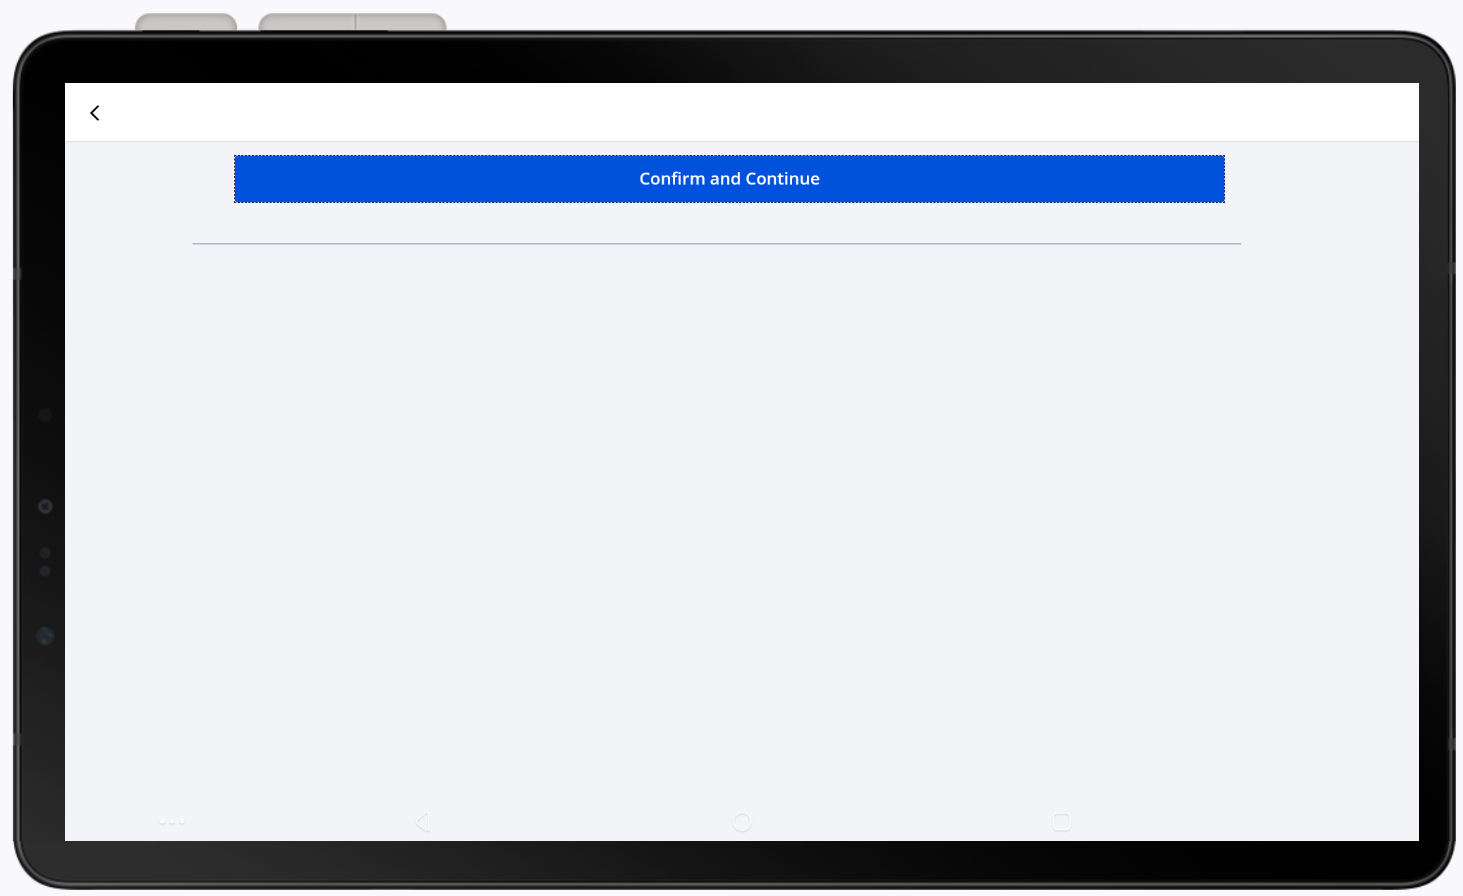
- Confirm all of the card details are correct, then tap Confirm and continue.
- Tap Checkout with Card.
- Select a receipt option. Enter a phone number for text delivery or email address for emailed receipt.
- If loyalty is enabled, assign the points to an existing customer by entering the customer name and tapping Search or tap New Customer to add a customer. Tap No Thanks to skip.
- When complete, the order screen reappears and a new order may start.
Return or void a paid order
You can void, or reverse, an order payment if the transaction has not settled yet. If the transaction has settled, you will need to do a return.
- *music*
- This video covers how to void or return an order in the Point of Sale Solution application.
- If the order payment from a transaction has not been settled, it can be voided or reversed. If the transaction has settled, you will need to do a return.
- Tap the Menu icon from the Orders screen and tap History to view a list of recent orders.
- If the order is not recent, use the search field to look up the order details, like the customer phone number, email, or order number.
- Tap the ticket number of the desired order. In the Order Details, tap Return.
- If orders have not been settled for the day, tap Void to void the sale. If the order has been settled, tap Return.
- In the Payment screen, select the desired payment method for the refund and follow the prompts to refund the payment.
- To make a manual return for a refund with no ticket, tap the Menu icon, then tap History.
- Tap Manual Return located on the bottom of the screen. Enter notes for the return reason and tap Done.
- Select the items to return, then tap Return. In the Payment screen, select the desired payment method for the refund and follow the prompts to refund the payment.
- *music*
To void or refund a ticket
- From the Orders screen, select Menu > History.
- Tap the Ticket # to select the order from the list of recent orders.
NOTE: If the order is not a recent one, search for the order by entering an order number from the receipt, the customer phone number or email in the top right corner search field.
- In the Details view, tap Return.
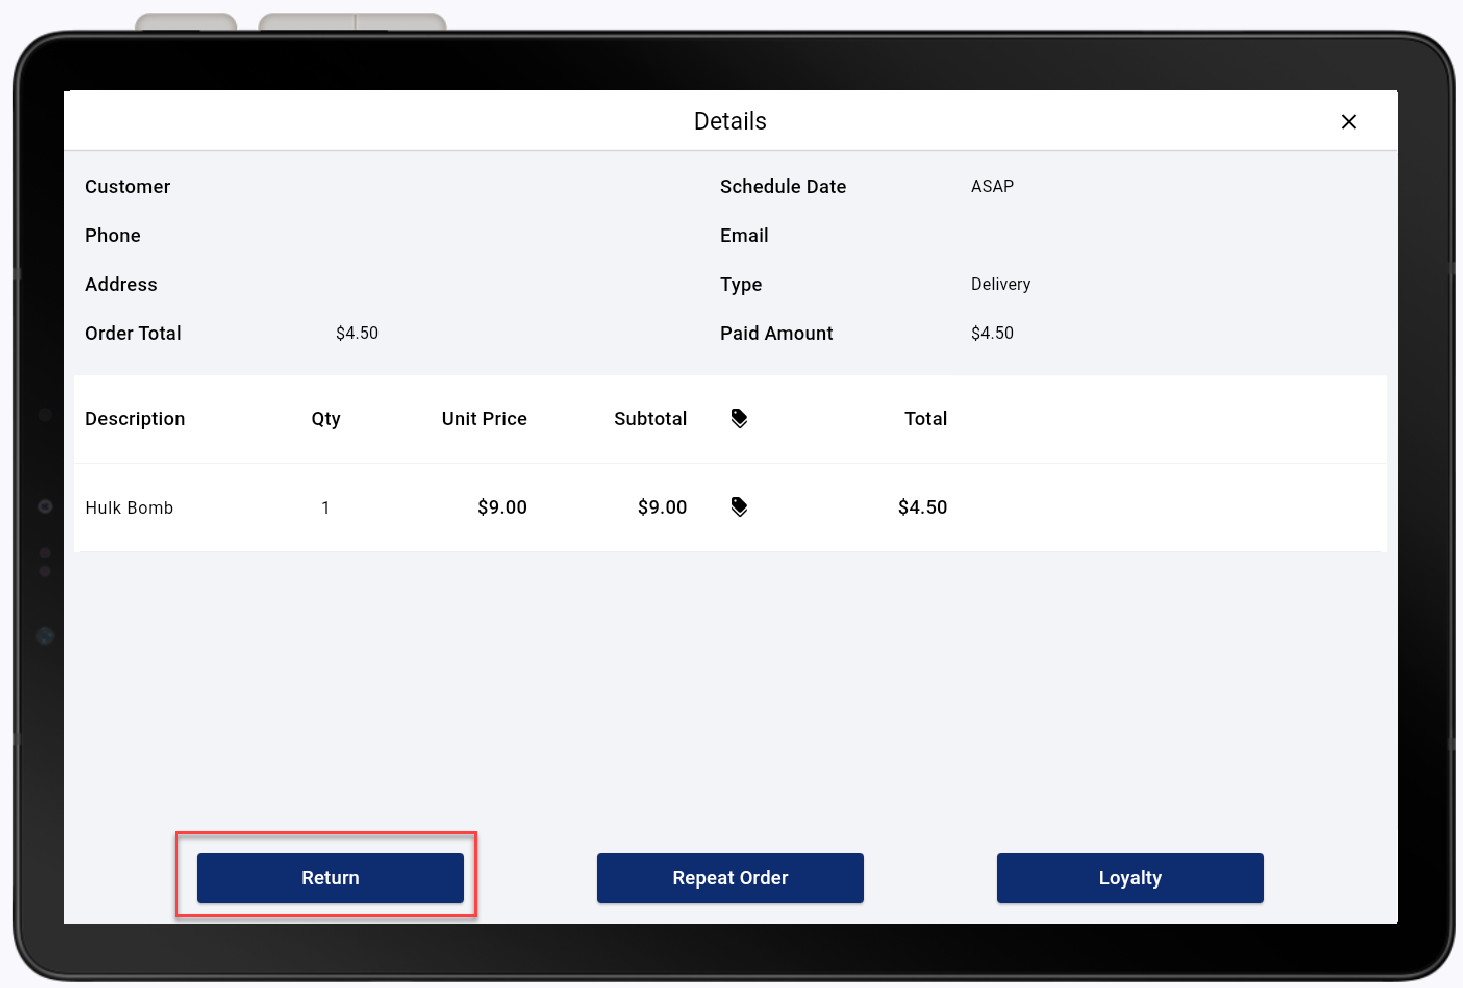
- If the order has not settled for the day, tap Void to void the sale and then tap Yes to confirm. Otherwise, tap Return.
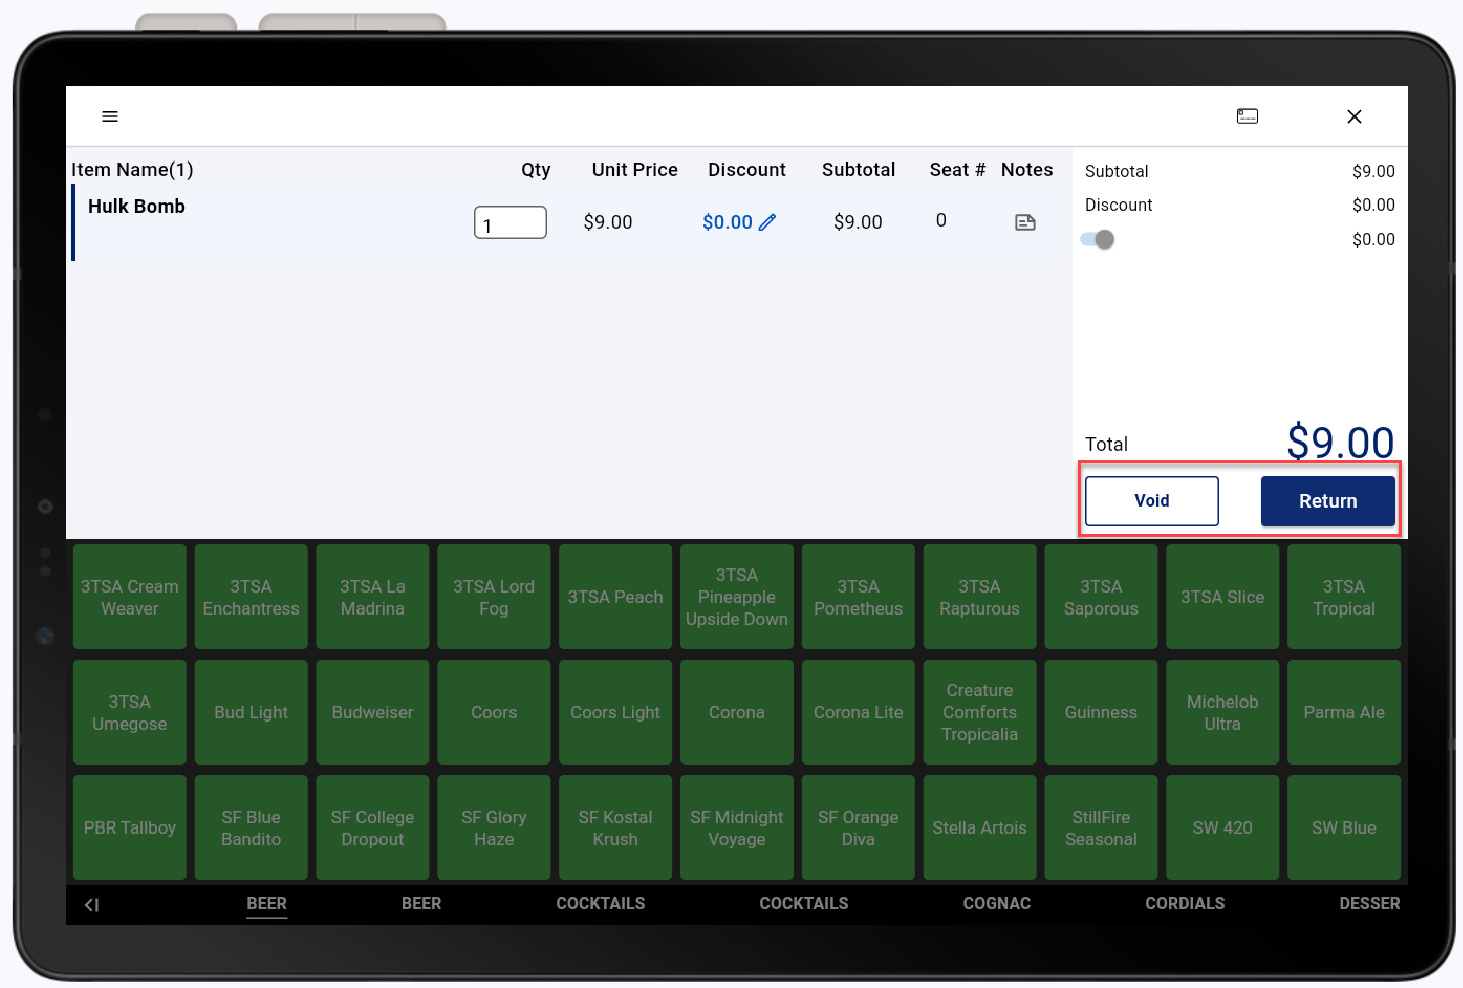
- Tap Continue.

- Follow prompts to refund the payment.
To manually return
To provide a refund without a ticket, use the manual return option.
- Tap History from the Orders menu.
- Tap Manual Return.
- Enter notes about the reason for the return, then tap Done.
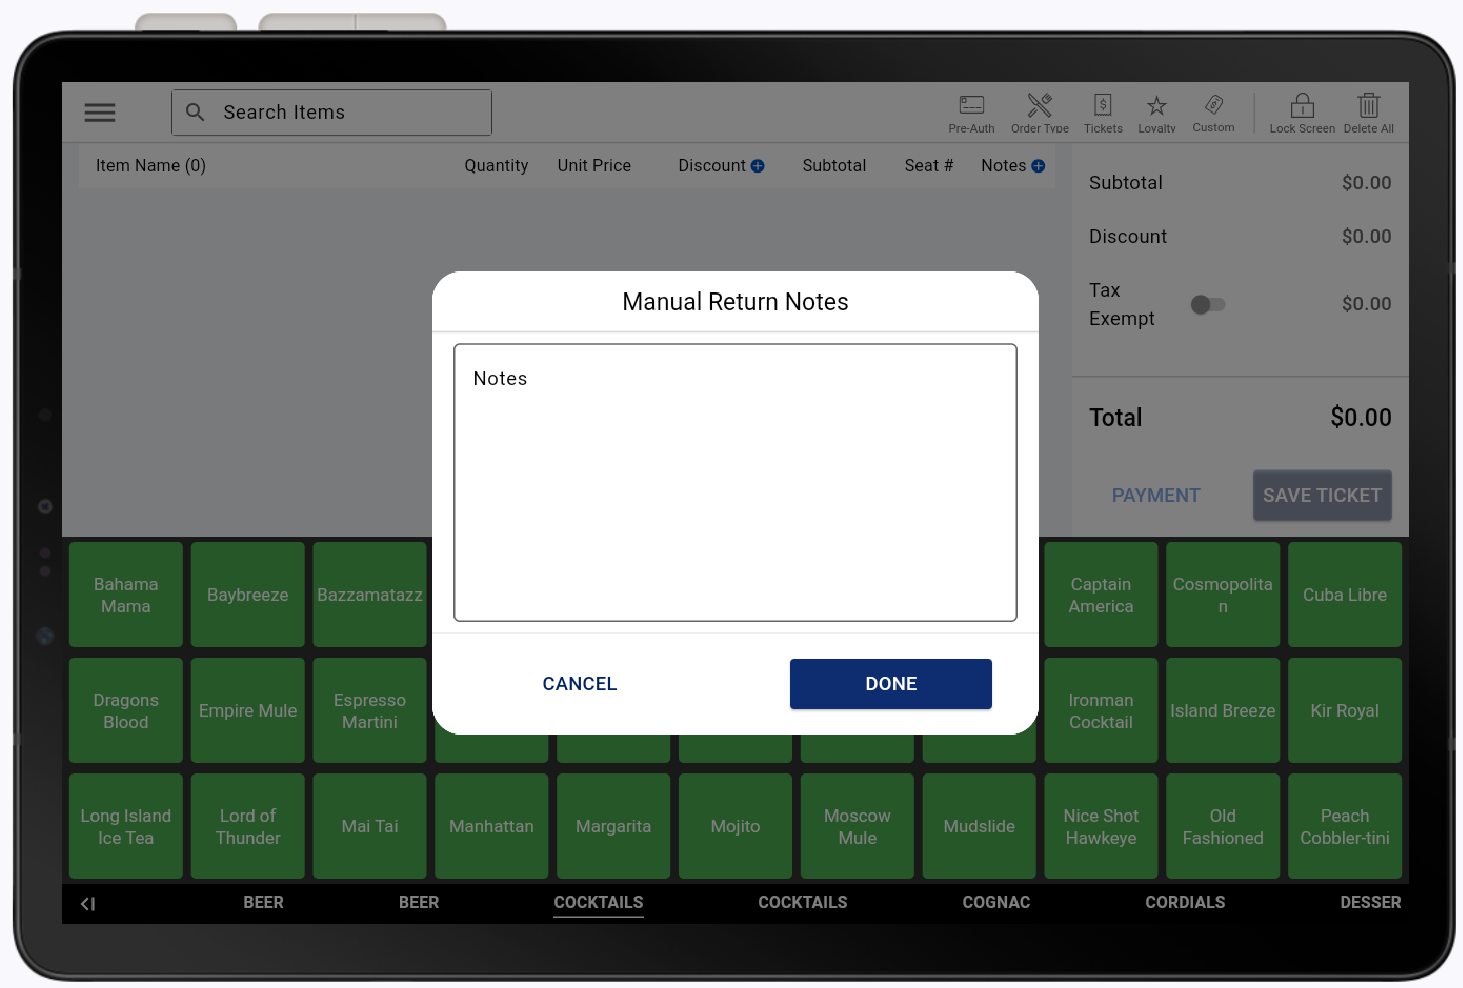
- Select the items to return, then tap Return.
- Select a payment option for the refund and enter prompted information if required.
- Tap Continue if you are refunding to credit card or Done if refunding to another payment type.
Order options
Access order options such as assigning an order type, saving a ticket to recall later, assigning and redeeming loyalty points and adding a product from the Point of Sale Solution app to your product list. Order tab options appear on the top bar of the Orders screen.
| Option | Description |
|---|---|
 | Pre-Auth Pre-authorize a sale amount on a credit card. This is also known as opening a tab. See Point of Sale Solution App Pre-Authorized Orders for more information. |
 | Order Type Choose an order type for the order and fill in the required information for that order type. The order types available to you will depend on the Global Settings options configured in Point of Sale Back Office. If you would prefer to prompt for an order type for each order, you can select that option in the Point of Sale Solution App Hardware settings. |
 | Tickets (Tables) Manage saved orders, including refreshing the saved ticket view, merging tickets, and viewing saved tickets by employee. See Point of Sale Solution App Order Management for more information. If you are using Table Layout, this button will be Tables. |
 | Loyalty Assign a sale to a customer's loyalty program and redeem rewards. See Point of Sale Solution App Loyalty for more information. |
 | Custom Create a custom product at the register. See Point of Sale Solution App Custom Products for more information. |
 | Lock Screen Lock the screen for security. To reopen the screen, enter your PIN. |
 | Delete All Delete the order information entered to start the order again. |