Smart Terminal E700 Setup
Description
What's in this article?
The Smart Terminal E700 is a fully featured point of sale device with a built-in screen and printer, and a smaller footprint to easily fit smaller retail countertops. The customer-facing terminal payment screen (Q20) includes a reader that can be used as a magnetic stripe, EMV, and NFC/contactless card reader. It can also be used used for manual card entry.

What's in the box
Your Smart Terminal E700 arrives with an AC power cable and adapter, an Ethernet cable, extra thermal paper rolls, and a screen cleaning cloth.
A Merchant Information sticker, featuring your unique merchant identification number (MID#) and the Technical Support phone number, has been affixed to your Welcome Letter. Your MID will be needed to identify your account any time you contact Customer Service or Technical Support.
1 Connect peripherals
Before connecting to power, you must first connect your Smart Register E700 to any peripherals you will be using. Plugging in additional devices while connected to power could result in damage to the peripherals or terminal.
To connect peripherals
- Connect your peripherals using the ports on the underside of the terminal:
- Connect the power adapter and power cord, then plug in the cord into the Power port on the back of the terminal.
WARNING! Do NOT plug the E700 into a power outlet until all of the peripherals are connected.
- Confirm that all cabling for your peripherals is complete, then plug the power cable into a power outlet.
E700 ports
Ports for the E700 are located on the back of the terminal and are described below:
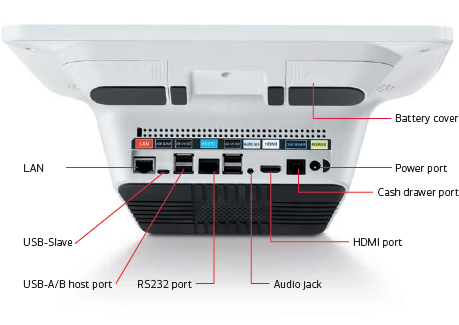
| Port | Connects to |
|---|---|
| Power | AC power supply |
| Cash drawer | A cash drawer cable |
| HDMI | An HDMI device |
| Audio jack | An assistive listening device for the hearing impaired |
| USB host | A USB device |
| RS232 | A serial device, such as an external POS device |
| USB-Slave | A PC for a local terminal download |
| LAN | Bi-directional ethernet connections |
2 Power up
After you confirmed that all cabling is complete, and you have connected to a power outlet, you can power up your terminal.
WARNING!
Do not disconnect power while applications are being downloaded to the terminal. Loss of power could cause the applications to download improperly or cause damage to the Flash memory.
The power button for E700 is located in the upper right side of the terminal.
- To power up the terminal, press and hold the Power button for three seconds until the main screen wakes.
- To power off, press and hold the Power button for three seconds until the Shutdown menu appears. Follow steps displayed.
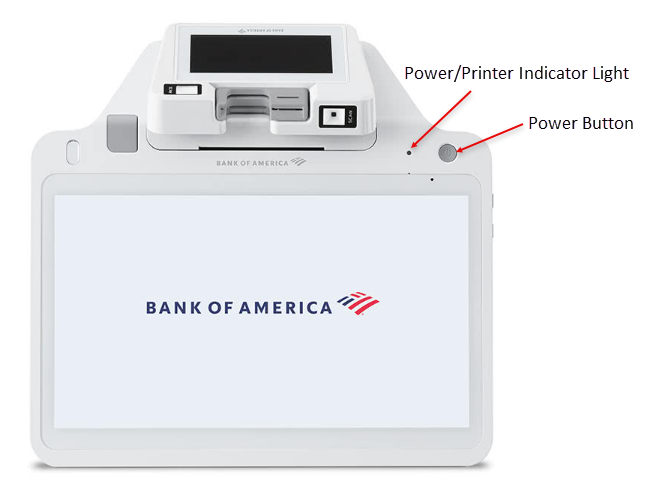
The E700 power indicator light is in the upper right corner of the large screen to the left of the Power button. The power indicator light turns green when the terminal is on and the battery is charged. When the terminal is connected to power, the power indicator light will remain on.
| Light Color | Indicates |
|---|---|
| Red | Device is charging |
| Green | Charging is complete |
| Red/Green flashing alternately | Charging problem |
| Yellow flashing | Check printer paper |
3 Connect to the internet
You can use a Wi-Fi network and/or Ethernet cable connection to your router with your Smart Terminal E700. You will need to know the name of your network and the password. Learn more about connecting to your network.
4 Load printer paper
The Smart Terminal E700 comes pre-loaded with a roll of printer paper, along with an additional three rolls in the box. Additional printer paper may be purchased from any office supply store. When the printer is out of paper, the yellow Paper Out indicator lights up.
- When the printer is out of paper, the yellow Paper Out indicator will light.

- Press the button on the left of the printer to open the cover.
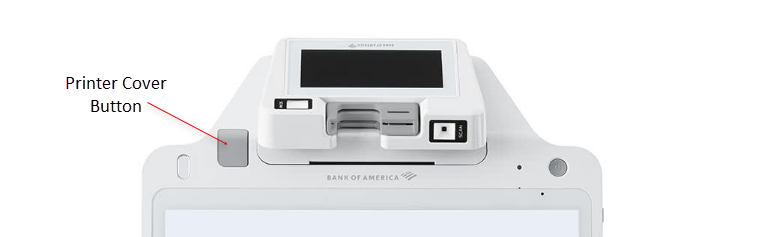
- Load the paper roll into the compartment and extend the paper out of the printer.
- Close the printer cover.
Tear printer paper
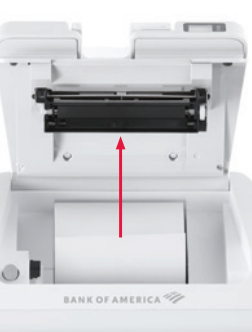
When connected to power, the E700 automatically cuts excess paper when the paper holder is closed. If the E700 is running on battery power, you can tear the paper by hand.
- Tilt the paper toward the bottom of the terminal at a 45-degree angle.
- Pull the paper from the left or right across the tear off bar inside the terminal.
Take a payment
The Smart Register E700 supports contactless card and mobile device "tap to pay" payments. Chip card insertion, and magnetic stripe swipe payments are also supported. If necessary, you can troubleshoot card swipe or insertion errors.
Insert the card into the chip card reader at the top of the display, chip end first, with the chip facing the customer. When prompted, remove the card.

Swipe the the card through the magnetic stripe reader at the top of the display with the stripe face down, keeping the card perpendicular to the main display.
Hold the card 1-2 inches away from the center of the customer-facing display until the customer-facing display puts out a beep sound. There will be no visual indication that the tap was successful. 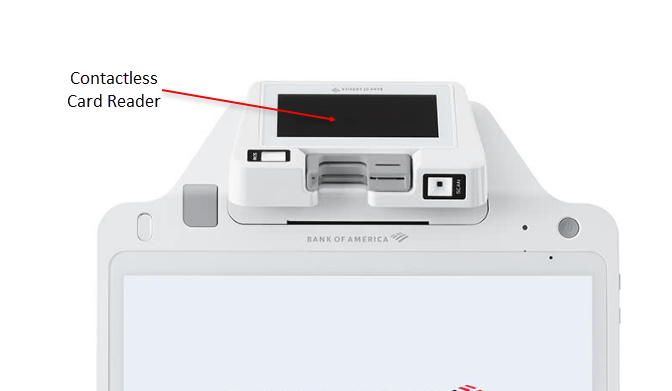
Hold the mobile device 1-2 inches away from the center of the customer-facing display until the customer-facing display puts out a beep sound. There will be no visual indication that the tap was successful.
Terminal settings
You can adjust your terminal settings to your preference, including; terminal volume and key sound, brightness and timeout (sleep).
Terminal care
For care guidelines, cleaning recommendations and other best practices, see Terminal Care.